 Kawasaki Z400 - Service manual > Engine Top End
Valve Clearance Inspection

NOTE
Valve clearance must be checked and adjusted when the engine is cold (at room temperature).
Remove:
Cylinder Head Cover (see Cylinder Head Cover Removal in the Engine Top End chapter) Plugs [A] [B]
Special Tool - Filler Cap Driver: 570011454
Check the valve clearance when the pistons are at TDC.
- The pistons are numbered beginning with the engine left side.
Using a wrench on the alternator rotor bolt, turn the crankshaft counterclockwise until the "1 T" mark [A] on the alternator rotor is aligned with the groove [B] in the inspection window on the alternator cover.
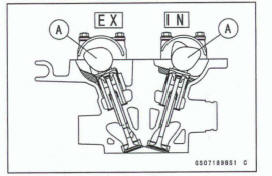
- Measure the valve clearance of the valves for which the cam [A] are turned away from each other.
Using the thickness gauge [A], measure the valve clearance between the cam and the valve lifter.
Valve Clearance
Standard:
Exhaust 0.25 - 0.31 mm (0.0098 - 0.0122 in.)
Intake 0.13 - 0.19 mm (0.0051 - 0.0075 in.)
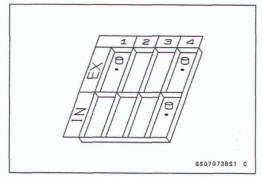
Each piston has two intake and two exhaust valves.
Measure these two intake or exhaust valves at the same crankshaft position.
Valve Clearance Measuring Position
#1 Piston TDC at End of Compression Stroke:
Intake Valve Clearances of W Piston
Exhaust Valve Clearances of #I Piston
NOTE
Check the valve clearance using method only.
Checking the clearance at any other cam position may result in improper valve clearance.
Valve Clearance Measuring Position
#2 Position TDC at End of Compression Stroke: Intake Valve Clearances of #2 Piston Exhaust Valve Clearances of #2 Piston
If the valve clearance is not within the specified range, first record the clearance, and then adjust it.
Valve Clearance Adjustment
To change the valve clearance, remove the camshaft chain tensioner, camshafts and valve lifters. Replace the shim with one of a different thickness.
NOTE
Mark and record the locations of the valve lifters and shims so that they can be reinstalled in their original positions.
- Clean the shim to remove any dust or oil.
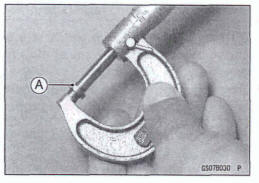
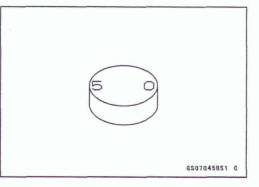
- Measure the thickness of the removed shim [A].
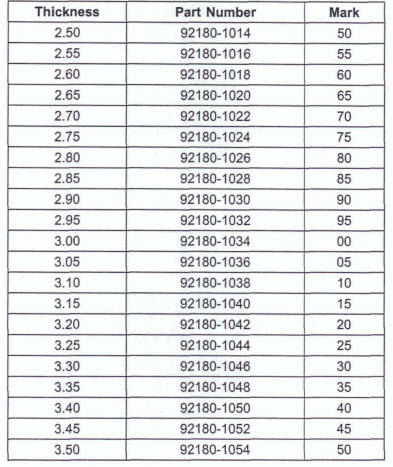
- Select a new shim thickness calculation as follows.
a+ b-c=d
[a] Pmt Shim Thickness
[b] Measured Valve Clearance
[c] Specified Valve Clearance (Mean Value = 0.28 mm
(Exhaust), 0.16 mm (Intake))
[d] Replace Shim Thickness
Adjustment Shims
NOTICE
Be sure to remeasure the clearance after selecting a shim. If the clearance is out of the specified range, use the additional shim.
If there is no valve clearance, use a shim that is a few sizes smaller, and remeasure the valve clearance.
- When installing the shim, face the marked side toward the valve lifter. At this time, apply engine oil to the shim to keep the shim in place during camshaft installation
NOTICE
Do not put shim stock under the shim. This may cause the shim to pop out at high rpm, causing extensive engine damage.
Do not grind the shim. This may cause it to fracture, causing extensive engine damage.
- Apply molybdenum disulfide oil solution to the valve lifter surface and install the lifter.
- Install the camshaft (see Camshaft Installation in the Engine Top End chapter).
- Recheck the valve clearance and readjust if necessary.
- Install the removed parts (see appropriate chapters)
Air Suction System Damage Inspection
Remove: Right Middle Fairing (see Middle Fairing Removal in the Frame chapter)
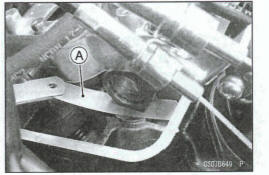
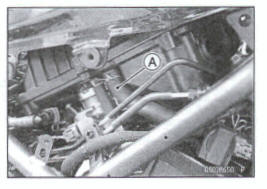
Disconnect the air switching valve hose [A] from the air cleaner housing.
Start the engine and run it at idle speed.
Plug the air switching valve hose end with your finger and feel vacuum pulsing in the hose.
*If there is no vacuum pulsation, check the hose line for leak. If there is no leak, check the air switching valve (see Air Switching Valve Unit Test in the Electrical System chapter) or air suction valve (see Air Suction Valve Inspection in the Engine Top End chapter).
Clutch
Clutch Operation Inspection
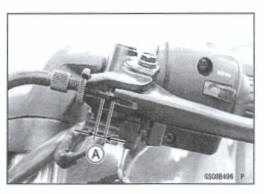
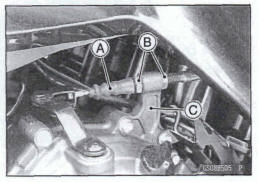
- Pull the clutch lever just enough to take up the free play [A].
- Measure the gap between the lever and the lever holder.
If the gap is too wide, the clutch may not release fully. If the gap is too narrow, the clutch may not engage fully. In either case, adjust it.
Clutch Lever Free Play
Standard: 2 - 3 mm (0.08 - 0.12 In.)
WARNING
The engine and exhaust system get extremely hot during normal operation and can cause serious bums. Never touch the engine or exhaust pipe during clutch adjustment.
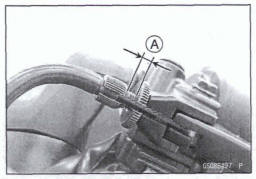
Turn the adjuster so that 5 - 6 rnrn (0.20 - 0.24 in.) [A] of threads are visible.
- Slide the dust cover [A] at the clutch cable lower end out of place.
- Loosen both adjusting nuts [B] at the clutch cover as far as they will go.
- Pull the clutch outer cable tight and tighten the adjusting nuts against the clutch cover [C].
- Slip the dust cover back onto place.
- Turn the adjuster at the clutch lever until the free play is correct.
WARNING
Too much cable play can prevent clutch disengagement and cause an accident resulting In serious Injury or &ah. When adjusting the clutch or replacing the cable, be sure the upper end of the clutch outer cable is fully 8oaM in its fitting, or it could slip into place later, creating enough cable play to re vent clutch disengagement.
- After the adjustment, start the engine and check that the clutch does not slip and that it releases properly.
Engine, Lubrication system
Engine Oil Change
- Situate the motorcycle so that it is vertical after warming up the engine.
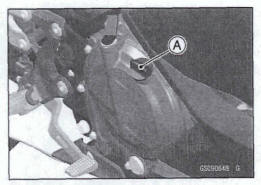
- Unscrew the oil filler plug [A].
- Place the oil pan beneath the engine.
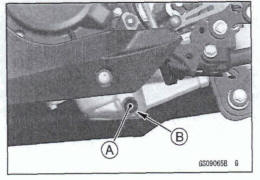
- Remove, the engine oil drain bolt [A] to drain the oil.
- The oil in the oil filter can be drained by removing the filter (see Oil Filter Replacement).
- Replace the drain bolt gasket [B] with a new one.
- Tighten:
Torque - Engine Oil Drain Bolt 30 N-m (3.1 kgf*m, 22 ft-lb)
- Pour in the specified type and amount of oil.
Recommended Engine Oil
Type: API SG, SH, SJ, SL or SM with JASO MA, MA1 or MA2 .
Viscosity: SAE 10W-40
Capacity: 1.6 L (1.7 US qt) (When filter is not removed.) 2.0 L (2.1 US qt) (When filter is removed.) 2.3 L (2.4 US qt) (When engine is completely dry.)

NOTE
- Do not add any chemical additive to the oil. Oils fulfilling the above requirements are fully formulated and provide adequate lubrication for both the engine and the clutch.
- Although IOW-40 engine oil is the recommended oil for most conditions, the oil viscosity may need to be changed to accommodate atmospheric conditions in your riding area.
Check the oil level (see Oil Level Inspection in the Engine Lubrication System chapter).
Install the removed parts (see appropriate chapters).
Oil Filter Replacement
- Drain the engine oil (see Engine Oil Change).
- Remove:
Left Lower Fairing (see Lower Fairing Removal in the Frame chapter)
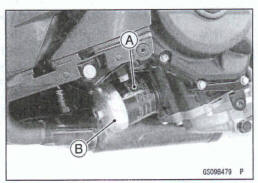
- Remove the oil filter [A] with the oil filter wrench [B].
Special Tool - Oil Filter Wrench: 57001-1249
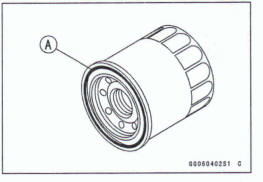
- Replace the filter with a new one.
- Apply engine oil to the Wing [A] before installation.
- Tighten the filter with the oil filter wrench.
Torque Oil Filter 17.5 N*m (1.78 kgf*m, 12.9 R4b)
NOTE
Hand tightening of the oil filter can not be allowed since it does not reach to this tightening torque.
- Pour in the specified type and amount of oil (see Engine Oil Change).
- Install the removed parts (see appropriate chapters).
See also:
 Kawasaki Z400 - Service manual > Cooling System
Coolant Level Inspection NOTE Check the level when the engine is cold (room or ambient temperature). Check the coolant level in the reserve tank with the motorcycle held perpendicular (Do not use the sidestand.).
Kawasaki Z400 - Service manual > Wheels/Tires
Air Pressure Inspection Remove the air valve cap. Measure the tire air pressure with an air pressure gauge [A] when the tires are cold (that is, when the motorcycle has not been ridden more than a mile during the past 3 hours)
 Benelli Imperiale 400
 BMW F900XR
 Honda CB500X
 KTM 390 Adventure
 Triumph Street Triple S
 Yamaha MT-03
 Kawasaki Z400
 Triumph Street Triple S
 Yamaha MT-03