 Triumph Street Triple S - Service manual > Wheels/Tyres
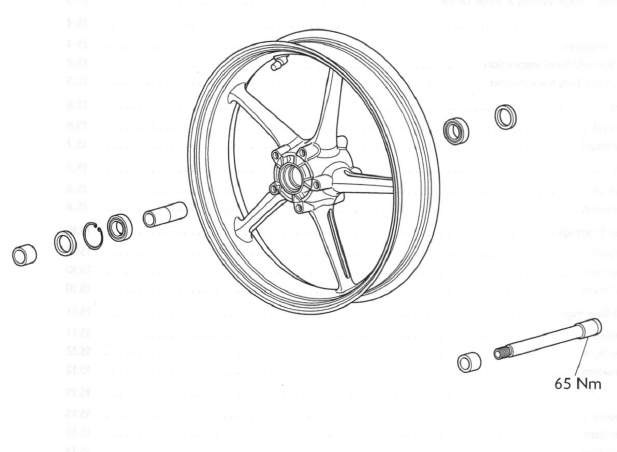
Exploded view - Front Wheel
Exploded View - Rear Wheel & Final Drive
Tyres
This model is equipped with tubeless tyres, valves, and wheel rims. Only tyres marked 'TUBELESS' and tubeless type tyre valves mounted on rims marked 'SUITABLE FOR TUBELESS TYRES' can be used.
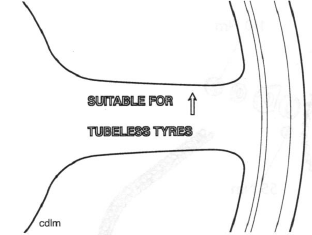
Typical Wheel Marking
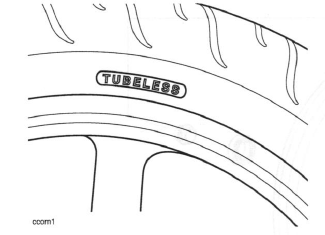
Typical Tyre Marking
Warning: Tyres that have been used on a rolling road dynamometer may become damaged. In some cases, the damage may not be visible on the external surface of the tyre.
Tyres must be replaced after such use as continued use of a damaged tyre may lead to instability, loss of control and an accident.
Tyre Pressures
Correct inflation pressure will provide maximum stability, rider comfort and tyre life.
Tyre pressures should be checked frequently and adjusted as necessary. Correct tyre pressures are:
Daytona

Street Triple and Street Triple R

Warning: Incorrect tyre inflation will cause abnormal tread wear and instability problems which may lead to loss of control and an accident.
Under-inflation may result in the tyre slipping on, or coming off the rim. Over-inflation will cause instability and accelerated tread wear.
Both conditions are dangerous as they may cause loss of control leading to an accident.
Tyre Wear/Wheel Inspection
As the tyre tread wears down, the tyre becomes more susceptible to puncture and failure. It is estimated that 90% of all tyre failures occur during the last 10% of tread life (90% worn). It is false economy and unsafe to use tyres until they are worn to their minimum.
All tyres are fitted with tread wear indicators. When the tyre becomes worn down as far as the top of a tread wear indicator, the tyre is worn beyond its service life and must be replaced.
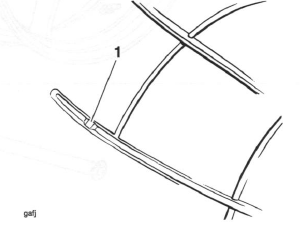
- Tread wear indicator
In accordance with the scheduled maintenance chart, measure the depth of the tread with a depth gauge, and replace any tyre that has worn to, or beyond the minimum allowable tread depth.
Inspect wheels for cracks, splits and kerb damage. Always replace wheels that are suspected of having become damaged.
Warning: Operation with excessively worn tyres is hazardous and will adversely affect traction, stability and handling which may lead to loss of control or an accident.
When tubeless tyres become punctured, leakage is often very slow. Always inspect tyres very closely for punctures.
Check the tyres for cuts, embedded nails or other sharp objects.
Check the rims for dents or deformation. Operation with damaged or defective wheels or tyres is dangerous and loss of control or an accident could result.
Always consult your Triumph dealer for tyre replacement, or for a safety inspection of the tyres.
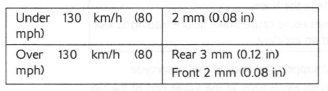
Minimum Recommended Tread Depth
The following chart can be used as a guide to the minimum safe tread depth.
Warning: Triumph motorcycles must not be operated above the legal road speed limit except in authorised closed course conditions.
Important Tyre Information
All Triumph motorcycles are carefully and extensively tested in a range of riding conditions to ensure that the most effective tyre combinations are approved for use on each model. It is essential that approved tyre combinations are used when purchasing replacement tyres as the use of non approved tyres or approved tyres in non approved combinations may lead to motorcycle instability. Always refer to the owner's handbook data section for details of approved tyres and tyre combinations.
Warning: If a tyre sustains a puncture, the tyre must be replaced.
Failure to replace a punctured tyre, or operation with a repaired tyre can lead to instability, loss of control or an accident.
Never use an inner tube to repair a punctured tyre. The rough surface inside the tyre can chafe the tube leading to instability, rapid deflation, loss of control and an accident.
Warning: The use of tyres other than those listed in the specification section of the owner's handbook may adversely affect handling leading to loss of control or an accident.
Use the recommended tyre options only in the combinations given in the owner's handbook.
Do not mix tyres from different manufacturers or tyres from the same manufacturer but from another option.
Warning: Always check tyre pressures before riding when the tyres are cold. Operation with incorrectly inflated tyres may affect handling leading to loss of control and an accident.
Warning: Operation with excessively worn or damaged tyres will adversely affect handling and control leading to loss of control or an accident.
Warning: Do not install tube-type tyres on tubeless rims. The bead will not seat and the tyres could slip on the rims, causing tyre deflation that may result in a loss of vehicle control and an accident.
Do not install an inner tube inside a tubeless tyre. This may cause instability and excessive heat build-up may cause the tube to burst resulting in rapid tyre deflation, loss of vehicle control and an accident.
Warning: Accurate wheel balance is necessary for safe, stable handling of the motorcycle. Do not remove or change any wheel balance weights. Incorrect wheel balance may cause instability leading to loss of control and an accident.
When wheel balancing is required, such as after tyre replacement, see your authorised Triumph dealer.
Only use self-adhesive weights. Clip on weights will damage the wheel and tyre resulting in tyre deflation, loss of control and an accident.
Warning: When replacement tyres are required, consult your authorised Triumph dealer who will arrange for the tyres to be fitted according to the tyre manufacturers instructions.
When tyres are replaced, allow time for the tyre to seat itself to the rim (approximately 24 hours). During this seating period, ride cautiously as an incorrectly seated tyre could cause loss of control or an accident. Initially, the new tyre will not produce the same handling characteristics as the worn tyre and the rider must allow adequate riding distance (approximately 100 miles) to become accustomed to the new handling characteristics.
After both 24 hours and 100 miles, the tyre pressures should be checked and adjusted and the tyre examined for correct seating and rectified as necessary.
Use of a motorcycle when not accustomed to its handling characteristics may lead to loss of control and an accident.
Front Wheel
Removal
Warning: Before starting work, ensure the motorcycle is stabilised and adequately supported. This will help prevent it from falling and causing injury to the operator or damage to the motorcycle.
1. Position the motorcycle on a paddock stand.
2. Detach and the support the front brake calipers;
Note:
- It is not necessary to disconnect the brake hoses.
Warning: Do not allow the calipers to hang on the brake hoses as this may damage the hoses.
Damaged hoses could cause brake failure leading to loss of control and an accident.
3. Raise and support the front of the motorcycle.
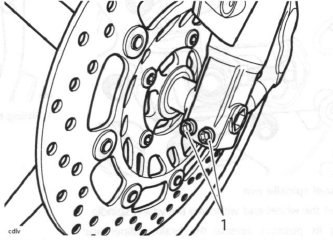
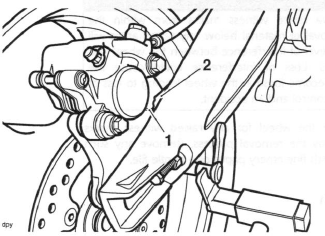
4. Slacken both pinch bolts at the lower end of the left hand fork.
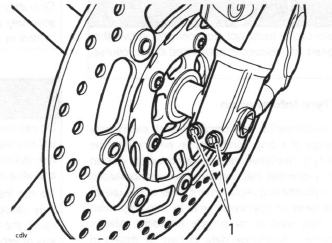
- Fork pinch bolts
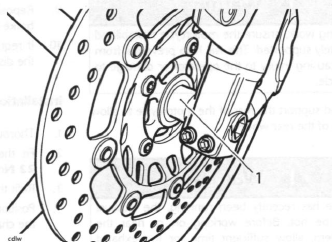
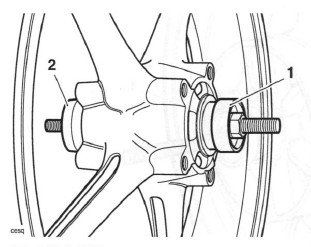
5. Release and remove the wheel spindle, which is threaded into the right hand fork.
6. Remove the wheel and the wheel spacers.
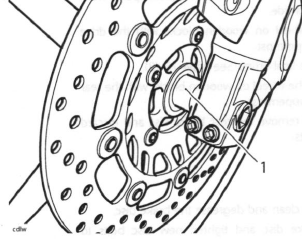
- Wheel spacers (left hand shown)
7. Place the wheel on wooden blocks.
Warning: Do not allow the wheel to rest on either brake disc as this may damage the disc and could lead to an accident.
Caution: To prevent wheel and bearing damage, observe absolute cleanliness and ensure there is no dirt ingress to the wheel bearings while the wheel is removed.
8. Thoroughly clean all components and inspect for wear or damage.
Installation
1. Lightly smear the wheel spacers with grease and locate in the hubs.
2. Position the wheel between the forks ensuring the spacers remain in position on both sides.
- Wheel spacers
3. Refit the wheel spindle from the left hand side and tighten to 65 Nm.
4. Lower the motorcycle to the ground and pump the front suspension to allow the left hand fork to 'float' to its natural position on the wheel spindle.
5. Tighten the fork pinch bolts to 22 Nm.
- Fork pinch bolts
6. Thoroughly clean and degrease the brake discs.
7. Refit the front brake calipers.
Rear Wheel
Removal
Warning: Before starting work, ensure the motorcycle is stabilised and adequately supported. This will help prevent it from falling and causing injury to the operator or damage to the motorcycle.
1. Raise and support the rear of the motorcycle to allow removal of the rear wheel.
Warning: If the engine has recently been running, the exhaust system will be hot. Before working on or near the exhaust system, allow sufficient time for the exhaust system to cool as touching any part of a hot exhaust system could cause burn injuries.
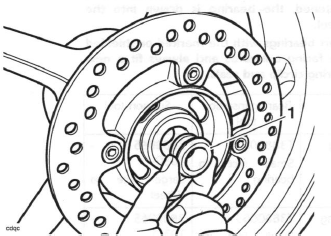
2. Remove the nut from the rear wheel spindle.
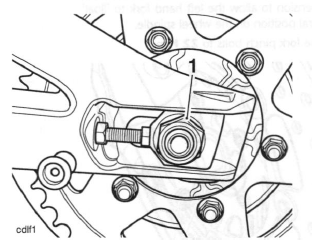
- Rear wheel spindle nut
3. Support the wheel and withdraw the wheel spindle.
4. Noting its position, release the brake caliper and carrier from the slot on the swinging arm and roll the wheel forward until the chain can be detached from the rear sprocket.
Warning: Do not allow the caliper to hang on the brake hose as this may damage the hose.
Damaged hoses could cause brake failure leading to loss of control and an accident.
5. Tie the rear brake caliper aside.
6. Withdraw the wheel and collect the flanged spacer from the right hand side and the plain spacer from the left hand side.
7. Place the wheel on wooden blocks with the drive sprocket uppermost.
8. Remove the final drive.
9. Reposition the wheel on wooden blocks with the rear brake disc uppermost.
10. If required, remove the rear brake disc and discard the disc bolts.
Installation
1. Thoroughly clean and degrease the brake disc.
2. Fit the brake disc and tighten new disc bolts to 22 Nm.
3. Refit the final drive assembly.
4. Position the wheel within the swinging arm and refit the chain to the final drive sprocket.
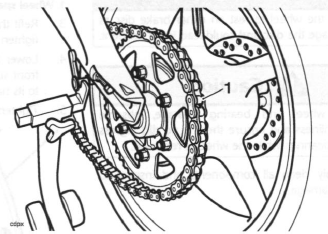
- Fitting the chain
5. Position the rear brake caliper and carrier to the swinging arm as noted prior to removal. Align the boss on the carrier with the raised slot on the swinging arm.
- Caliper carrier boss
- Swinging arm slot
6. Refit the wheel spacers, flanged spacer to the right hand side (flange facing outwards) and plain spacer to the left.
- Wheel spacer (right hand shown)
7. Lift the rear wheel into position, aligning the wheel, caliper carrier and swinging arm.
Warning: Check that the spacers are still correctly positioned.
Incorrectly fitted wheel spacers will cause a dangerous riding condition leading to loss of motorcycle control and an accident.
8. Fit the wheel spindle with the threaded end facing to the left.
9. Keeping the chain adjuster blocks in contact with the adjuster bolts, tighten the wheel spindle nut to 110 Nm.

- Rear wheel spindle nut
10. Lower the motorcycle to the ground.
Warning: It is dangerous to operate the motorcycle with defective brakes and you must have your authorised Triumph dealer take remedial action before you attempt to ride the motorcycle again. Failure to take remedial action may reduce braking efficiency leading to loss of motorcycle control and an accident.
11. Check the operation of the rear brake.
12. Check and, if necessary, adjust the chain.
Front Wheel Bearings
Removal
1. Remove the front wheel.
Caution: Do not allow the wheel to rest on the brake discs, as this may damage the discs. Support the wheel on wooden blocks, equally spaced around the rim, such that the brake discs are raised above the ground.
2. Place the wheel on wooden blocks to prevent damage to the brake discs.
3. Remove and discard the seals and the bearing circlip.
Warning: Always wear eye, hand and face protection when using a hammer and drift. Use of a hammer and drift can cause bearings to fragment. Pieces of fragmented bearing could cause eye and soft tissue injuries if suitable protective apparel is not worn.
Caution: To prevent wheel damage and to aid bearing removal, always apply force evenly on both sides of the bearing to prevent it from 'tipping and becoming stuck.
Application of uneven force will lead to difficulty in removing the bearing and to a damaged wheel.
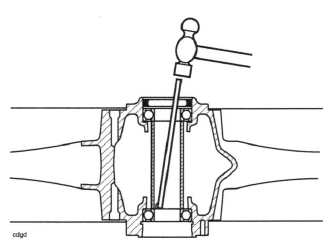
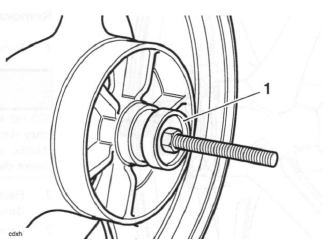
4. Using a suitable pin punch, through the centre of the wheel, drift out the wheel bearings. Collect the centre sleeve.
Wheel Bearing Removal
Inspection
Warning: Only remove raised witness marks from within the wheel. Removal of material below any raised areas will reduce the level of interference between the wheel and the bearings. Loss of interference could cause the bearing to become loose in the wheel leading to loss of motorcycle control and an accident.
1. Examine the wheel for any raised witness marks caused by the removal process. Remove any such marks with fine emery paper or a gentle file.
Installation
Note:
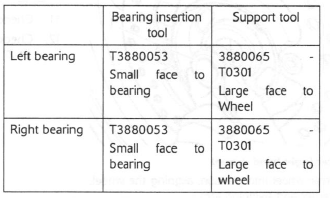
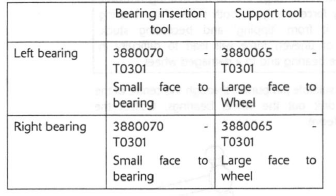
- Refer to the chart below for the correct tool and tool face
when inserting bearings.
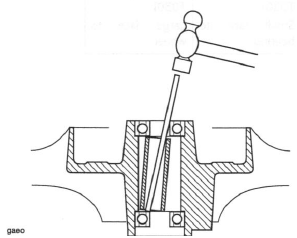
Bearings are inserted by means of a draw - bolt acting on the insertion tool. A support tool is located on the opposite side of the wheel to the insertion tool and as the bolt is tightened, the bearing is drawn into the wheel. - Insert bearings with the marked or shielded side facing outwards and always fit a new bearing circlip and seals.
1. Fit the wheel bearings and centre sleeve using the method described on the previous page.
- Tool T3880053
- Tool 3880065 - T0301
2. Fit a new circlip.
3. Lubricate and fit new seals to the front wheel.
Lubricate the seal's knife-edge with grease to NLGI 2 specification (we recommend Mobil HP222).
4. Fit the front wheel.
Rear Wheel Bearings
Removal
1. Remove the rear wheel.
Caution: Do not allow the wheel to rest on the brake disc, as this may damage the disc. Support the wheel on wooden blocks, equally spaced around the rim, such that the brake disc is raised above the ground.
2. Place the wheel on wooden blocks to prevent damage to the brake disc.
3. Remove and discard the seals and the bearing circlip.
Warning: Always wear eye, hand and face protection when using a hammer and drift. Use of a hammer and drift can cause bearings to fragment. Pieces of fragmented bearing could cause eye and soft tissue injuries if suitable protective apparel is not worn.
Caution: To prevent wheel damage and to aid bearing removal, always apply force evenly on both sides of the bearing to prevent it from 'tipping' and becoming stuck.
Application of uneven force will lead to difficulty in removing the bearing and to a damaged wheel.
4. Using a suitable pin punch, through the centre of the wheel, drift out the wheel bearings. Collect the centre sleeve.
Rear Wheel Bearing Removal
Inspection
Warning: Only remove raised witness marks from within the wheel. Removal of material below any raised areas will reduce the level of interference between the wheel and the bearings. Loss of interference could cause the bearing to become loose in the wheel leading to loss of motorcycle control and an accident.
1. Examine the wheel for any raised witness marks caused by the removal process. Remove any such marks with fine emery paper or a gentle file.
Installation
Note:
- Refer to the chart below for the correct tool and tool face
when inserting bearings.
Bearings are inserted by means of a drawbolt acting on the insertion tool. A support tool is located on the opposite side of the wheel to the insertion tool and as the bolt is tightened, the bearing is drawn into the wheel. - Insert bearings with the marked or shielded side facing outwards and always fit a new bearing circlip and seals.
1. Fit the wheel bearings and centre sleeve using the method described on the previous page.
- Tool T3880070
2. Fit a new circlip.
3. Lubricate and fit new seals to the rear wheel.
Lubricate the seal's knife-edge with grease to NLGI 2 specification (we recommend Mobil HP222).
4. Fit the rear wheel.
Final Drive
Removal
Warning: Before starting work, ensure the motorcycle is stabilised and adequately supported. This will help prevent it from falling and causing injury to the operator or damage to the motorcycle.
1. Remove the rear wheel.
Caution: Do not allow the wheel to rest on the brake disc, as this may damage the disc. Support the wheel on wooden blocks, equally spaced around the rim, such that the brake disc is raised above the ground.
2. Place the wheel on wooden blocks with the drive sprocket uppermost.
3. Gently lever the drive flange from the wheel hub.
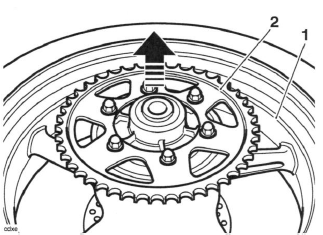
- Rear wheel
- Drive flange
4. Remove the cush drive rubbers.
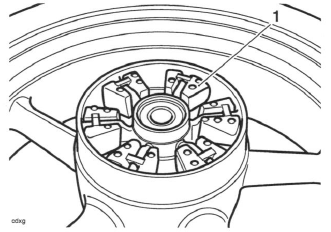
- Cush drive
Inspection
1. Check the cush drive rubbers for deterioration, cracks etc.
2. Inspect the sprocket teeth for wear, damage and chips.
3. Check the wheel and drive flange for wear, cracks and damage.
Installation
1. Install the cush drive rubbers to the wheel.
2. Refit the drive flange to the wheel.
3. Refit the rear wheel.
See also:
 Triumph Street Triple S - Service manual > Rear Brake Pads
Warning: Before starting work, ensure the motorcycle is stabilised and adequately supported. This will help prevent it from falling and causing injury to the operator or damage to the motorcycle.
Triumph Street Triple S - Service manual > Frame and Bodywork
Exploded View - Frame - all Models Exploded View - Rear Subframe - Daytona 675
 Benelli Imperiale 400
 BMW F900XR
 Honda CB500X
 KTM 390 Adventure
 Triumph Street Triple S
 Yamaha MT-03
 Kawasaki Z400
 Triumph Street Triple S
 Yamaha MT-03