 Triumph Street Triple S - Service manual > Rear Brake Pads
Warning: Before starting work, ensure the motorcycle is stabilised and adequately supported. This will help prevent it from falling and causing injury to the operator or damage to the motorcycle.
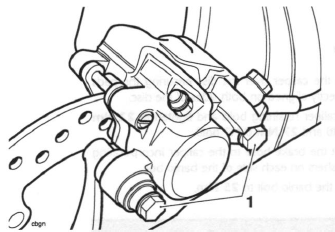
1. Push the brake caliper inwards towards the wheel in order to displace the caliper piston.
2. Remove the plug protecting the pad retaining pin.
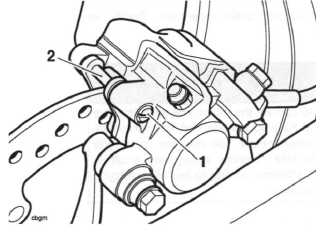
- Plug
- Pad retaining pin
Note:
- Before removing the brake pads, note the relationship of the pads to the caliper and ensure that, on assembly, they are fitted in the same way.
Warning: Do not allow the caliper to hang on the brake hoses as this may damage the hoses and could lead to loss of motorcycle control and an accident.
3. Remove the brake caliper bolts and raise the caliper.
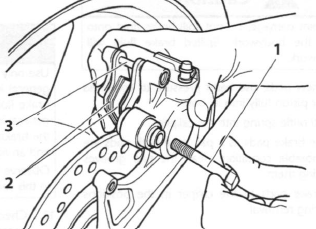
- Brake caliper bolt
- Brake pads
- Pad retaining pin
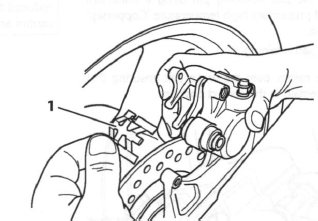
4. Remove the pad retaining pin and remove the pads.
5. Remove the anti-rattle spring and inspect for damage.
- Anti-rattle spring
Installation
Warning: Never use mineral based grease (such as lithium or copper based grease) in any area where contact with the braking system hydraulic seals and dust seals is possible.
Mineral based grease will damage the hydraulic seals and dust seals in the calipers and master cylinders.
Damage caused by contact with mineral based grease may reduce braking efficiency resulting in an accident.
Caution: To prevent paint damage, do not spill brake fluid onto any area of the bodywork. Spilled brake fluid will damage paintwork.
1. If fitting new pads, use hand pressure to compress the caliper piston fully into its bore.
2. Fit the anti rattle spring into the caliper.
3. Renew the brake pads as a pair or, if both pads are in a serviceable condition, clean the pad grooves before fitting them.
4. Fit the brake pads to the caliper in the positions noted during removal.
Warning: Do not apply more than a minimum coating of grease to the pad retaining pins. Excess grease may contaminate the brake pads, hydraulic seals and discs causing reduced braking efficiency and an accident.
5. Lubricate the pad retaining pin using a minimum amount of proprietary high temperature 'Copperslip' type grease.
6. Install the pad retaining pin.
7. Lower the caliper over the brake disc ensuring that the pads remain in the correct positions.
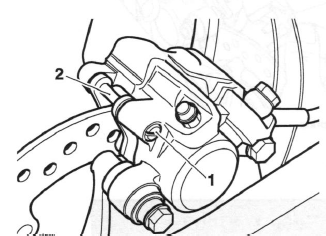
- Plug
- Pad retaining pin
8. Fit the caliper bolts and tighten to 22 Nm (M8 bolt) and 27 Nm (M12 bolt).
9. Tighten the pad retaining pin to 18 Nm.
10. Fit the retaining plug and tighten to 3 Nm.
11. Pump the brake pedal to correctly position the caliper pistons.
12. Check the brake fluid level in the rear reservoir and top-up as required with new D.O.T. 4 fluid.
Warning: Use only DOT 4 specification brake fluid as listed in the general information section of this manual. The use of brake fluids other than those DOT 4 fluids listed in the general information section may reduce the efficiency of the braking system leading to loss of motorcycle control and an accident.
Observe the brake fluid handling warnings given earlier in this section of the manual.
13. Check for correct brake operation. Rectify as necessary.
Warning.
It is dangerous to operate the motorcycle with defective brakes; you must have your authorised Triumph dealer take remedial action before you ride the motorcycle again. Failure to take remedial action may result in reduced braking efficiency leading to loss of motorcycle control and an accident.
Rear Brake Caliper
Removal
Warning: Before starting work, ensure the motorcycle is stabilised and adequately supported. This will help prevent it from falling and causing injury to the operator or damage to the motorcycle.
Caution: To prevent paint damage, do not spill brake fluid onto any area of the bodywork. Spilled brake fluid will damage paintwork.
1. Disconnect the rear brake hose at the caliper and place the free end of the hose in a suitable container to collect the brake fluid.
2. Remove the caliper mounting bolts.
3. Remove the brake caliper assembly.
- Caliper mounting bolts
Disassembly
1. Remove the plug protecting the pad retaining pin.
2. Remove the pad retaining pin.
3. Remove the brake pads and anti-rattle spring.
Warning: To prevent injury, never place fingers or hands inside the caliper opening when removing the piston. Always wear eye, hand and face protection when using compressed air. Eye, face and skin damage will result from direct contact with compressed air.
4. Cover the caliper opening with a clean, heavy cloth and, using either compressed air or by reconnecting the master cylinder and pumping the brake lever, remove the piston.
Inspection
1. Check the piston and caliper bore for corrosion, scoring and damage. Renew as necessary.
Warning: Always renew caliper seals and pistons after removal from the caliper. An effective hydraulic seal can only be made if new components are used.
A dangerous riding condition leading to an accident could result if this warning is ignored.
2. Inspect the brake pads for damage and wear beyond the service limit. Renew as necessary.
Assembly
Warning: Never use mineral based grease (such as lithium or copper based grease) in any area where contact with the braking system hydraulic seals and dust seals is possible.
Mineral based grease will damage the hydraulic seals and dust seals in the calipers and master cylinders.
Damage caused by contact with mineral based grease may reduce braking efficiency resulting in an accident.
Warning: Ensure that the caliper bores do not become scratched during removal and assembly.
A dangerous riding condition leading to an accident could result if this warning is ignored.
Warning: Before installation, all internal brake components should be cleaned and lubricated with clean new DOT 4 brake fluid.
Never use solvents, petrol (gasoline), engine oil, or any other petroleum distillate on internal brake components as this will cause deterioration of the hydraulic seals in the calipers and master cylinders.
A dangerous riding condition leading to loss of motorcycle control and an accident could result if this warning is ignored.
1. Fit new fluid seals to the caliper. Apply brake fluid to the outside of the caliper piston and fluid seal.
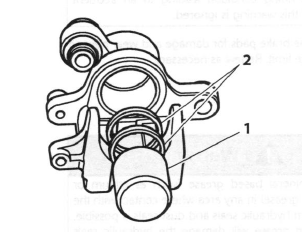
- Piston
- Seals
Warning: Ensure that the piston does not tip during assembly as this could damage the caliper.
A dangerous riding condition leading to an accident could result if this warning is ignored.
2. Carefully push the piston into the caliper by hand.
3. Install the anti-rattle spring into the caliper.
4. Position the brake pads in the caliper.
Warning: Do not apply more than a minimum coating of grease to the pad retaining pins. Excess grease may contaminate the brake pads, hydraulic seals and discs causing reduced braking efficiency and an accident.
5. Lubricate the pad retaining pin using a minimum amount of proprietary high temperature 'Copperslip' type grease.
6. Fit and tighten the pad retaining pin to 18 Nm.
7. Fit the retaining plug and tighten to 3 Nm.
8. Apply a thin smear of silicone based brake grease to the outside of the sleeve and the sliding section of the bolt as shown below. Do not apply grease to the threads of the bolt.
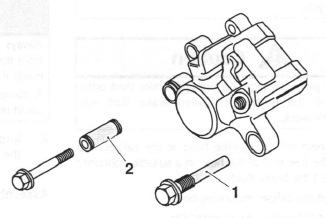
- Bolt
- Sleeve
Installation
1. Position the caliper over the disc ensuring the pads are correctly aligned on both sides of the disc.
2. Fit the caliper retaining bolts and tighten to 22 Nm (M8 bolt) and 27 Nm (M12 bolt).
3. Connect the brake hose to the caliper incorporating new washers on each side of the banjo bolt.
4. Tighten the banjo bolt to 25 Nm.
Warning: Use only DOT 4 specification brake fluid as listed in the general information section of this manual. The use of brake fluids other than those DOT 4 fluids listed in the general information section may reduce the efficiency of the braking system leading to loss of motorcycle control and an accident.
Observe the brake fluid handling warnings given earlier in this section of the manual.
5. Fill the master cylinder with new, DOT 4 brake fluid from a sealed container.
6. Bleed the rear brake.
7. Check for correct brake operation. Rectify as necessary.
Warning: It is dangerous to operate the motorcycle with defective brakes; you must have your authorised Triumph dealer take remedial action before you ride the motorcycle again. Failure to take remedial action may result in reduced braking efficiency leading to loss of motorcycle control and an accident.
Rear Brake Disc
Wear
Warning: Before starting work, ensure the motorcycle is stabilised and adequately supported. This will help prevent it from falling and causing injury to the operator or damage to the motorcycle.
1. Replace any brake disc worn beyond the service limit or that exceeds the disc run-out limit.
Rear Disc Thickness
Standard: 5.0 mm
Service Limit: 4.5 mm
Disc Run-out
Service Limit: 0.30 mm
Measure disc run-out using an accurate dial gauge mounted on a surface plate.
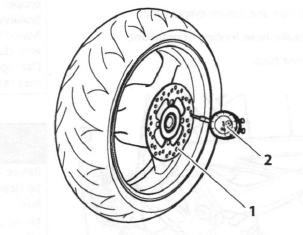
- Disc
- Dial gauge
Note:
- Details of rear brake disc removal and installation can be found in the wheel section.
Rear Master Cylinder
Removal
Warning Before starting work, ensure the motorcycle is stabilised and adequately supported. This will help prevent it from falling and causing injury to the operator or damage to the motorcycle.
1. Remove the rider's seat.
2. Disconnect the battery, negative (black) lead first.
Caution: To prevent paint damage, do not spill brake fluid onto any area of the bodywork. Spilled brake fluid will damage paintwork.
3. Drain the fluid from the master cylinder by bleeding the system at the rear caliper until all fluid has been expelled.
4. Remove the clip and washer from the clevis pin at the lower end of the brake pushrod.
5. Remove the clevis pin.
6. Disconnect from the master cylinder the:
- rear brake hose (noting orientation),
- reservoir hose.

- Master cylinder fixings
- Master cylinder
- Heel guard
7. Remove the screws securing the master cylinder and heel guard to the frame to release the master cylinder.
Disassembly
1. Remove the boot from the cylinder and pushrod.
2. Remove the circlip retaining the pushrod to the cylinder.
3. Remove the pushrod and piston set from the master cylinder bore, noting the relative position of the seals and piston components.
Inspection
1. Visually inspect the master cylinder bore for wear, scratches or corrosion. Replace as necessary.
2. Check the piston and cylinder bore for damage, wear or deterioration. Replace as necessary.
3. Always renew the piston and seal set if the cylinder is dismantled.
4. Examine the pushrod for bends and damage.
Replace as necessary.
Assembly
Warning: Never use mineral based grease (such as lithium or copper based grease) in any area where contact with the braking system hydraulic seals and dust seals is possible.
Mineral based grease will damage the hydraulic seals and dust seals in the calipers and master cylinders.
Damage caused by contact with mineral based grease may reduce braking efficiency resulting in an accident.
Warning: Before installation, all internal brake components should be cleaned and lubricated with clean new DOT 4 brake fluid.
Never use solvents, petrol (gasoline), engine oil, or any other petroleum distillate on internal brake components as this will cause deterioration of the hydraulic seals in the calipers and master cylinders.
A dangerous riding condition leading to loss of motorcycle control and an accident could result if this warning is ignored.
1. Clean the master cylinder bore, piston and seals, with new brake fluid.
2. Ensure all ports are clear of obstruction.
Warning: Ensure that the piston and piston seal are fitted facing the same way as noted during removal. A dangerous riding condition leading to an accident could result from incorrect assembly of the master cylinder.
3. Install the spring and piston set together.
4. Apply a small amount of brake grease to the pushrod.
5. Install the pushrod in the master cylinder and retain with a new circlip.
6. Refit the boot.
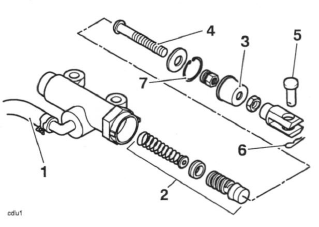
- Reservoir hose
- Piston set
- Dust boot
- Push rod
- Clevis pin
- Clip
- Circlip
7. If the pushrod has been disassembled, adjust the length of the pushrod as shown below:
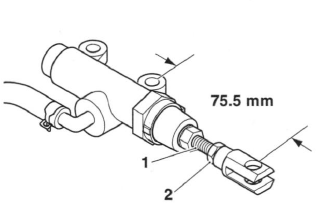
- Pushrod
- Locknut
8. Set the pushrod free length to 75.5 mm.
9. Tighten the locknut to 18 Nm.
Installation
1. Fit the reservoir hose to the master cylinder.
2. Secure the master cylinder and heel guard to the frame. Tighten the securing screws to 18 Nm.
3. Connect the push rod to the brake pedal using a new clevis pin and split pin.
4. Incorporating new washers, fit the brake hose to the master cylinder. Ensuring correct orientation of the brake hose, tighten the banjo bolt to 25 Nm.
Warning: Use only DOT 4 specification brake fluid as listed in the general information section of this manual. The use of brake fluids other than those DOT 4 fluids listed in the general information section may reduce the efficiency of the braking system leading to loss of motorcycle control and an accident.
Observe the brake fluid handling warnings given earlier in this section of the manual.
5. Fill and bleed the rear brake system.
6. Reconnect the battery, positive (red) lead first.
7. Refit the rider's seat.
8. Check for correct brake operation. Rectify as necessary.
Warning: It is dangerous to operate the motorcycle with defective brakes; you must have your authorised Triumph dealer take remedial action before you ride the motorcycle again. Failure to take remedial action may result in reduced braking efficiency leading to loss of motorcycle control and an accident.
See also:
 Triumph Street Triple S - Service manual > Front Brake Master Cylinder
Front Brake Master Cylinder - Daytona 675 and Street Triple R Removal Warning: Before starting work, ensure the motorcycle is stabilised and adequately supported. This will help prevent it from falling and causing injury to the operator or damage to the motorcycle.
Triumph Street Triple S - Service manual > Wheels/Tyres
Exploded view - Front Wheel Exploded View - Rear Wheel & Final Drive
 Benelli Imperiale 400
 BMW F900XR
 Honda CB500X
 KTM 390 Adventure
 Triumph Street Triple S
 Yamaha MT-03
 Kawasaki Z400
 Triumph Street Triple S
 Yamaha MT-03