 Triumph Street Triple S - Service manual > Frame and Bodywork
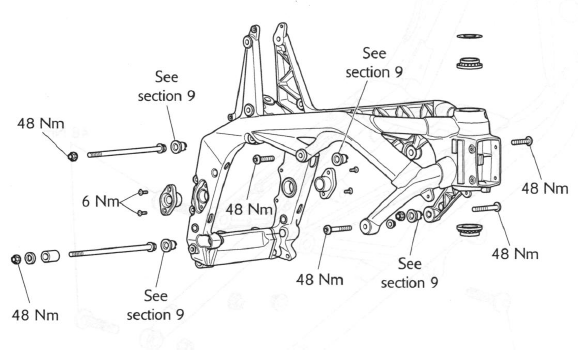
Exploded View - Frame - all Models
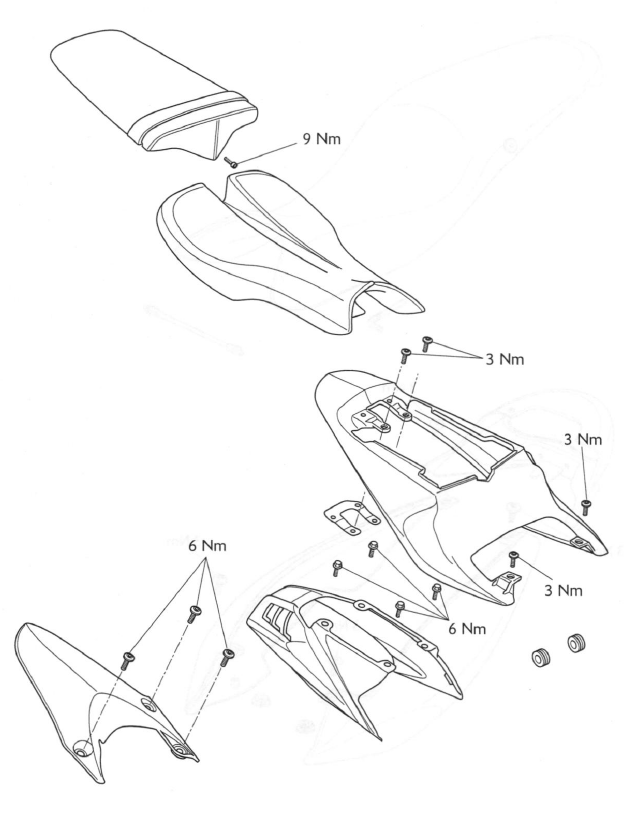
Exploded View - Rear Subframe - Daytona 675
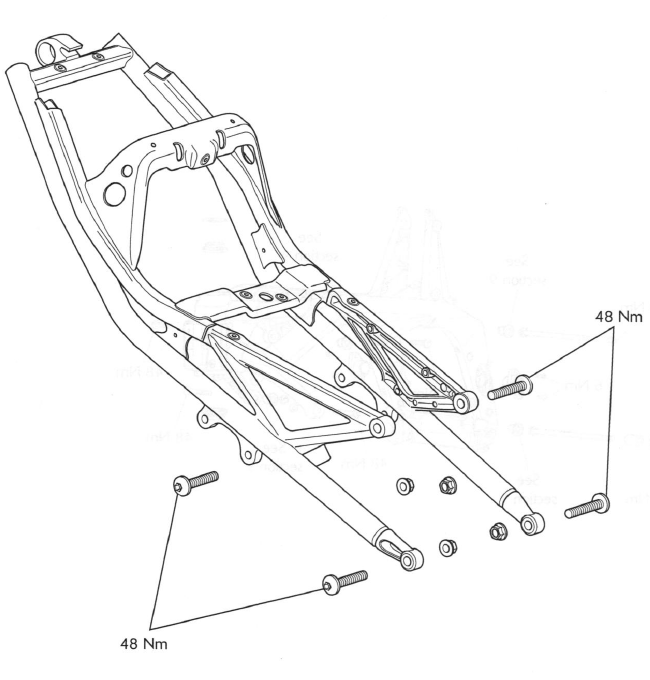
Exploded View - Rear Subframe - Street Triple and Street Triple R

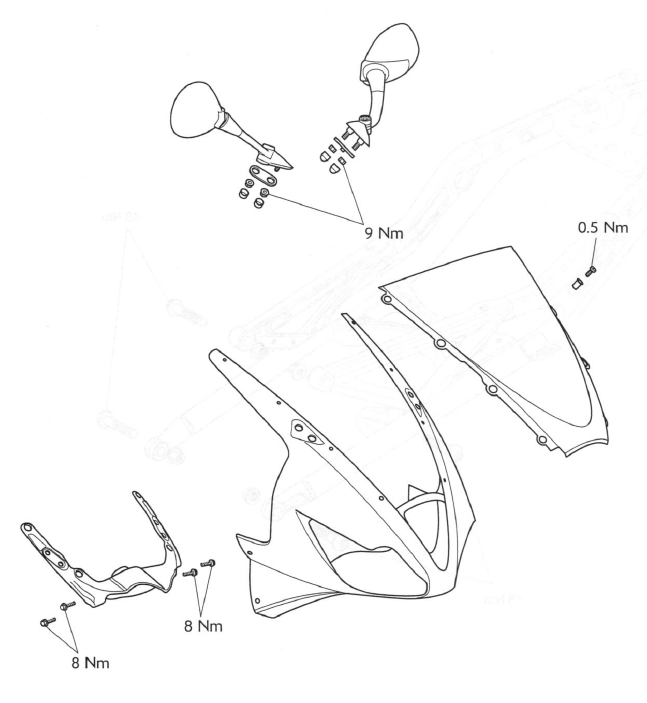
Exploded View - Cockpit and Mountings - Daytona 675 up to VIN 381274
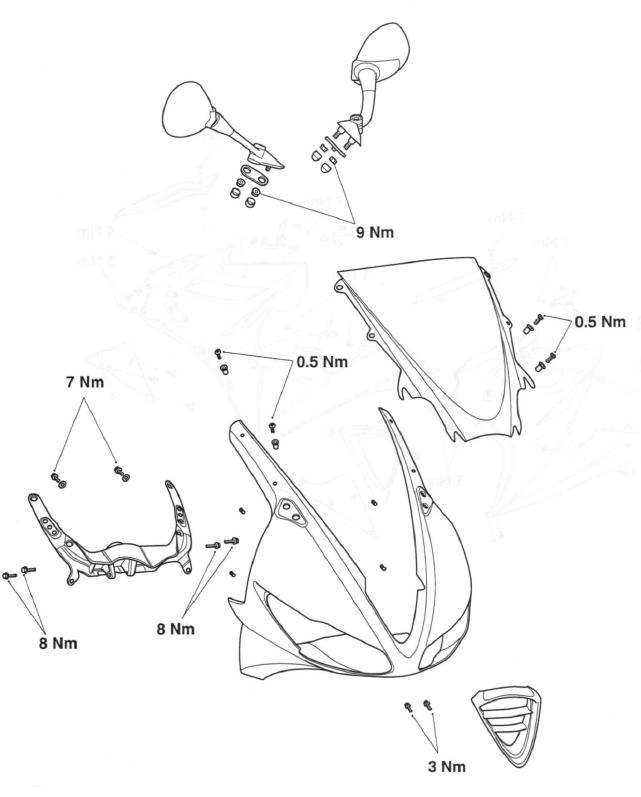
Explode View - Cockpit and mountings - Daytona 675 from VIN 381275
Exploded View - Lower Fairings - Daytona 675
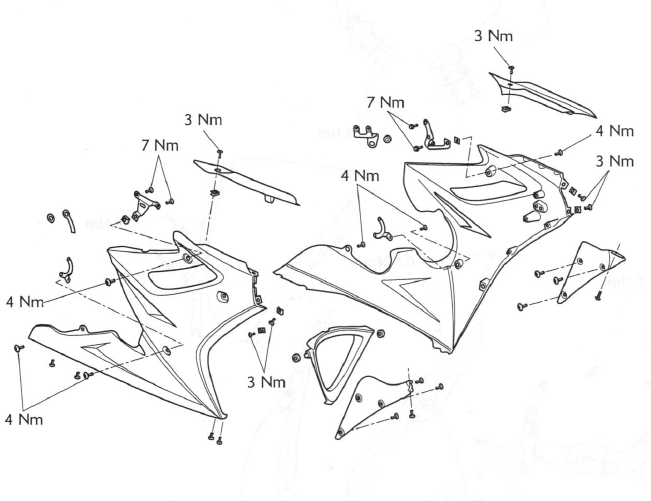
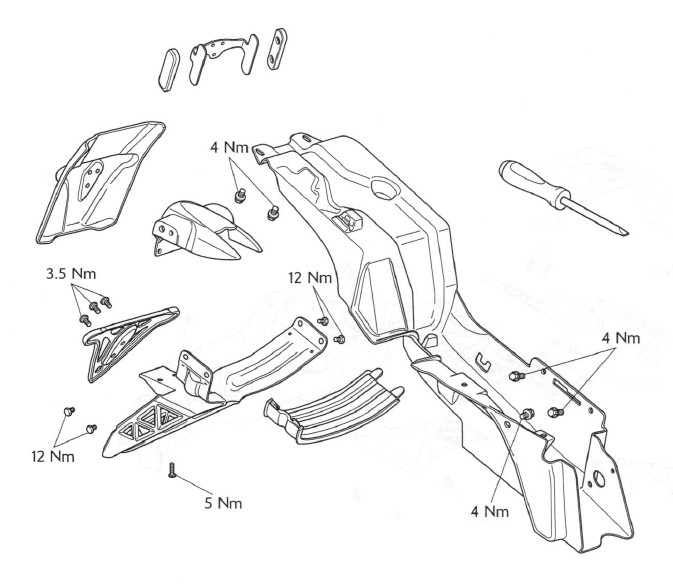
Exploded View - Rear Panels - Daytona 675
Exploded View - Rear Panels - Street Triple and Street Triple R
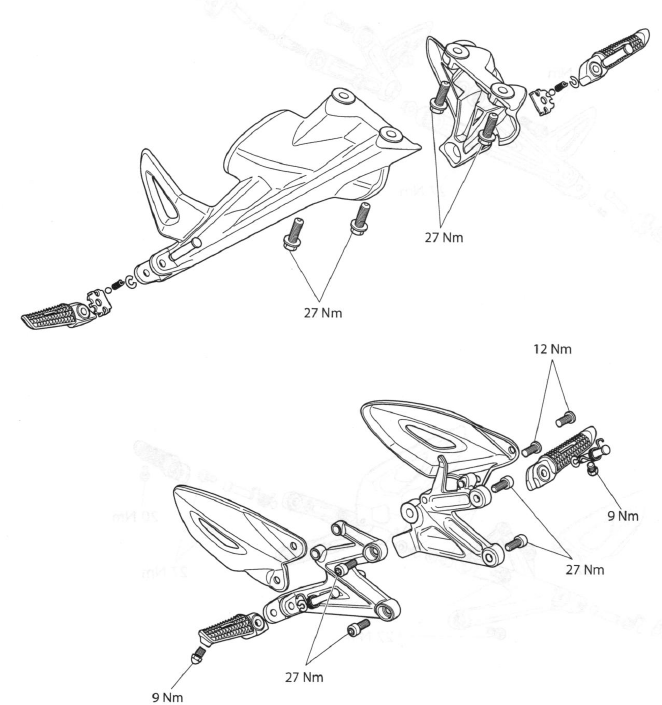
Exploded View - Footrests and Mountings - Daytona 675
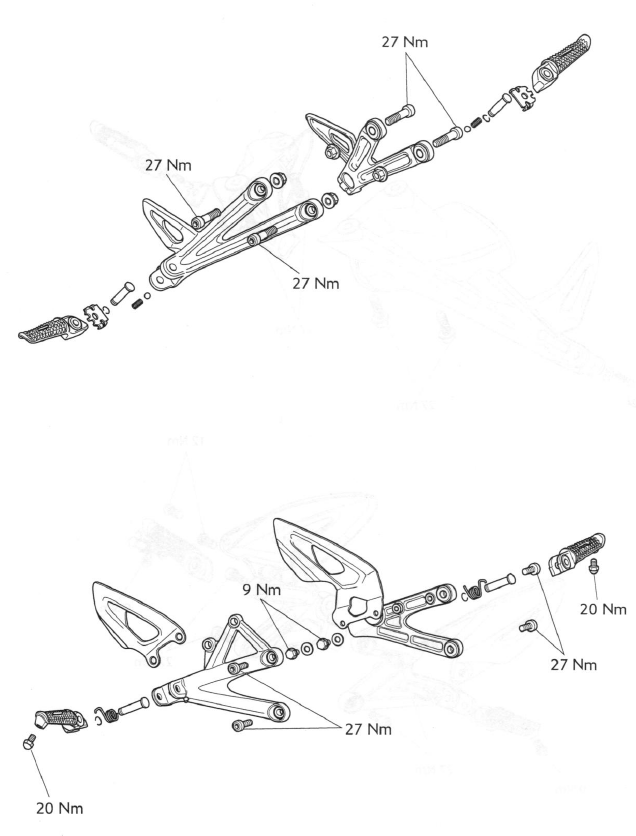
Exploded View - Footrests and Mountings - Street Triple and Street Triple R
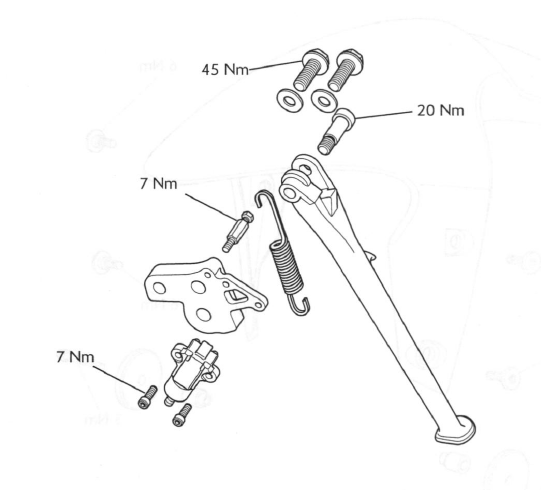
Exploded View - Sidestand - all Models
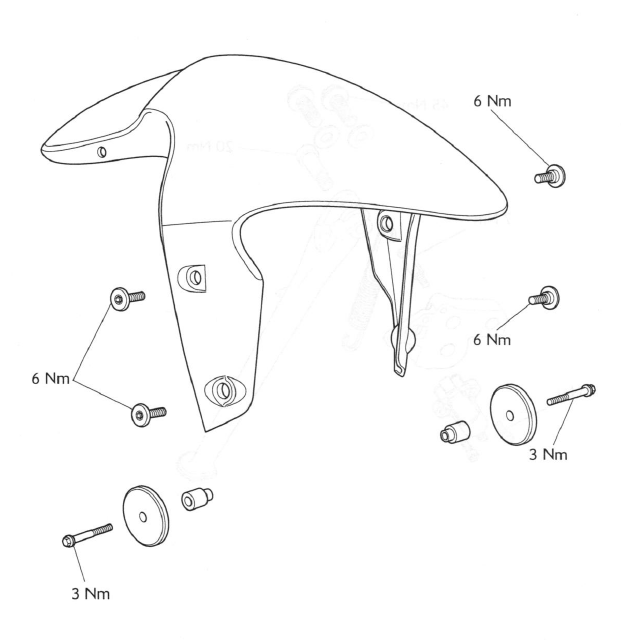
Exploded View - Front Mudguard - all Models
Exploded View - Rear Mudguard - Daytona 675
Exploded View - Rear Mudguard - Street Triple and Street Triple R
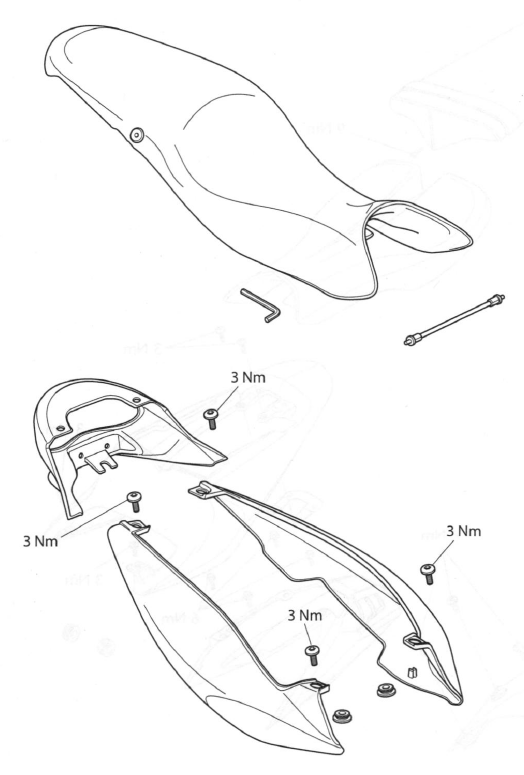
Rider's Seat - all models
Removal
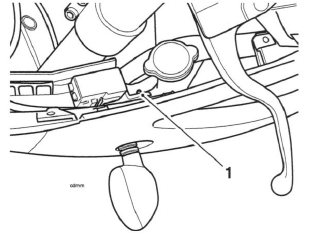
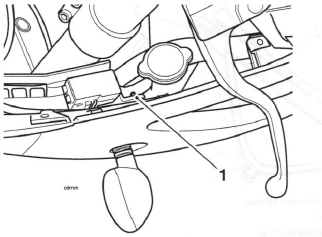
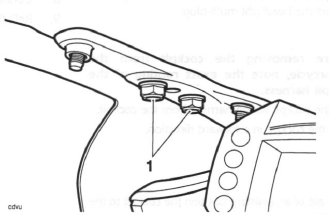
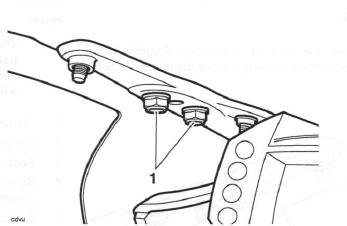
The seat lock is located on the left hand side of the battery tray, in line with the footrest mounting rail. To remove the seat, insert the ignition key into the seat lock and turn it anti-clockwise while pressing down on the rear of the seat.
This will release the seat from its lock and allow it to be slid rearwards for complete removal from the motorcycle.
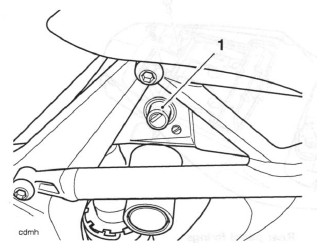
- Seat lock
Refit
To refit the seat, engage the seat's tongue under the fuel tank and press down at the rear to engage in the seat lock.
Warning: To prevent detachment of the seat during riding, after fitting always grasp the seat and pull firmly upwards. If the seat is not correctly secured it will detach from the lock. A loose or detached seat could cause loss of motorcycle control and an accident.
Caution: To prevent damage to the seat and its cover, care must be taken not to drop the seat. Do not lean the seat against the motorcycle or a wall as it may fall. Instead, place the seat, with the seat cover facing up, on a flat surface which is covered with a soft cloth.
Rear Seat - Daytona 675 only
Removal
To remove the rear seat cover or rear seat (where fitted): Remove the fixing located beneath the padding. This will allow the rear seat/seat cover to be slid forwards for complete removal from the motorcycle.
- Fixing
Refit
To refit the rear seat, engage the seat's tag under the rear subframe rail and install the fixing. Tighten the seat fixing to 9 Nm.
Frame, Footrests and Fixings
Inspection
1. Inspect the frame, footrests and fairings for damage, cracks, chafing and other dangerous conditions.
Check fairing and frame fixings for security.
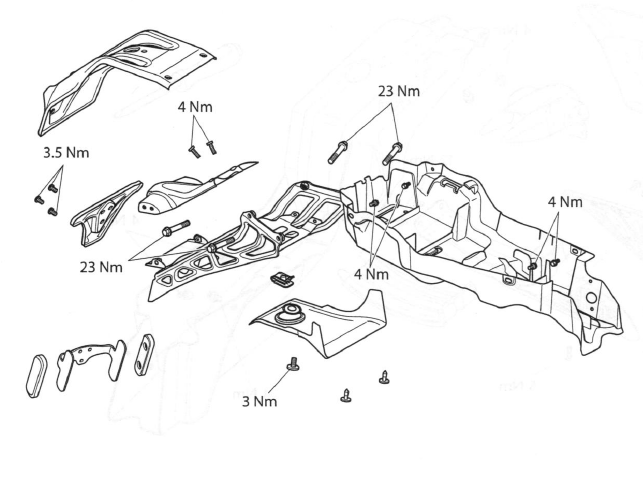
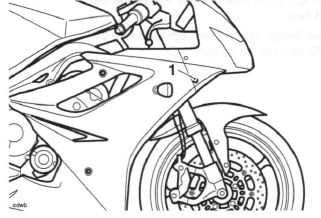
2. Inspect the bank angle indicators on the rider's footrests for wear. The bank angle indicators are worn out when 5mm of the bank indicator remains.
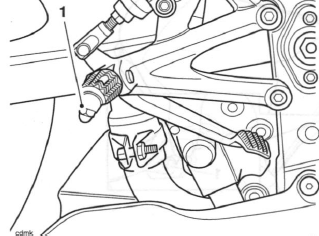
- Bank angle indicator (Daytona 675 shown)
Warning: Use of a motorcycle with bank angle indicators worn beyond the maximum limit will allow the motorcycle to be banked to an unsafe angle.
Banking to an unsafe angle may cause instability, loss of control and an accident causing injury or death.
Warning: If the motorcycle is involved in an accident or collision it must be taken to an authorised Triumph dealer for repair or inspection.
Any accident can cause damage to the motorcycle which, if not correctly repaired, may cause another accident which may result in injury or death.
Warning: The frame must not be modified as any modification to the frame such as welding or drilling may weaken the frame resulting in an accident.
Rear Panel - Daytona 675
Removal
1. Remove the seats.
2. Disconnect the battery, negative (black) lead first.
3. To release the rear panel assembly, remove the fixings shown in the illustration below.
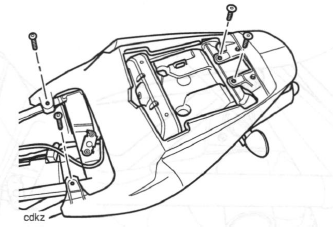
Rear panel fixings
4. Gently pull the panel outwards.
5. Lift and withdraw the rear panel assembly in a rearward direction.
6. Disconnect the rear lamp multi-plug.
Installation
1. Installation is the reverse of removal noting the following:
Note:
- Tighten the fixings to 3 Nm.
- Reconnect the battery, positive (red) lead first.
Rear Panel - Street Triple and Street Triple R
Removal
1. Remove the seat.
2. Disconnect the battery, negative (black) lead first.
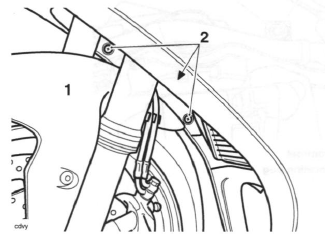
3. To release the rear panel assembly, remove the fixings shown in the illustration below.
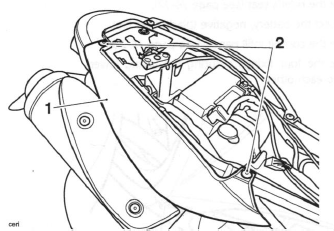
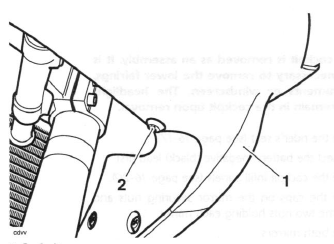
- Rear panel (right hand shown)
- Fixings
4. Gently pull the panel outwards.
5. Release the rear panel locating peg from the grommet on the subframe.
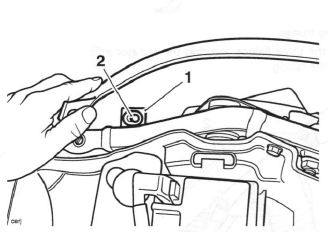
- Subframe grommet
- Rear panel locating peg
Installation
1. Installation is the reverse of removal noting the following:
Note:
- Ensure the locating peg is correctly inserted in the subframe grommet.
- Tighten the rear panel fixings to 3 Nm.
- Reconnect the battery, positive (red) lead first.
Cockpit Infill Panels - Daytona 675
Removal
Note:
- Follow the same procedure for both left and right hand sides.
1. Remove the rider's seat.
2. Disconnect the battery, negative (black) lead first.
Note:
- From VIN 381275, the front fixing for the right hand infill panel also secures the front of the regulator/rectifier bracket to the fairing.
3. Remove the two screws securing the cockpit infill panel.

- Cockpit infill panel
- Fixings
4. Remove the panel.
Installation
1. Installation is the reverse of removal noting the following:
Note:
- Tighten the fixings to 5 Nm.
- Reconnect the battery, positive (red) lead first.
Lower Fairing - Daytona 675
Removal
Note:
- Follow the same procedure for both left and right hand sides.
- The cockpit does NOT need to be removed in order to remove the lower fairings.
1. Remove the rider's seat.
2. Disconnect the battery, negative (black) lead first.
3. Remove the cockpit infill panels.
4. Remove the four fixings securing the fairing lower halves to each other.
- Lower fairing fixings
5. Remove the three fixings securing the radiator infill panel to the fairing.
- Radiator infill panel (right hand shown)
- Fixings (one fixing is not shown)
Note:
- From VIN 381275, the fixing for the front right hand indicator also secures the rear of the regulator/rectifier bracket to the fairing
6. From VIN 381275 only: If the left hand fairing is being removed, remove the fixing for the indicator.
7. Remove the three screws securing the fairing to the fairing brackets.
8. Remove the screw securing the fairing to the cockpit.
9. Detach the lower fairing stud from the frame grommet.
- Lower fairing
- Fairing retaining screws
- Fairing to cockpit screw
- Fairing stud/grommet location (one on each fairing)
Note:
- If the left hand fairing half is being removed, detach the rear fuse box grommet from the fairing stud. The fuse box will remain attached to its forward fixing stud on the headlamp when the lower fairing is removed.
- Fuse box grommet/stud
10. Ease the panel away from the cockpit to remove it.
11. Disconnect the direction indicator connectors.
Note:
- When the lower fairing is removed the lower infill panel may remain in either fairing half.
12. Remove the lower fairing infill panel.
- Right hand lower fairing
- Infill panel
- Fixing stud/grommet
Installation
1. Refit the lower fairing infill panel to either fairing half.
2. Position the fairing to the rear of the cockpit.
3. Reconnect the direction indicator connectors.
4. Align the fairing stud to the frame grommet and refit.
5. Align the fairing stud to the fuse box grommet and refit.
- Fuse Box grommet/stud
6. Refit the lower fairing infill panel to the opposite fairing half.
7. Refit the fairing to cockpit lower fixing, and tighten to 3 Nm.
8. Refit the fairing to the fairing brackets, tighten the fixings to 4 Nm.
9. From VIN 381275 only: If fitting the right hand fairing, fit the indicator fixing and tighten to 3 Nm.
Ensure the fixing secures the alternator rectifier/ regulator to the fairing.
10. Refit the radiator infill panel fixings.
11. Refit the lower fairing fixings.
12. Refit the cockpit infill panels.
13. Reconnect the battery, positive (red) lead first.
14. Refit the rider's seat.
Windscreen - Daytona 675 up to VIN 381274
Removal
Note:
- It is not necessary to remove the mirrors to remove the windscreen.
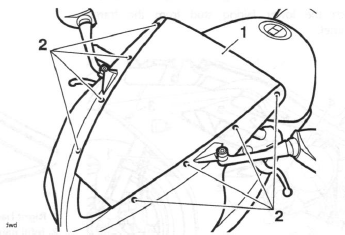
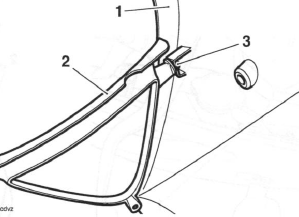
- Windscreen
- Fixings
1. Release the eight windscreen fixings.
2. Slide the windscreen upwards and to the rear.
Installation
Installation is the reverse of removal noting the following.
Note:
- Tighten the fixings to 0.5 Nm.
Windscreen - Daytona 675 from VIN 381275
Removal
1. Remove the caps on the mirror securing nuts, release the two nuts and remove the mirror, on both sides.
- Mirror fixings
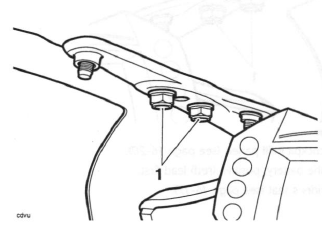
2. Release the four windscreen fixings.
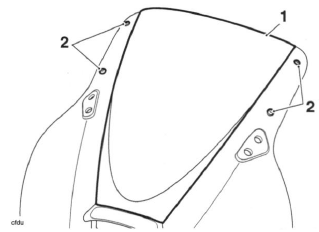
- Windscreen
- Windscreen fixings
3. Slide the windscreen upwards and to the rear.
Installation
1. Installation is the reverse of removal noting the following:
Note:
- Tighten the windscreen fixings to 0.5 Nm.
- Tighten the mirror fixings to 9 Nm. Refit the nut covers.
Cockpit - Daytona 675
Removal
Note:
- The cockpit is removed as an assembly. It is not necessary to remove the lower fairings, instruments or windscreen. The headlight will remain in the cockpit upon removal.
1. Remove the rider's seat.
2. Disconnect the battery, negative (black) lead first.
3. Remove the cockpit infill panels.
4. Remove the caps on the mirror securing nuts and release the two nuts holding each mirror.
5. Remove both mirrors.
- Mirror fixings
6. Remove the two screws (one on each side) securing the cockpit to each lower fairing.
- Fairing to cockpit screw
7. Remove the two fixings (one on each side) securing the radiator infill panel to the cockpit.
- Cockpit
- Radiator infill panel fixing (left hand shown)
8. With the aid of an assistant detach the cockpit and disconnect the headlight multi-plug.
Note:
- Before removing the cockpit from the motorcycle, note the exact routing of the cockpit harness.
9. Detach the cockpit wiring harness from the cockpit.
10. Remove the cockpit in a forward direction.
Installation
1. With the aid of an assistant position the cockpit to the motorcycle.
2. Refit the cockpit harness following the routing noted during removal.
3. Reconnect the headlight multi-plug.
4. Refit the cockpit to the lower fairings, tighten the two fixings to 3 Nm.
5. Refit the two fixings (one on each side) securing the radiator infill panel to the cockpit.
6. Refit the mirrors, tighten the fixings to 9 Nm. Refit the nut covers.
- Mirror fixings
7. Refit the cockpit infill panels.
8. Connect the battery, positive (red) lead first.
9. Refit the rider's seat.
Radiator Cowl - Street Triple and Street Triple R
Removal
1. Remove the rider's seat.
2. Disconnect the battery, negative (black) lead first.
3. Remove the fuel tank.
4. Remove the airbox.
5. Disconnect the front direction indicator connections, located under the airbox.

- Left hand direction indicator connections
- Right hand direction indicator connections
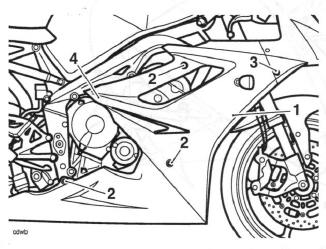
6. Release the fixing securing the direction indicator to the radiator cowl.
7. Release the three fixings securing the radiator cowl to the radiator.
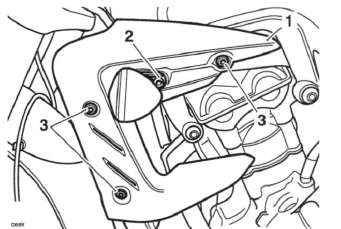
- Radiator cowl
- Direction indicator fixing
- Fixings
8. Remove the radiator cowl and, noting the routing of the direction indicator harness, carefully feed the harness through the radiator bracket as the cowl is removed.
Installation
1. Pass the direction indicator harness through the radiator cowl and position the direction indicator to the radiator cowl.
2. Pass the direction indicator harness through the radiator bracket and align the radiator cowl to its fixing holes.
Note:
- Ensure the direction indicator harness passes through the hole in the radiator bracket and is not trapped by the radiator cowl as it is installed.
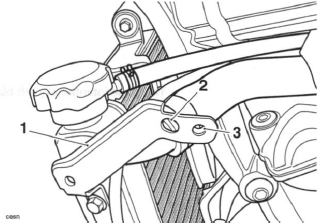
- Radiator bracket
- Direction indicator harness hole
- Direction indicator fixing hole
3. Route the direction indicator harness inside the frame rail to a position above the camshaft cover.
Reconnect the electrical connectors to the main harness.
4. Install the three radiator cowl fixings and the direction indicator fixing and tighten as follows:
- Tighten the radiator cowl fixings to 5 Nm.
- Tighten the direction indicator fixing to 4 Nm.
5. Refit the airbox.
6. Refit the fuel tank.
7. Reconnect the battery, positive (red) lead first.
See also:
 Triumph Street Triple S - Service manual > Wheels/Tyres
Exploded view - Front Wheel Exploded View - Rear Wheel & Final Drive
Triumph Street Triple S - Service manual > Electrical
Exploded View - Instruments - Daytona 675
 Benelli Imperiale 400
 BMW F900XR
 Honda CB500X
 KTM 390 Adventure
 Triumph Street Triple S
 Yamaha MT-03
 Kawasaki Z400
 Triumph Street Triple S
 Yamaha MT-03