 Triumph Street Triple S - Service manual > Starter Drive Gears/Sprag Clutch
Removal
Note:
- The sprag clutch may be detached after first removing the
rider's seat and the battery (disconnect the negative (black) lead first).
The left hand lower fairing (Daytona 675 only) and the alternator must also be removed. Refer to the relevant sections for removal procedures.
1. Remove the rider's seat.
2. Disconnect the battery, negative (black) lead first.
3. Daytona 675 only: Remove the left hand lower fairing.
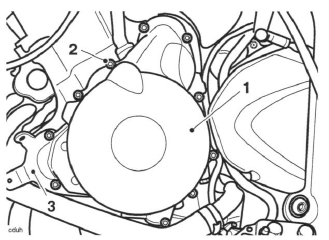
4. Release the bolts securing the left hand engine cover noting the position of the copper washer under the head of one of the upper bolts. Collect the solenoid/fairing bracket from under the front two bolts.
5. Remove the left hand engine cover and position aside.
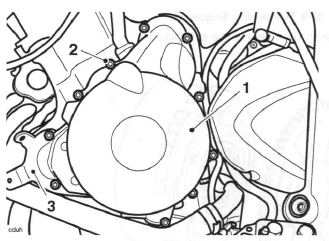
- Left hand engine cover
- Copper washer position
- Solenoid/fairing bracket
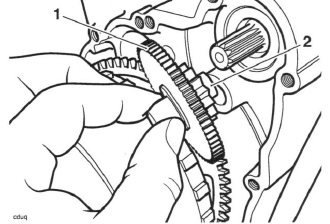
6. Withdraw the starter idler gear and shaft, noting the fitted position of the components.
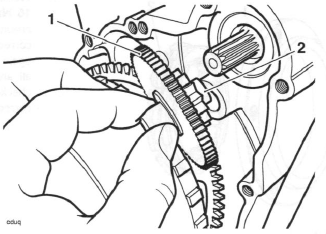
- Idler gear
- Idler shaft
7. Remove the alternator rotor.
8. Withdraw the starter drive gear from the sprag clutch.
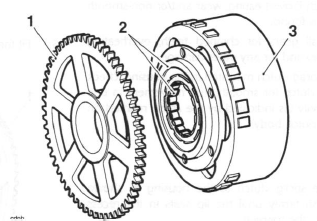
- Starter drive gear
- Sprag clutch/housing
- Alternator rotor
9. Remove and discard the fixings securing the sprag clutch housing to the alternator rotor. Withdraw the sprag clutch housing.
10. Remove the sprag clutch from the housing.
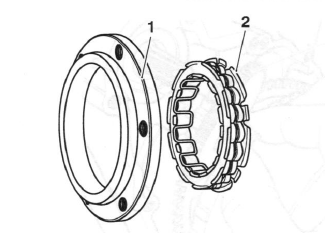
- Sprag clutch housing
- Sprag clutch assembly
Inspection
1. Check the sprag clutch bearings for overheating, wear and/or non-smooth operation. Replace the sprag clutch if overheating, wear and/or non-smooth operation is found.
2. Examine all gears for chipped teeth, overheating (going blue) and for any other damage.
3. With the sprag clutch mounted in the housing, check the sprag clutch for smooth, free movement in one direction only (as indicated by the arrow marked on the sprag clutch body).
Installation
1. Locate the sprag clutch to the housing as shown below. Push firmly until the lip seats in the recess provided in the housing.
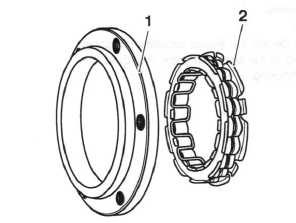
- Sprag clutch housing
- Sprag clutch assembly
2. Fit the housing to the alternator rotor.
3. Ensure that the housing is squarely seated and is not jammed on the rotor. Install new fixings.
4. Working in the sequence shown, tighten the bolts to 16 Nm. Once all six bolts have been tightened, go around again in sequence and recheck each bolt is correctly torqued, if any bolt moves, go around again. Repeatedly check the bolts in sequence until all are correctly torqued and do not move when checked, this will ensure the sprag clutch housing is correctly seated on the rotor.
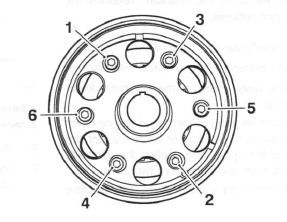
Bolt Tightening Sequence
5. Fit the starter drive gear to the sprag clutch.
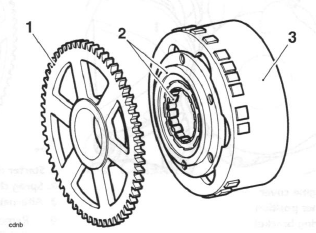
- Starter drive gear
- Sprag clutch housing
- Alternator rotor
6. Refit the alternator rotor.
7. Lubricate the idler gear shaft with a 50/50 solution of engine oil and molybdenum disulphide grease.
8. Fit the starter idler gear and shaft to the crankcase.
- Idler gear
- Idler shaft
9. Thoroughly clean the left hand engine cover.
10. Position a new gasket to the crankcase dowels then refit the left hand engine cover.
11. Ensure the bolt with the copper washer is correctly located. Refit the solenoid/fairing bracket to the front two bolts. Tighten the cover bolts to 9 Nm.
- Left hand engine cover
- Copper washer position
- Solenoid/fairing bracket
12. Daytona 675 only: Refit the left hand lower fairing.
13. Reconnect the battery, positive (red) lead first.
14. Refit the rider's seat.
See also:
 Triumph Street Triple S - Service manual > Output Shaft
Note: The numbers in brackets in the following text refer to the exploded view. Working from the opposite end to the drive sprocket, dismantle the output shaft as follows.
Triumph Street Triple S - Service manual > Lubrication
Exploded View - Sump Exploded View - Oil Pump/Water Pump, Gears and Heat Exchanger
 Benelli Imperiale 400
 BMW F900XR
 Honda CB500X
 KTM 390 Adventure
 Triumph Street Triple S
 Yamaha MT-03
 Kawasaki Z400
 Triumph Street Triple S
 Yamaha MT-03