 Yamaha MT-03 - Service manual > Starter clutch and A.C. Magneto

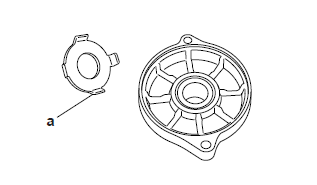
Removing the A.C. Magneto rotor
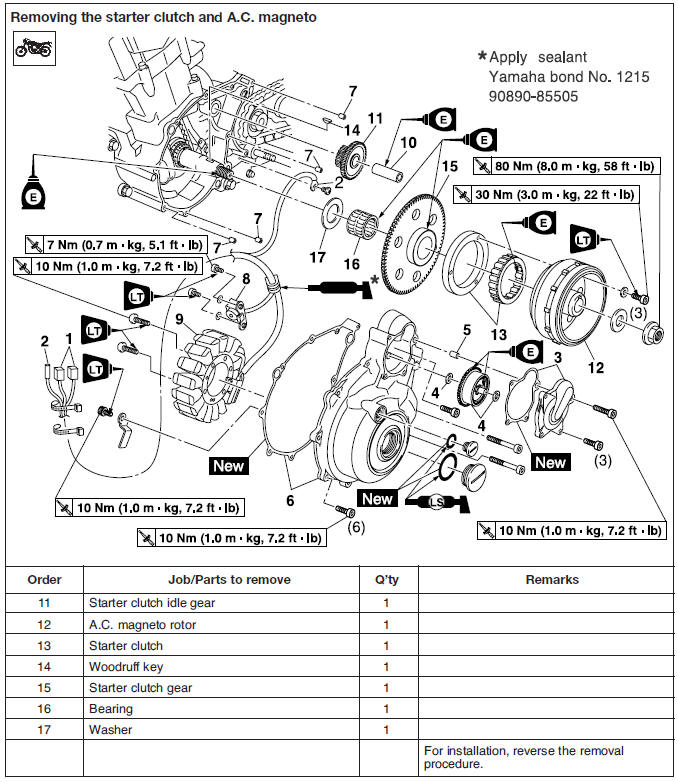
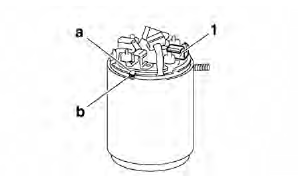
1. Remove:
- Torque limiter cover
CAUTION:
Do not remove the bearing "1".
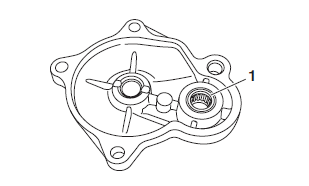
2. Remove:
- A.C. magneto cover
NOTE:
Loosen each bolt 1/4 of a turn at a time, in stages and in a crisscross pattern. After all of the bolts are fully loosened, remove them.
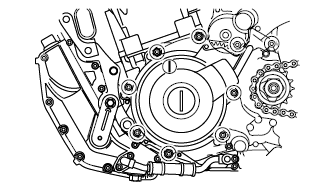
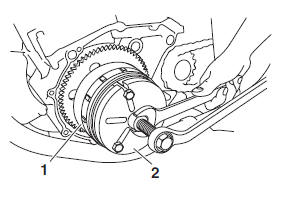
3. Remove:
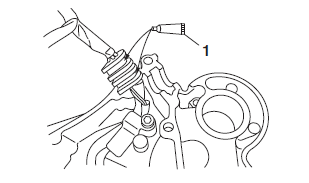
- A.C. magneto rotor nut "1"
- Washer
NOTE:
- While holding the A.C. magneto rotor "2" with the sheave holder "3", loosen the A.C. magneto rotor nut.
- Do not allow the sheave holder to touch the projection "a" on the A.C. magneto rotor.
 Sheave holder
90890-01701
Sheave holder
90890-01701
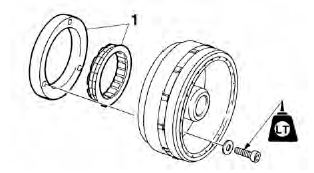
4. Remove:
- A.C. magneto rotor "1" (with the flywheel puller "2")
- Woodruff key
NOTE:
Use the rotor puller.
 Flywheel puller
90890-01362
Flywheel puller
90890-01362
Checking the stator coil and crankshaft Position sensor
1. Check:
- Stator coil
- Crankshaft position sensor
Damage → Replace the crankshaft position sensor/stator assembly.

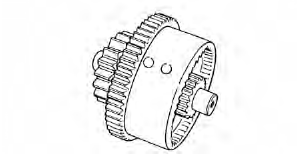
Checking the starter clutch
1. Check:
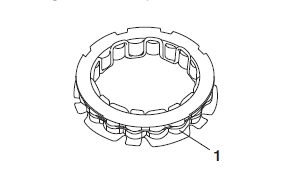
- Starter clutch rollers "1" Damage/wear → Replace.
2. Check:
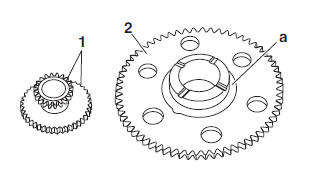
- Starter clutch idle gear "1"
- Starter clutch gear "2" Burrs/chips/roughness/wear → Replace the defective part(s).
3. Check:
- Starter clutch gear's contacting surfaces "a" Damage/pitting/wear → Replace the starter clutch gear.
4. Check:
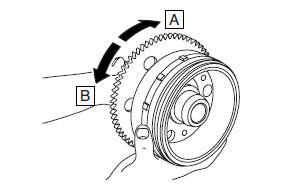
- Starter clutch operation
a. Install the starter clutch gear onto the starter clutch and hold the starter clutch.
b. When turning the starter clutch gear clock wise
 , it should turn freely, otherwise
the
starter clutch is faulty and must be replaced.
, it should turn freely, otherwise
the
starter clutch is faulty and must be replaced.
c. When turning the starter clutch gear counter clock wise
 , the starter clutch and the
starter clutch gear should engage, otherwise
the starter clutch is faulty and must be
replaced.
, the starter clutch and the
starter clutch gear should engage, otherwise
the starter clutch is faulty and must be
replaced.
Checking the torque limiter
1. Check:
- Torque limiter Damage/wear → Replace.
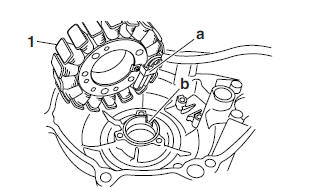
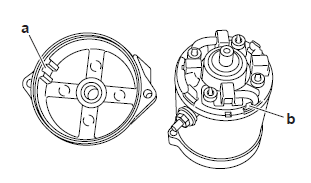
Installing the A.C. Magneto rotor
1. Install:
- Stator coil "1"
 Stator coil bolts
10 Nm (1.0 m*kg, 7.2 ft*lb)
LOCTITE
Stator coil bolts
10 Nm (1.0 m*kg, 7.2 ft*lb)
LOCTITE
- Crankshaft position sensor
 Crankshaft position sensor
bolts
7 Nm (0.7 m*kg, 5.1 ft*lb)
LOCTITE
Crankshaft position sensor
bolts
7 Nm (0.7 m*kg, 5.1 ft*lb)
LOCTITE
NOTE:
Align the projection "a" on the stator coil with the slot "b" in the A.C. magneto cover.
2. Apply:
- Yamaha bond No. 1215 "1" (into the slits)
 Yamaha bond No. 1215
90890-85505
Yamaha bond No. 1215
90890-85505
3. Install:
- Starter clutch "1" (to A.C. magneto rotor)
- Starter clutch bolts
 Starter clutch bolts
30 Nm (3.0 m*kg, 22 ft*lb)
LOCTITE
Starter clutch bolts
30 Nm (3.0 m*kg, 22 ft*lb)
LOCTITE
4. Install:
- Woodruff key
- A.C. magneto rotor
- Washer
- A.C. magneto rotor nut
NOTE:
- Clean the tapered portion of the crankshaft and the A.C. magneto rotor hub.
- When installing the A.C. magneto rotor, make sure the woodruff key is properly seated in the keyway of the crankshaft.
- Lubricate crankshaft end threads with engine oil.
5. Tighten:
- A.C. magneto rotor nut "1"
 A.C. magneto rotor nut
80 Nm (8.0 m*kg, 58 ft*lb)
A.C. magneto rotor nut
80 Nm (8.0 m*kg, 58 ft*lb)
NOTE:
- While holding the A.C. magneto rotor "2" with the sheave holder "3", tighten the A.C. magneto rotor nut.
- Do not allow the sheave holder to touch the projection "a" on the A.C. magneto rotor.
 Sheave holder
90890-01701
Sheave holder
90890-01701

6. Install:
- Gasket
- A.C. magneto cover
 A.C. magneto cover bolts
10 Nm (1.0 m*kg, 7.2 ft*lb)
LOCTITE
A.C. magneto cover bolts
10 Nm (1.0 m*kg, 7.2 ft*lb)
LOCTITE
NOTE:
Tighten the A.C. magneto cover bolts in stages, using a crisscross pattern.
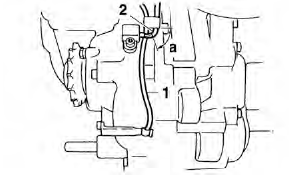
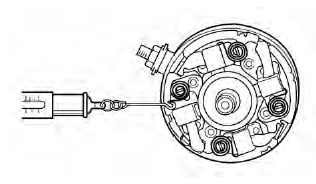
7. Install:
- Neutral switch lead "1"
NOTE:
Route the neutral switch lead so that it is taut and route it under the speed sensor lead "2" as shown.
a. 5 mm or more
Electric starter
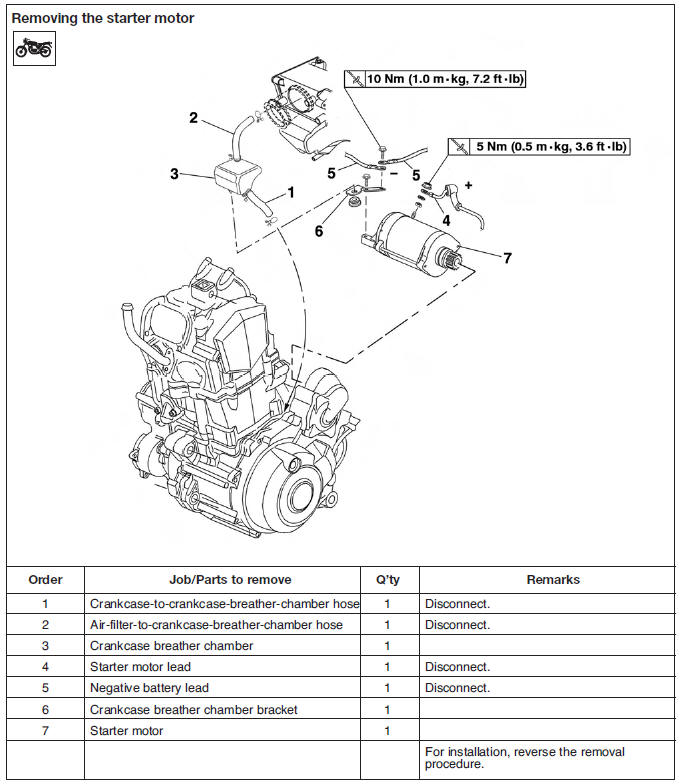
Checking the starter motor
1. Check:
- Commutator
Dirt → Clean with 600 grit sandpaper.
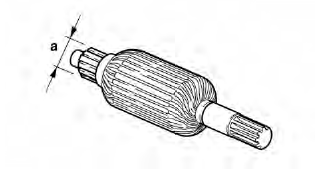
2. Measure:
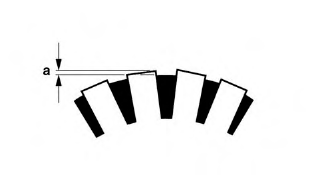
- Commutator diameter "a"
Out of specification → Replace the starter motor.
 Limit
27.0 mm (1.06 in)
Limit
27.0 mm (1.06 in)
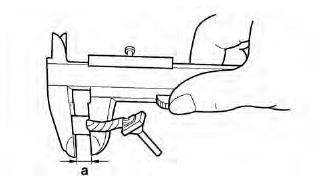
3. Measure:
- Mica undercut "a"
Out of specification → Scrape the mica to the proper measurement with a hacksaw blade that has been grounded to fit the commutator.
 Mica undercut (depth)
0.70 mm (0.028 in)
Mica undercut (depth)
0.70 mm (0.028 in)
NOTE:
The mica of the commutator must be undercut to ensure proper operation of the commutator.
4. Measure:
- Armature assembly resistances (commutator and insulation) Out of specification → Replace the starter motor.
a. Measure the armature assembly resistances with the pocket tester.
 Pocket tester
90890-03112
Pocket tester
90890-03112
 Armature coil
Commutator resistance "1"
0.025-0.035 Ω at 20ºC (68ºF)
Armature coil
Commutator resistance "1"
0.025-0.035 Ω at 20ºC (68ºF)
Insulation resistance "2" Above 1 M at 20ºC (68ºF)
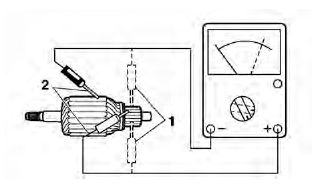
b. If any resistance is out of specification, replace the starter motor.
5. Measure:
- Brush length "a"
Out of specification → Replace the brushes as a set.
 Limit
5.00 mm (0.20 in)
Limit
5.00 mm (0.20 in)
6. Measure:
- Brush spring force
Out of specification → Replace the brush springs as a set.
 Brush spring force
7.65-10.01 N (27.51-36.01 oz)
(780-1,021 gf)
Brush spring force
7.65-10.01 N (27.51-36.01 oz)
(780-1,021 gf)
7. Check:
- Gear teeth.
Damage/wear → Replace the gear.
8. Check:
- Bearing
- Oil seal
Damage/wear →Replace the defective part(s).
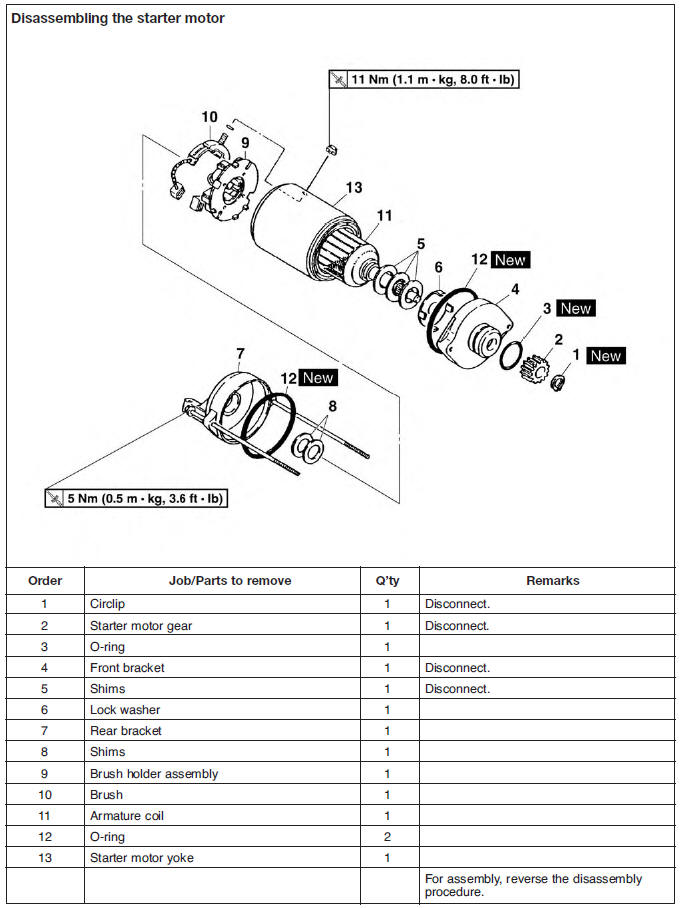
Assembling the starter motor
1. Install:
- Brush seat "1"
NOTE:
Align the tab "a" on the brush seat with the slot "b" in the starter motor yoke.
2. Install:
- Lock washer
NOTE:
Align the tabs "a" on the lock washer with the groves in the front bracket.
3. Install:
- Rear bracket
NOTE:
Align the slot "a" in the rear bracket with the tab "b" on the brush seat.
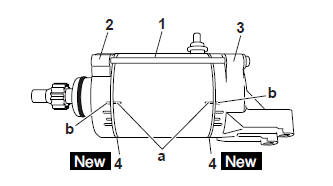
4. Install
- Starter motor yoke "1"
- Front bracket "2"
- Rear bracket "3"
- O-rings "4"
- Bolts
 Starter motor bracket bolts
5 Nm (0.5 m*kg, 3.6 ft*lb)
Starter motor bracket bolts
5 Nm (0.5 m*kg, 3.6 ft*lb)
NOTE:
Align the alignment marks "a" on the starter motor yoke with the alignment marks "b" on the front and rear brackets.
5. Install:
- Starter motor gear
- Circlip

 Benelli Imperiale 400
 BMW F900XR
 Honda CB500X
 KTM 390 Adventure
 Triumph Street Triple S
 Yamaha MT-03
 Kawasaki Z400
 Triumph Street Triple S
 Yamaha MT-03