 Triumph Street Triple S - Service manual > Rear Light
Rear Light - Daytona 675
Removal
Note:
- The rear light is a sealed for life unit and must be replaced in the event of a failure.
1. Remove the seats.
2. Disconnect the battery, negative (black) lead first.
3. Remove the rear panel.
4. Release the fixings securing the light unit to the rear panel.
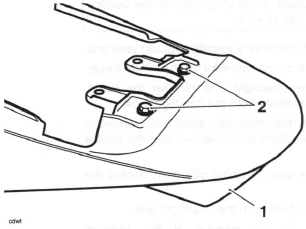
- Rear light unit
- Rear light fixings
5. Remove the rear light.
Installation
1. Installation is the reverse of the removal procedure.
Note:
- Tighten the rear light to rear panel fixings to 4 Nm.
- Reconnect the battery, positive (red) lead first.
Rear Light - Street Triple and Street Triple R
Removal
Note:
- The rear light is a sealed for life unit and must be replaced in the event of a failure.
1. Remove the seat.
2. Disconnect the battery, negative (black) lead first.
3. Remove the rear panels.
4. Loosen the rear light finisher fixing, located below the rear mudguard.
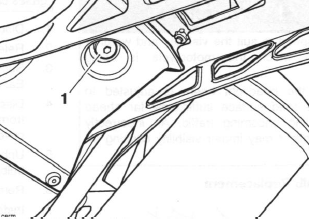
- Rear light finisher fixing
5. Remove the rear light finisher.
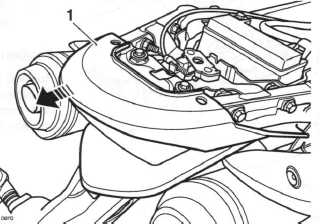
- Rear light finisher
6. Release the fixings securing the rear light unit to the rear subframe.
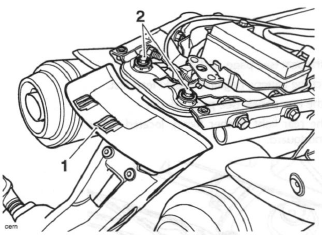
- Rear light unit
- Rear light fixings
7. Disconnect the electrical connector and remove the rear light.
Installation
1. Installation is the reverse of the removal procedure
Note:
- Tighten the rear light to rear subframe fixings to 4 Nm.
- Tighten the rear light finisher fixing to 3 Nm.
- Reconnect the battery, positive (red) lead first.
See also:
 Triumph Street Triple S - Service manual > Headlights
Headlights - Daytona 675 Headlight Adjustment Note: Each headlight can be adjusted by means of vertical and horizontal adjustment screws located on the rear of each headlight. Horizontal adjustment screw (left hand) Vertical adjustment screw (left hand) Horizontal adjustment screw (right hand) Vertical adjustment screw (right hand) Pivot screws (DO NOT adjust these screws)
Triumph Street Triple S - Service manual > Direction Indicators
Bulb Replacement Daytona 675 up to VIN 381274 Direction indicator lens Screw
 Benelli Imperiale 400
 BMW F900XR
 Honda CB500X
 KTM 390 Adventure
 Triumph Street Triple S
 Yamaha MT-03
 Kawasaki Z400
 Triumph Street Triple S
 Yamaha MT-03