 Triumph Street Triple S - Service manual > Headlights
Headlights - Daytona 675
Headlight Adjustment
Note:
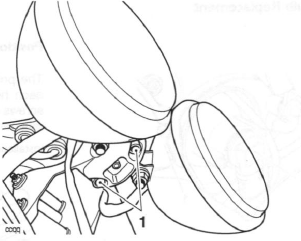
- Each headlight can be adjusted by means of vertical and horizontal adjustment screws located on the rear of each headlight.
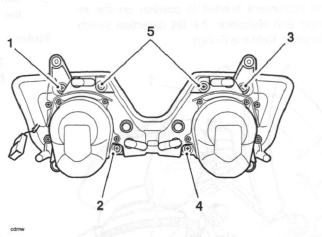
- Horizontal adjustment screw (left hand)
- Vertical adjustment screw (left hand)
- Horizontal adjustment screw (right hand)
- Vertical adjustment screw (right hand)
- Pivot screws (DO NOT adjust these screws)
1. Switch the headlight dipped beam on.
Caution: Do not adjust the pivot screws as this could cause the headlight reflector to become detached from the pivot screw, leading to irreparable damage to the headlight.
2. Turn the vertical adjustment screws on each headlight clockwise to raise the beam or anticlockwise to lower the beam.
3. On the right hand headlight turn the horizontal adjustment screw clockwise to move the beam to the left or anti-clockwise to move the beam to the right.
4. On the left hand headlight turn the horizontal adjustment screw clockwise to move the beam to the right or anti-clockwise to move the beam to the left.
5. Switch the headlights off when both beam settings are satisfactorily set.
Warning: Adjust road speed to suit the visibility and weather conditions in which the motorcycle is being operated.
Ensure that the beam is adjusted to illuminate the road surface sufficiently far ahead without dazzling oncoming traffic. An incorrectly adjusted headlight may impair visibility causing an accident.
Headlight Bulb Replacement
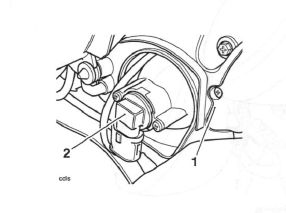
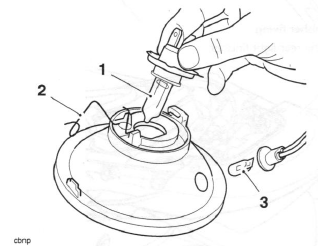
- Headlight unit
- Bulb retainer
Each headlight bulb can be replaced as follows:
Warning: The bulb becomes hot during use. Always allow sufficient time for the bulb to cool before handling.
Avoid touching the glass part of the bulb. If the glass is touched or gets dirty, clean with alcohol before re-use.
Warning: Do not reconnect the battery until the assembly process has been completed. Premature battery reconnection could result in ignition of the battery gases causing risk of injury.
1. Remove the rider's seat.
2. Disconnect the battery, negative (black) lead first.
3. Remove the fairing infill panel.
4. Remove the four screws and remove the bulb cover from the bulb to be replaced.
5. Disconnect the multi-plug from the bulb retainer.
6. Detach the bulb retainer from the headlight assembly by rotating it anti-clockwise.
7. Remove the bulb from the bulb retainer.
Installation
1. Installation is the reverse of removal, noting the following:
Note:
- When reconnecting the battery, connect the positive (red) lead first.
Position Lamp Bulb Replacement
The position lamps are fitted to the left and right of each headlight. To replace a bulb, remove the two screws and remove the bulb cover, detach the rubber retainer from the headlight and pull out the bulb.
Installation is the reverse of the removal procedure.
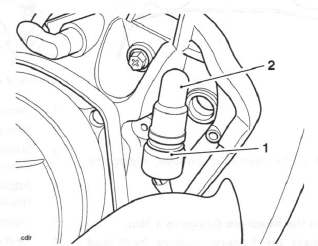
- Bulb holder
- Position lamp bulb
Headlight Assembly - Daytona 675
Removal
1. Remove the rider's seat.
2. Disconnect the battery, negative (black) lead first.
3. Remove the cockpit.
4. Release the four fixings securing the headlight to the cockpit. Remove the headlight.
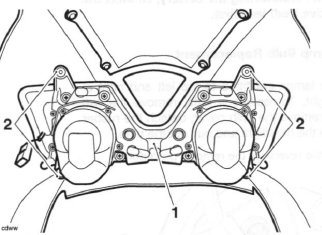
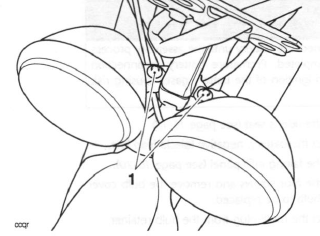
- Headlight
- Fixings
Installation
1. Installation is the reverse of removal, noting the following:
Note:
- Tighten the headlight fixings to 3 Nm.
- Reconnect the battery, positive (red) lead first.
Headlights - Street Triple and Street Triple R
Headlight Adjustment
Note:
- The vertical beams of the left hand and right hand headlights can only be adjusted together. Independent adjustment is not possible.
- Vertical adjuster fixings
1. Switch the headlight dipped beam on.
2. Remove the adjuster cover.
3. Slacken the clamp bolt sufficient to allow restricted movement of the headlights.
4. Adjust the position of the headlights to give the required beam setting.
5. Tighten the clamp bolt to 30 Nm.
6. Re-check the headlight beam settings.
7. Switch the headlights off when both beam settings are satisfactorily set.
8. Refit the adjuster cover.
- Horizontal beam adjusters
Note:
The horizontal beams of both headlights can be adjusted individually. The same procedure is used to adjust either headlight.
9. Switch the headlight dipped beam on.
10. Slacken the headlight bowl fixing.
11. Adjust the horizontal position of the headlight to give the required beam setting.
12. Tighten the clamp bolt to 15 Nm.
13. Repeat for the second headlight.
14. Re-check the headlight beam settings.
15. Switch the headlights off when both beam settings are satisfactorily set.
Warning: Adjust road speed to suit the visibility and weather conditions in which the motorcycle is being operated.
Ensure that the headlight beam is adjusted to illuminate the road surface sufficiently far ahead without dazzling oncoming traffic. An incorrectly adjusted headlight may impair visibility causing an accident.
Headlight Bulb Replacement
- Headlight bulb
- Bulb clip
- Position lamp
Each headlight bulb can be replaced as follows:
Warning: The bulb becomes hot during use. Always allow sufficient time for the bulb to cool before handling.
Avoid touching the glass part of the bulb. If the glass is touched or gets dirty, clean with alcohol before reuse.
Warning: Do not reconnect the battery until the assembly process has been completed. Premature battery reconnection could result in ignition of the battery gases causing risk of injury.
1. Disconnect the battery, negative (black) lead first.
2. Release the clamp screw for the headlight bezel.
3. Support the headlight and remove the bezel.
Ease the headlight from the headlight bowl.
4. Disconnect the multi-pin electrical connector from the headlight bulb, then remove the rubber cover.
5. Unhook the wire retaining clip from behind the bulb.
6. Remove the bulb from the headlight unit.
7. Installation is the reverse of the removal procedure. Tighten the clamp screw to 4 Nm.
Note:
- When reconnecting the battery, connect the positive (red) lead first.
Position Lamp Bulb Replacement
Position lamp bulbs are fitted to both headlight units.
To replace a position light bulb, remove the headlight unit from the headlight bowl to gain access for position light bulb replacement.
See also:
 Triumph Street Triple S - Service manual > Instrument Pack
Instrument Pack - Daytona 675 Removal 1. Remove the rider's seat. 2. Disconnect the battery, negative (black) lead first.
Triumph Street Triple S - Service manual > Rear Light
Rear Light - Daytona 675 Removal Note: The rear light is a sealed for life unit and must be replaced in the event of a failure.
 Benelli Imperiale 400
 BMW F900XR
 Honda CB500X
 KTM 390 Adventure
 Triumph Street Triple S
 Yamaha MT-03
 Kawasaki Z400
 Triumph Street Triple S
 Yamaha MT-03