 Triumph Street Triple S - Service manual > Direction Indicators
Bulb Replacement
Daytona 675 up to VIN 381274
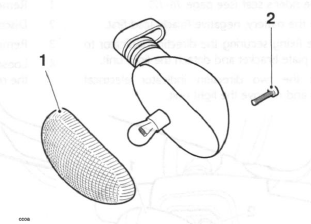
- Direction indicator lens
- Screw
The lens on each direction indicator is held in place by a securing screw located in the body of the light.
Release the screw and remove the amber lens to gain access to the bulb for replacement.
Daytona 675 from VIN 381275, Street Triple and Street Triple R all VINs
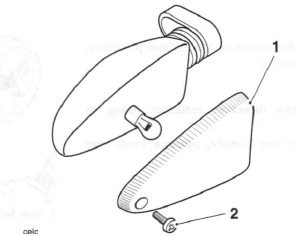
- Direction indicator lens
- Screw
The lens on each direction indicator is held in place by a securing screw located in the lens of the light.
Release the screw and remove the lens to gain access to the bulb for replacement.
Rear Direction Indicator - Daytona 675
Removal
1. Remove the rider's seat.
2. Disconnect the battery, negative (black) lead first.
3. Release the fixing securing the direction indicator to the licence plate bracket and detach the light unit.
4. Disconnect the two direction indicator electrical connectors and remove the light unit.
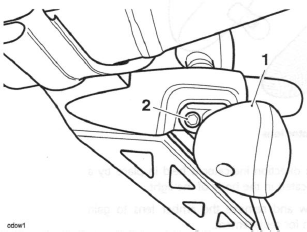
- Direction indicator (left hand shown)
- Fixing
Installation
1. Installation is the reverse of the removal procedure, noting the following.
Note:
- Tighten the direction indicator fixing to 3 Nm.
- Reconnect the battery, positive (red) lead first.
Rear Direction Indicator - Street Triple and Street Triple R
Removal
1. Remove the seat.
2. Disconnect the battery, negative (black) lead first.
3. Remove the rear panels.
4. Loosen the rear light finisher fixing, located below the rear mudguard.
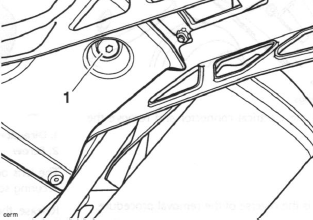
- Rear light finisher fixing
5. Remove the rear light finisher.
- Rear light finisher
6. Release the fixings securing the light unit to the rear subframe.
- Rear light unit
- Rear light fixings
7. Disconnect the electrical connector and remove the rear light.
8. Remove and discard the two fixings securing the indicator mount panel.
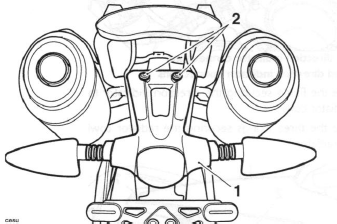
- Indicator mount panel
- Fixings
9. Release the fixings securing the direction indicators to the licence plate bracket and detach the direction indicators together with the indicator mount panel.
10. Disconnect the direction indicator and licence plate light electrical connectors.
11. Noting the routing of the indicator and licence plate harnesses, remove the direction indicators from the indicator mount panel.
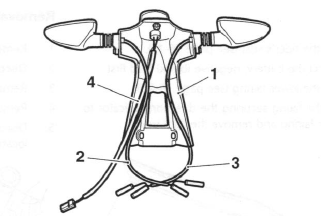
- Indicator mount panel
- Right hand direction indicator harness
- Left hand direction indicator harness
- Licence plate light harness
Installation
1. Installation is the reverse of the removal procedure, noting the following.
Note:
- Ensure the direction indicator and licence plate harnesses are routed as noted on removal.
- Tighten the direction indicator fixings to 3 Nm.
- Fit new fixings for the indicator mount panel and tighten to 4 Nm.
- Tighten the rear light to rear subframe fixings to 4 Nm.
- Tighten the rear light finisher fixing to 3 Nm.
- Reconnect the battery, positive (red) lead first.
Front Direction Indicator - Daytona 675
Removal
1. Remove the rider's seat.
2. Disconnect the battery, negative (black) lead first.
3. Remove the lower fairing.
4. Release the fixing securing the direction indicator to the lower fairing and remove the light unit.
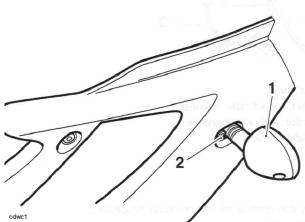
- Direction indicator (right hand shown)
- Fixing
Installation
1. Installation is the reverse of the removal procedure, noting the following.
Note:
- Tighten the direction indicator fixing to 3 Nm.
- Reconnect the battery, positive (red) lead first.
Front Direction Indicator- Street Triple and Street Triple R
Removal
1. Remove the rider's seat.
2. Disconnect the battery, negative (black) lead first.
3. Remove the fuel tank.
4. Remove the airbox.
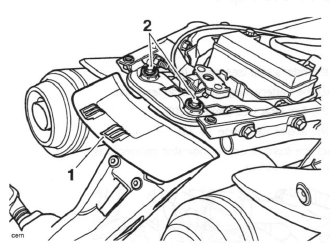
5. Disconnect the front direction indicator connections, located under the airbox.
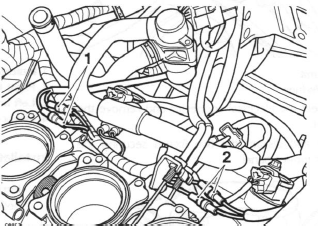
- Left hand direction indicator connections
- Right hand direction indicator connections
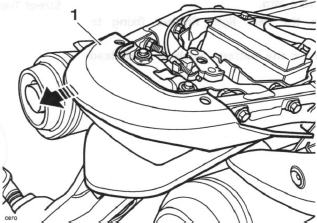
6. Release the fixing securing the direction indicator to the radiator cowl.
7. Release the three fixings securing the radiator cowl to the radiator.
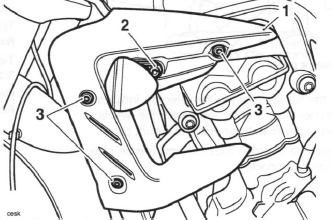
- Radiator cowl
- Direction indicator fixing
- Fixings
8. Remove the radiator cowl and, noting the routing of the direction indicator harness, carefully feed the harness through the radiator bracket as the cowl is removed.
9. Remove the direction indicator from the radiator cowl.
Installation
1. Pass the direction indicator harness through the radiator cowl and position the direction indicator to the radiator cowl.
2. Pass the direction indicator harness through the radiator bracket and align the radiator cowl to its fixing holes.
Note:
- Ensure the direction indicator harness passes through the hole in the radiator bracket and is not trapped by the radiator cowl as it is installed.
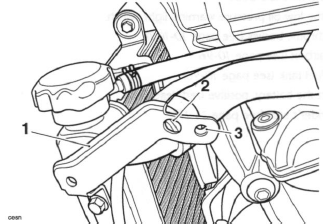
- Radiator bracket
- Direction indicator harness hole
- Direction indicator fixing hole
3. Route the direction indicator harness inside the frame rail to a position above the camshaft cover.
Reconnect the electrical connectors to the main harness.
4. Install the three radiator cowl fixings and the direction indicator fixing and tighten as follows:
- Tighten the radiator cowl fixings to 5 Nm.
- Tighten the direction indicator fixing to 4 Nm.
5. Refit the airbox.
6. Refit the fuel tank.
7. Reconnect the battery, positive (red) lead first.
8. Refit the rider's seat.
Licence Plate Light
Bulb Replacement
1. Release the screw and detach the licence plate light from the licence plate bracket.
2. Carefully remove the rubber bulb holder from the back of the light unit and remove the bulb.
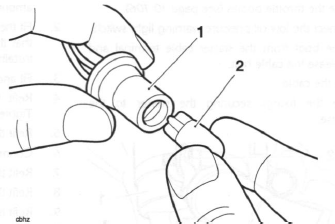
- Bulb holder
- Bulb
3. Installation is the reverse of the removal procedure.
Starter Motor
Removal
1. Remove the rider's seat.
2. Disconnect the battery, negative (black) lead first.
3. Remove the fuel tank.
4. Remove the airbox.
5. Remove the throttle bodies.
6. Disconnect the low oil pressure warning light switch.
7. Ease the boot from the starter cable terminal and then release the cable bolt.
8. Detach the cable.
9. Release the fixings securing the starter to the crankcase.
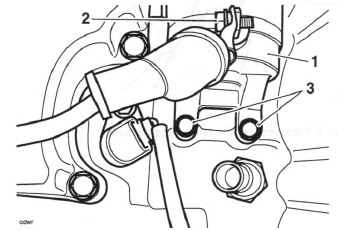
- Starter motor
- Starter cable fixing
- Fixings
10. Ease the starter motor from the upper crankcase.
Inspection
1. Ensure the starter turns freely and without binding.
2. Check the starter O-ring for damage and deterioration. Replace as necessary.
Installation
1. Lubricate the starter motor O-ring with a small amount of petroleum jelly.
2. Fit the starter motor to the upper crankcase ensuring that the O-ring does not become damaged during installation.
3. Fit and tighten the starter bolts to 10 Nm.
4. Refit the starter cable and secure with the bolt. Tighten to 3 Nm.
5. Refit the starter cable boot.
6. Connect the low oil pressure warning light switch.
7. Refit the throttle bodies.
8. Refit the airbox.
9. Refit the fuel tank.
10. Reconnect the battery, positive (red) lead first.
11. Refit the rider's seat.
See also:
 Triumph Street Triple S - Service manual > Rear Light
Rear Light - Daytona 675 Removal Note: The rear light is a sealed for life unit and must be replaced in the event of a failure.
Triumph Street Triple S - Service manual > Alternator
Removal 1. Remove the rider's seat. 2. Daytona 675 only: Remove the left hand lower fairing. 3. Disconnect the battery, negative (black) lead first.
 Benelli Imperiale 400
 BMW F900XR
 Honda CB500X
 KTM 390 Adventure
 Triumph Street Triple S
 Yamaha MT-03
 Kawasaki Z400
 Triumph Street Triple S
 Yamaha MT-03