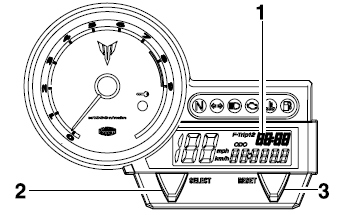
 Yamaha MT-03 - Owner's Manual > Multi-function meter unit
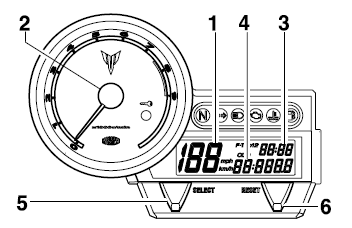
- Speedometer
- Tachometer
- Clock
- Odometer/Tripmeters/Fuel reserve tripmeter
- "SELECT" button
- "RESET" button
WARNING
Be sure to stop the vehicle before making any setting changes to the multi-function meter unit.
The multi-function meter unit is equipped with the following:
- speedometer (which shows the riding speed)
- a tachometer (which shows engine speed)
- an odometer (which shows the total distance traveled)
- two tripmeters (which show the distance traveled since they were last set to zero)
- a fuel reserve tripmeter (which shows the distance traveled since the fuel level warning light came on)
- a clock
- a self-diagnosis device
- an indicator lights brightness control mode
To switch the speedometer and odometer/tripmeter displays between kilometers and miles, push the "SELECT" and "RESET" buttons together and turn the key to "ON". When the digits start flashing on the display, push the "SELECT" button to choose kilometers or miles.
NOTE: Be sure to turn the key to "ON" before using the "SELECT" and "RESET" buttons.
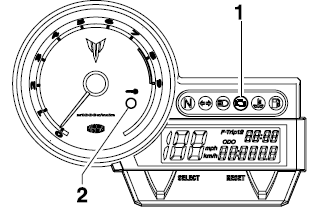
Tachometer
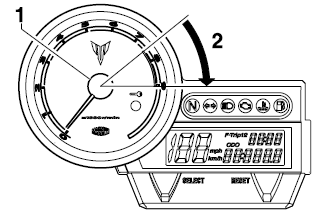
- Tachometer
- Red zone
The electric tachometer allows the rider to monitor the engine speed and keep it within the ideal power range.
CAUTION: Do not operate the engine in the tachometer red zone.
Red zone: 7,500 r/min and above.
Odometer, tripmeter modes
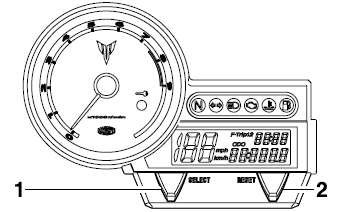
- "SELECT" button
- "RESET" button
Pushing the "SELECT" button switches the display between the odometer mode "ODO" and the tripmeter modes "TRIP 1" and "TRIP 2" in the following order:
ODO → TRIP 1 → TRIP 2 → ODO
If the fuel level warning light comes on, the odometer display will automatically change to the fuel reserve tripmeter mode "F-TRIP" and start counting the distance traveled from that point. In that case, push the "SELECT" button to switch the display between the various tripmeter, odometer modes in the following order:
F-TRIP → ODO → TRIP 1 → TRIP 2 → F-TRIP
To reset a tripmeter, select it by pushing the "SELECT" button, and then push the "RESET" button for at least four seconds. If you do not reset the fuel reserve tripmeter manually, it will reset itself automatically and the display will return to the prior mode after refueling and traveling 5 km (3 mi).
Clock mode
- Clock
- "SELECT" button
- "RESET" button
Turn the key to "ON".
To set the clock
1. Push the "SELECT" button for at least two seconds.
2. When the hour digits start flashing, push the "RESET" button to set the hours.
3. Push the "SELECT" button, and the minute digits will start flashing.
4. Push the "RESET" button to set the minutes.
5. Push the "SELECT" button, and then release it to start the clock.
Self-diagnosis devices
- Engine trouble warning light "
 "
" - Immobilizer system indicator light "
 "
"
This model is equipped with a self-diagnosis device for various electrical circuits.
If any of those circuits are defective, the engine trouble warning light will start flashing. If this occurs, have a Yamaha dealer check the vehicle.
This model is also equipped with a self-diagnosis device for the immobilizer system.
Turn the key to "ON". If any of the immobilizer system circuits are defective, the immobilizer system indicator light will flash, and it will indicate an error code.
If this occurs, have a Yamaha dealer check the vehicle. However, if the indicator light slowly flashes five times, and then quickly flashes two times repeatedly, this error could be caused by signal interference. If this occurs, try the following.
1. Use the code re-registering key to start the engine.
NOTE: Make sure there are no other immobilizer keys close to the main switch, and do not keep more than one immobilizer key on the same key ring! Immobilizer system keys may cause signal interference, which may prevent the engine from starting.
2. If the engine starts, turn it off and try starting the engine with the standard keys.
3. If one or both of the standard keys do not start the engine, take the vehicle, the code re-registering key and both standard keys to a Yamaha dealer and have the standard keys re-registered.
If the immobilizer system indicator light flashes any error codes, have a Yamaha dealer check the vehicle.
CAUTION: If the display indicates an error code, the vehicle should be checked as soon as possible in order to avoid engine damage.
See also:
 Yamaha MT-03 - Owner's Manual > Indicator and warning lights
Immobilizer system indicator light "" Neutral indicator light "" Turn signal indicator light "" High beam indicator light "" Engine trouble warning light "" Coolant temperature warning light "" Fuel level warning light ""
Yamaha MT-03 - Owner's Manual > Indicator lights brightness control mode
Indicator lights brightness: This function allows you to adjust the brightness of the indicator lights to suit the outside lighting conditions. To adjust the brightness of the indicator lights
 Benelli Imperiale 400
 BMW F900XR
 Honda CB500X
 KTM 390 Adventure
 Triumph Street Triple S
 Yamaha MT-03
 Kawasaki Z400
 Triumph Street Triple S
 Yamaha MT-03