 Triumph Street Triple S - Owner's Manual > Main Menu
To access the Main menu:
- The motorcycle must be stationary with the ignition switched on.
- Press the HOME button on the right handlebar switch housing.
- Scroll the Main menu by pushing the joystick down/up until the required option is selected and then press the joystick center to confirm.
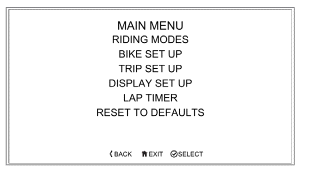
Main Menu Screen
The Main menu allows access to the following options:
Riding Modes
This menu allows configuration of the riding modes.
Bike Set Up
This menu allows configuration of the different features of the motorcycle.
Trip Set Up
This menu allows configuration of Trip 1 and Trip 2.
Display Set Up
This menu allows configuration of the display options.
Lap Timer
This menu allows configuration of the lap timer and the viewing of lap timer data.
Reset to Defaults
This menu allows all instrument settings to be returned to the default setting.
Riding Modes
To access the Riding Modes menu:
- From the MAIN MENU, push the joystick down and select RIDING MODES.
- Press the joystick center to confirm.
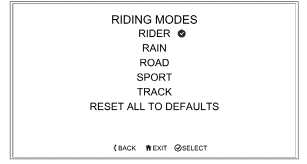
- Scroll down/up using the joystick to select the required riding mode.
Press the joystick center to confirm.
- The relevant setting options for the selected riding mode are now shown.
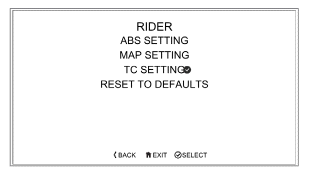
To change a setting, scroll down/up using the joystick until the required setting option is highlighted and press the joystick center to select.
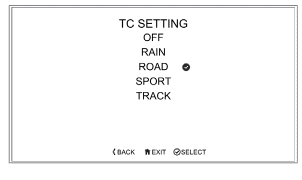
Riding Mode Configuration
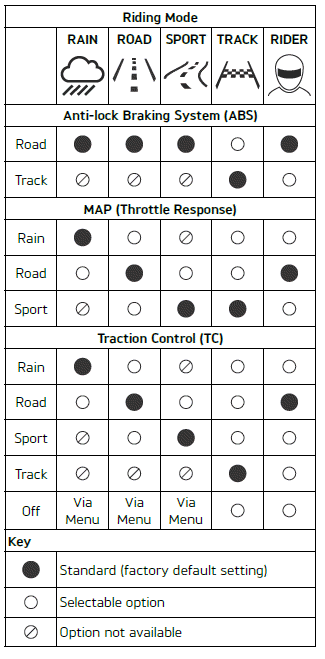
Refer to the following table for the ABS, MAP and TC options available for each riding mode.
Bike Set Up Menu
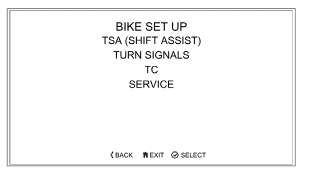
The Bike Set Up menu allows configuration of the different features of the motorcycle.
To access the Bike Set Up menu:
- From the MAIN MENU, push the joystick down and select BIKE SET UP.
- Press the joystick center to confirm.
Bike Set Up - TSA (Shift Assist) (if equipped)
Triumph Shift Assist (TSA) triggers a momentary engine torque change to allow gears to engage, without closure of the throttle or operation of the clutch. This feature works for both up-shifts and down-shifts of gear.
The clutch must be used for stopping and pulling away.
TSA will not operate if the clutch is applied or if an up-shift is attempted by mistake when in 6th gear.
It is necessary to use a positive pedal force to make sure there is a smooth gear shift.
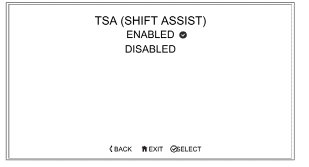
To enable/disable TSA:
- From the Bike Set Up menu, push the joystick down to select TSA (SHIFT ASSIST) and press the joystick to confirm.
- Push the joystick down/up to scroll between ENABLED and DISABLED.
- Press the joystick center to confirm the required selection.
- The display will then return to the Bike Set Up menu.
For more information on Triumph Shift Assist (TSA).
Bike Set Up - Turn Signals
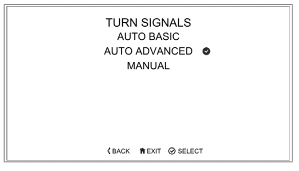
The turn signals can be set to Auto Basic, Auto Advanced or Manual mode.
Selecting a Turn Signals Mode
To select the required turn signals mode:
- From the Bike Set Up menu, push the joystick down to select TURN SIGNALS and press the joystick center to confirm.
- Push the joystick down/up to scroll between AUTO BASIC, AUTO ADVANCED
and MANUAL.
- Auto Basic - The self-canceling function is on. The turn signals will activate for eight seconds and an additional 71 yards (65 meters).
- Auto Advanced - The self-canceling function is on. A short press activates the turn signals for three flashes. A longer press activates the turn signals for eight seconds and an additional 71 yards (65 meters).
- Manual - The self-canceling function is off. The turn signals must be manually canceled using the turn signal switch.
- Press the joystick center to confirm the required selection.
- The display will then return to the Bike Set Up menu.
Bike Set Up - Traction Control (TC)
The Traction Control (TC) system can be temporarily disabled. The Traction Control (TC) system cannot be permanently disabled, it will be automatically enabled when the ignition is turned off and then on again.
To disable or enable the TC system:
- From the BIKE SET UP menu, press the joystick center to select TC.
- Push the joystick down/up to scroll between ENABLED and DISABLED.
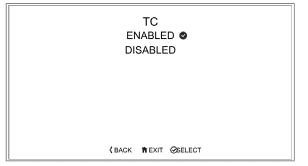
- Press the joystick center to select the required option.
- Once selected the display will return to the BIKE SET UP display.
Bike Set Up - Service
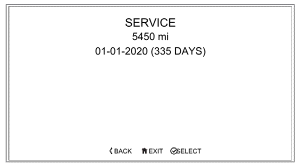
The service interval is set to a distance and/or time period.
To review the service interval:
- From the BIKE SET UP menu, push the joystick down to select SERVICE.
- Press the joystick center to display the SERVICE information.
Trip Set Up
This menu allows the configuration of the trip meters.
To access the Trip Set Up menu:
- From the MAIN MENU, push the joystick down and select TRIP SET UP.
- Press the joystick center to confirm.
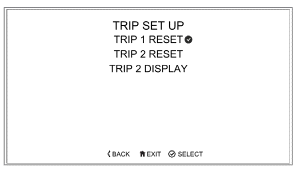
Selecting TRIP 1 RESET or TRIP 2 RESET allows the relevant trip meter to be configured manually or automatically.
The set up procedure is the same for both trip meters.
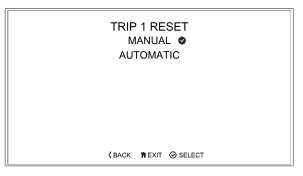
Manual reset will only reset the selected trip meter when the rider chooses to do so. Automatic reset will reset each trip meter after the ignition has been switched off for a set time. Trip meter 2 can be enabled or disabled.
Trip Set Up - Manual Reset
To set the trip computer to reset manually:
- From the TRIP SETUP menu, push the joystick down and then press the joystick center to select TRIP 1 RESET or TRIP 2 RESET.
- Push the joystick center to select MANUAL.
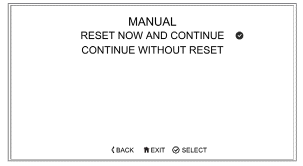
There are two options:
- RESET NOW AND CONTINUE - Resets all trip meter data in the relevant trip meter.
- CONTINUE WITHOUT RESET - Any trip meter data in the relevant trip meter will not be reset.
Trip Set Up - Automatic Reset
To set the trip computer to automatically reset:
- From the TRIP SETUP menu, push the joystick down/up and then press the joystick center to select TRIP 1 RESET or TRIP 2 RESET.
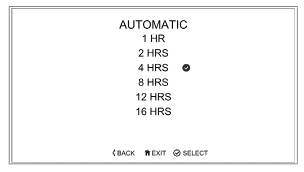
- Push the joystick down/up to select AUTOMATIC and then press the joystick center to confirm.
- Using the joystick down/up, choose the timer setting and press the joystick center to confirm the required time limit.
- The required time limit is then stored in the trip memory. A tick is shown to indicate the selected option.
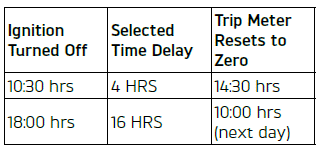
- When the ignition is turned off, the trip meter is set to zero when the time period has elapsed.
The following table shows two examples of the automatic trip reset functionality.
Trip 2 Enable/Disable
Trip 2 meter can be enabled or disabled.
If trip 2 meter is disabled, it will no longer be shown in the information tray.
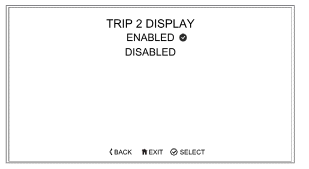
To enable or disable the Trip 2 meter:
- From the TRIP SET UP menu, push the joystick down/up to scroll to the TRIP 2 DISPLAY. Press the joystick center to confirm.
- Push the joystick down/up to scroll between ENABLED and DISABLED.
Press the joystick center to confirm.
A tick is shown to indicate the selected option.
Display Set Up Menu
The Display Set Up menu allows configuration of the different display screen options.
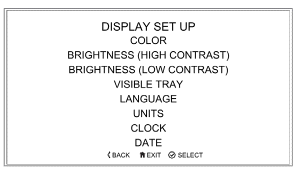
To access the Display Set Up menu:
- From the MAIN MENU, push the joystick down and select DISPLAY SET UP. Press the joystick center to confirm.
- Select the required option from the list to access the relevant information.
Display Set Up - Color
To select a different color for the display information:
- From the DISPLAY SET UP menu, push the joystick down/up to select COLOR.
- Press the joystick center to confirm.
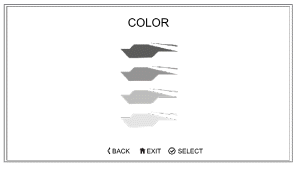
- Push the joystick down/up to scroll between the four different colored icons. There are four color options available; blue, green, yellow and white.
- Press the joystick center to select the required color.
- The new color is then applied to the instrument display for all styles.
Press the HOME button to exit.
Display Set Up - Brightness
There are two brightness options to select from:
- High contrast - day time mode
- Low contrast - night time mode
To adjust the brightness:
- From the DISPLAY SET UP menu, push the joystick down to select BRIGHTNESS (HIGH CONTRAST) or BRIGHTNESS (LOW CONTRAST) menu.
- Press the joystick center to select the required menu.
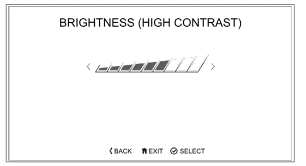
Brightness (High Contrast) Shown
- Push the joystick left/right to adjust the brightness.
- Press the joystick center to confirm the required level of brightness.
- Press the HOME button to return to the main display.
Note: In bright sunlight, low brightness settings will be overridden to make sure that the instruments can be viewed at all times.
Display Set Up - Visible Tray
The Visible Tray menu allows the selection of the items to be shown in the information tray.
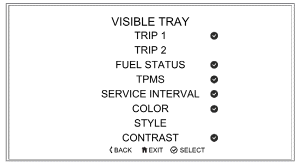
To select the Visible Tray menu:
- From the DISPLAY SET UP menu, push the joystick down to select the VISIBLE TRAY option.
- Press the joystick center to show the available options.
- Scroll the menu by moving the joystick down/up until the required option is highlighted.
- Press the joystick center to select/ deselect the information trays.
An information tray item with a tick next to it will be shown in the tray.
An information tray item without a tick next to it will not be shown in the tray.
Display Set Up - Language
The Language menu allows the preferred language to be used as the instrument display language.
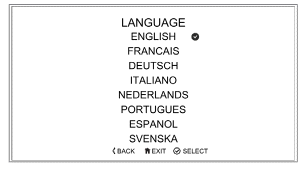
To select the required language for the instrument display:
- From the DISPLAY SET UP menu, push the joystick down to select the LANGUAGES option.
- Press the joystick center to confirm and display the available language options.
- Scroll the menu by pushing the joystick down/up until the required language option is highlighted.
- Press the joystick center to select/ deselect the correct LANGUAGE. A tick is shown to indicate the selected option.
- Press the joystick center to confirm the language option.
Display Set Up - Units
The Units menu allows the selection of a preferred unit of measurement.
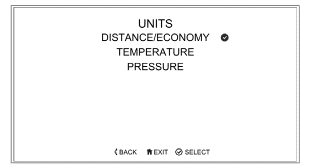
To select the required units of measurement:
- From the DISPLAY SET UP menu, push the joystick down and select UNITS.
- Press the joystick center to confirm.
To change the unit of measurement:
- Push the joystick down/up to highlight the required option (DISTANCE/ECONOMY, TEMPERATURE or PRESSURE).
- Press the joystick center to select. A tick is shown to indicate the selected option.
- Push the joystick down/up to select the required unit of measurement.
- Press the joystick center to confirm.
A tick is shown to indicate the selected option.
The options available are:
Economy:
- Miles & MPG (UK)
- Miles & MPG (US)
- KM & L/100KM
- KM & KM/L
Temperature:
- ºC
- ºF
Pressure:
- PSI
- bar
- KPa
Display Set Up - Clock
The Clock menu allows the adjustment of the clock to be set to the local time.
To set the clock:
- From the Display Set Up menu, push the joystick down to select CLOCK and press the joystick center to confirm.
- Push the joystick down/up to select between either 12 Hr or 24 Hr clock and press the joystick center to confirm selection. A tick is shown to indicate the selected option.
The clock will display in either 12 or 24 hour format. Once the clock format is set, the display will return to the CLOCK menu.
To set the time, push the joystick down/ up to select HOURS or MINUTES.
To adjust the hour setting:
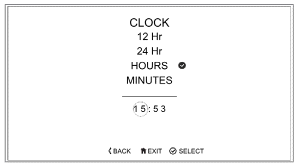
- Select HOURS on the display and press the joystick center. A tick will appear next to HOURS and the hour display will flash as shown below.
- Push the joystick down/up to set the hour. Press the joystick center to confirm.
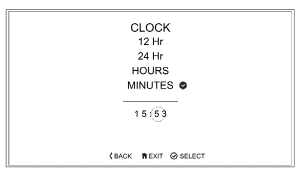
To adjust the minute setting:
- Select MINUTES on the display and press the joystick center. A tick will appear next to MINUTES and the minute display will flash as shown below.
- Push the joystick down/up to set the minute. Press the joystick center to confirm.
Display Set Up - Date
This function allows the date and date format to be adjusted.
To set the date and date format:
- From the DISPLAY SET UP menu, push the joystick down to select DATE and press the joystick center to confirm.
- Push the joystick down/up to select DATE FORMAT. Press the joystick center to confirm.
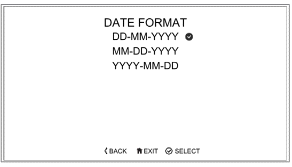
- Push the joystick down/up to select either of the date format options and press the joystick center to confirm selection. A tick is shown to indicate the selected option.
- Once the date format is set the display will return to the DATE menu.
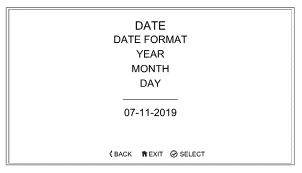
To set the date:
- From the DISPLAY SET UP menu, push the joystick down to select DATE and press the joystick center to confirm.
- Push the joystick down/up to select YEAR and press the joystick center to confirm. The YEAR display will flash.
- Push the joystick down/up to set the current year and then press the joystick center to confirm.
- To set the MONTH and DAY repeat the procedure used to set the year.
Lap Timer
To set the lap timer option, the motorcycle must be stationary with the ignition turned to the ON position.
- Push the HOME button to show the MAIN MENU.
- Push the joystick down and then press joystick center to select LAP TIMER.
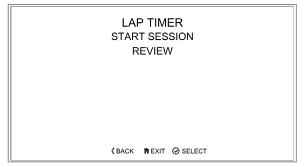
The options available are:
- START SESSION
- REVIEW (Review is available only if lap timer data is stored).
Lap Timer - Start Session
This function allows the lap timer options to be set.
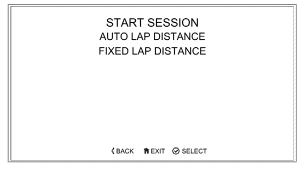
There are two options available:
- AUTO LAP DISTANCE - The motorcycle odometer is used to calculate the lap distance and average speed. The lap distance is accurate to +/-54 yards (50 meters).
- FIXED LAP DISTANCE - Allows the exact lap distance in yards or meters to be set. The lap timer uses the set distance to calculate a more accurate average speed, compared to Auto Lap Distance.
AUTO LAP DISTANCE
To set the auto lap distance:
- Push the joystick down/up to select AUTO LAP DISTANCE and press the joystick center to start the lap timer session.
FIXED LAP DISTANCE
To set the fixed lap distance:
- Push the joystick down/up to select FIXED LAP DISTANCE and press the joystick center. The UNITS and SET DISTANCE menus will be shown.
UNITS
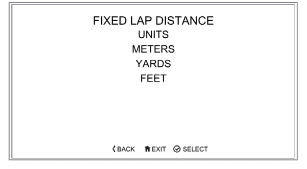
SET DISTANCE
To manually input a measured distance:
- Using the joystick left/right and up/ down, input the measured distance in meters or yards.
- Press the joystick center to confirm the selection.
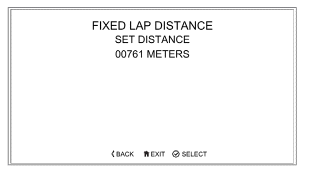
To start the lap timer.
Lap Timer - Review
This function allows the rider to review any stored sessions.
To select the LAP TIMER - REVIEW menu the motorcycle must be stationary with the ignition turned to the ON position.
- Push the HOME button to show the MAIN MENU.
- Push joystick down and then press joystick center to select LAP TIMER.
- Push joystick down to select the REVIEW menu.
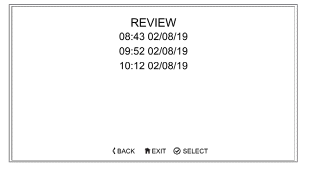
- Push joystick center to display the stored sessions.
- Scroll the menu by moving the joystick up/down until the required session is highlighted.
- Press joystick center to select the required session and review the stored lap times using joystick up/ down.
Sessions are stored in time and date order.
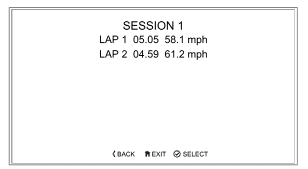
Note: The lap timer will store up to five sessions and up to 24 laps per session. Once this limit is reached, earlier sessions will be overwritten.
Reset to Defaults
The Reset to Default option allows the Main Menu display items to be reset to the default setting.
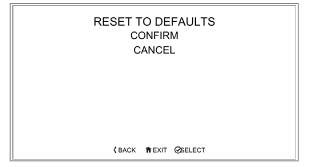
To reset the Main Menu display items:
- From the Main Menu, push the joystick down and select RESET TO DEFAULTS.
- Push the joystick down/up to select CONFIRM or CANCEL. Press the joystick center to confirm the selection.
- Confirm - The following main menu settings and data will be reset to the factory default values - Riding Modes, Indicator Set Up, Trip Computers, Visible Trays, Language, Traction Control, Style, Display Brightness, Lap Timer settings and data.
- Cancel - The main menu settings and data will remain unchanged and the display will return to the previous menu level.
See also:
 Triumph Street Triple S - Owner's Manual > Warning and Information Messages
It is possible for multiple warning and information messages to be shown when a fault occurs. Where this is the case, warning messages will take priority over information messages and the warning symbol will be shown on the display. The number of currently active warning messages is shown in the information tray.
 Triumph Street Triple S - Owner's Manual > Information Tray
Warning: When the motorcycle is in motion, only attempt to switch between the information tray modes or reset the fuel information under the following conditions: At low speed In traffic free areas On straight and level roads or surfaces In good road and weather conditions.

 Benelli Imperiale 400
 BMW F900XR
 Honda CB500X
 KTM 390 Adventure
 Triumph Street Triple S
 Yamaha MT-03
 Kawasaki Z400
 Triumph Street Triple S
 Yamaha MT-03