 Triumph Street Triple S - Owner's Manual > Information Tray
Warning: When the motorcycle is in motion, only attempt to switch between the information tray modes or reset the fuel information under the following conditions:
- At low speed
- In traffic free areas
- On straight and level roads or surfaces
- In good road and weather conditions.
Failure to observe this important warning could lead to loss of motorcycle control and an accident.
Note: To access the information tray, the warning messages must first be acknowledged.
The information tray appears in the top section of the display screen for styles 01, 02 and 03. It appears on the left hand side of the display screen for style 04. It allows easy access to different motorcycle status information.
To view the different information tray items, push the joystick left/right until the required information tray item is shown.
The information tray contains the following information tray items:
- Warnings and Information Messages
- Trip Meter
- Fuel Consumption
- Tire Pressure Monitoring System (TPMS) (if equipped)
- Service Interval
- Color
- Screen Contrast
- Brightness
- Style Select
- Lap Timer
Different information tray items can be shown or hidden from the information tray.
Warning Review
Any warnings and information messages are shown in the Warnings tray. An example is shown below.
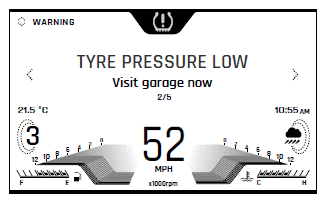
To view the warnings:
- Push the joystick down/up to scroll through the options until the warning review is shown.
- Push the joystick left/right to review each warning (if more than one). The warning counter will show the amount of warnings that are present.
- Push the joystick down/up to return to the information tray.
Low Battery Warning
If items such as heated grips are mounted and are on with the engine at idle, over a period of time, the battery voltage may drop below a predetermined voltage and a warning message will be shown in the Warnings tray.
Trip Meter
There are two trip meters that can be accessed and reset in the information tray.
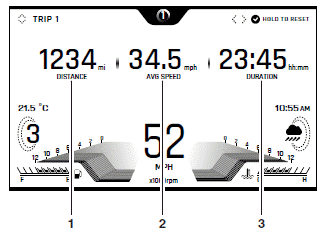
- Distance traveled
- Average speed
- Duration of trip
To view a specific trip meter:
- Push the joystick left/right to scroll through the information tray items until Trip 1 meter is shown.
- Select TRIP 1 or TRIP 2 by pushing the joystick down/up.
Note: TRIP 2 meter can be shown or hidden from the information tray..
To reset a trip meter:
- Select the trip meter to be reset.
- Press and hold the joystick center for more than one second.
- The trip meter will then be reset.
The trip meter can also be reset from the Main menu.
Fuel Consumption
The Fuel Consumption information tray shows fuel consumption information.
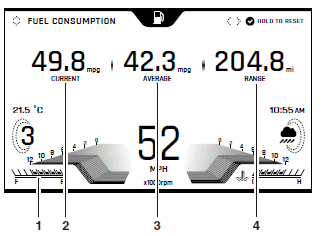
- Fuel gage
- Current fuel consumption
- Average fuel consumption
- Range to empty
Current Fuel Consumption
This is an indication of the fuel consumption at an instant in time. If the motorcycle is stationary, --.- will be shown in the display area.
Average Fuel Consumption
This is an indication of the average fuel consumption. After being reset the display will show dashes until 0.1 miles/ km has been covered.
Range to Empty
This is an indication of the predicted distance that can be traveled on the remaining fuel in the tank.
Reset
To reset the average fuel consumption, press and hold the joystick center.
Note: After refueling, the fuel gage and range to empty information will be updated only while riding the motorcycle.
Depending on the riding style, updating could take up to five minutes.
Tire Pressure Monitoring System (TPMS) (if equipped)
Warning: Stop the motorcycle if the tire pressure warning light illuminates.
Do not ride the motorcycle until the tires have been checked and the tire pressures are at their recommended pressure when cold.
The Tire Pressure Monitoring System (TPMS) information tray shows the front and rear tire pressures.
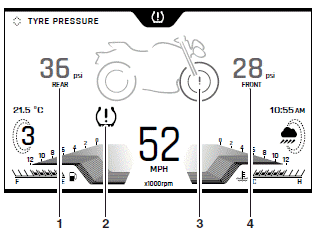
- Rear tire pressure indicator
- Tire pressure warning light
- Low front tire pressure warning shown
- Front tire pressure indicator
Tire Pressure Warning Light
The tire pressure warning light will only illuminate when the front or rear tire pressure is below the recommended pressure. It will not illuminate if the tire is over inflated.
Front Tire Pressure Indicator
This shows the current front tire pressure.
Rear Tire Pressure Indicator
This shows the current rear tire pressure.
Low Tire Pressure
The front or rear tire will be highlighted on the motorcycle image to indicate that the tire pressure is below the recommended pressure.
For more information on TPMS and tire pressures.
Service
The Service information tray shows the distance and days remaining before the next service is recommended.
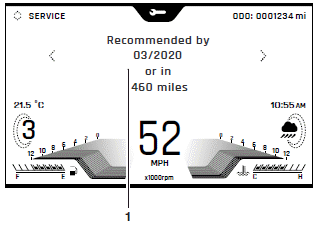
- Service information
Color
The Color information tray allows a different color to be applied to the current style. There are four color options available; blue, green, yellow and white.
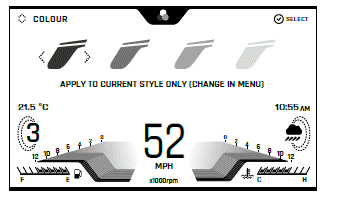
To apply a different color to the current style:
- Push the joystick left/right to select the required color.
- Press the joystick center to confirm the required color.
- The new color is then applied to the current style.
- To apply a color to all styles.
Screen Contrast
The Contrast information tray allows the display screen contrast to be adjusted.
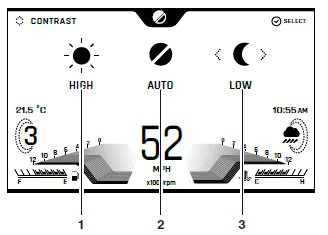
- High contrast option
- Auto contrast option
- Low contrast option
There are three options available:
- HIGH - This option locks the display screen to the white background version of each display screen style for maximum visibility during the day.
- AUTO - This option uses the instrument light sensor to adjust the contrast to the most suitable setting. In bright sunlight, low brightness settings will be overridden to make sure the instruments can be viewed at all times.
- LOW - This option locks the display screen to the black background version of each display screen style for maximum visibility at night time.
To select an option:
- Push the joystick left/right to select the HIGH, AUTO or LOW contrast option and press the joystick center to confirm.
- If the rider defined brightness setting is suitable this will be used.
Note: Do not cover the light sensor on the display screen as this will stop the screen brightness and contrast from working correctly.
Brightness
The Brightness information tray allows the brightness of the display screen to be adjusted.
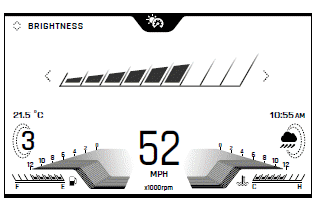
To adjust the brightness of the display screen:
- Push the joystick left/right to increase/decrease the level of brightness.
- Press the joystick center to confirm the required level of brightness.
Note: In bright sunlight, low brightness settings will be overridden to make sure that the instruments can be viewed at all times.
Note: Do not cover the light sensor on the display screen as this will stop the screen brightness and contrast from working correctly.
Style Select
The Style Select information tray allows a different style to be applied to the display screen.
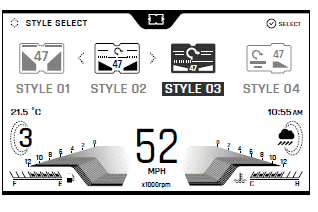
Style Select Information Tray (Style 03 Selected)
To change the display screen style:
- Push the joystick left/right to select the required style and then press the joystick center to confirm.
Lap Timer
The Lap Timer information tray allows a certain distance/lap to be timed and compared against a previously timed lap.
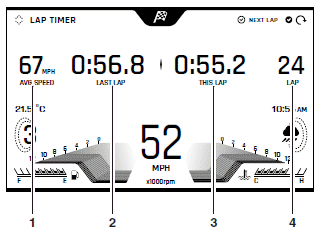
- Average speed
- Last lap time
- This lap time
- Number of lap
To start a lap:
- Briefly press the joystick down/up or center. The lap counter will start to count the first lap. This is shown as THIS LAP.
- Pressing the joystick down/up or center will start a new lap, and the previous lap's time and average speed will be shown in the information tray as LAST.LAP next to the new lap time.
- A long press (longer than two seconds) of the joystick down/up or center will stop the lap timer, clear the stored data and start a new lap time.
- The stored lap timer data is viewable from the Main Menu.
Instrument Panel Position Adjustment
Warning: Operation of the motorcycle with an incorrectly adjusted instrument panel is dangerous.
An incorrectly adjusted instrument panel will result in loss of instrument vision when riding and may cause a distraction leading to loss of control of the motorcycle and an accident.
Always adjust the instrument panel to provide sufficient vision of the instruments before riding the motorcycle.
Warning: Never attempt to clean or adjust the instrument panel while riding the motorcycle. Removal of the rider's hands from the handlebar while riding the motorcycle will diminish the ability of the rider to maintain control of the motorcycle.
Attempting to clean or adjust the instrument panel while riding the motorcycle may result in loss of control of the motorcycle and an accident.
Only attempt to clean or adjust the instrument panel while stationary.
Caution: Do not press directly onto the instrument panel display screen.
Only adjust the position of the instrument panel using the adjustment lever.
Pressing directly on the instrument panel display screen may damage the instrument panel.
The instrument panel can be adjusted to allow for improved visibility of the display screen.
To adjust the instrument panel:
Note: Moderate force using the thumb and finger is required to adjust the position of the instrument panel.
Position the instrument panel to allow an unobstructed view of the display screen using the adjustment handle.
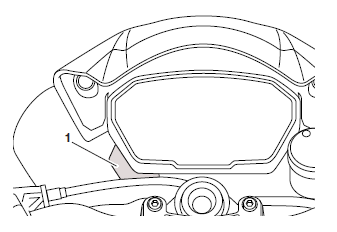
- Adjustment handle
See also:
 Triumph Street Triple S - Owner's Manual > Main Menu
To access the Main menu: The motorcycle must be stationary with the ignition switched on. Press the HOME button on the right handlebar switch housing. Scroll the Main menu by pushing the joystick down/up until the required option is selected and then press the joystick center to confirm. Main Menu Screen

 Benelli Imperiale 400
 BMW F900XR
 Honda CB500X
 KTM 390 Adventure
 Triumph Street Triple S
 Yamaha MT-03
 Kawasaki Z400
 Triumph Street Triple S
 Yamaha MT-03