 Triumph Street Triple S - Service manual > Instrument Pack
Instrument Pack - Daytona 675
Removal
1. Remove the rider's seat.
2. Disconnect the battery, negative (black) lead first.
3. Remove the cockpit.
4. Release the four fixings securing the instrument bracket to the air intake duct. Collect the fall detection switch and bracket from the right hand side of the instrument bracket.
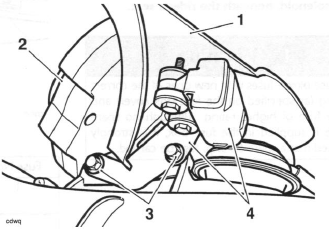
- Instrument bracket
- Instrument pack
- Instrument bracket fixings (right hand shown)
- Fall detection switch and bracket
5. Raise the instrument pack and disconnect the electrical connection to the main harness. Remove the pack and bracket.
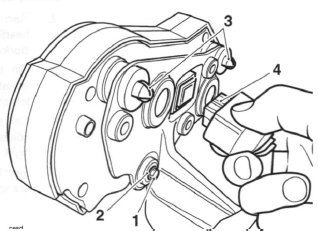
6. Release the fixing securing the instrument pack to the bracket.
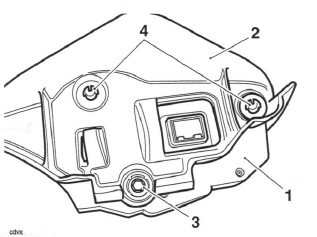
- Instrument pack
- Instrument bracket
- Fixing
- Bayonet fixings
7. Remove the instrument pack from the bracket.
Installation
1. Position the instrument pack to the bracket.
2. Insert the bayonet fixings into the grommets.
3. Refit the fixing and tighten to 3 Nm.
4. Connect the instruments to the harness.
5. Place the instrument bracket in position on the air intake duct and reposition the fall detection switch and its bracket. Refit the fixings.
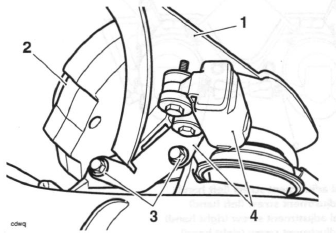
- Instrument bracket
- Instrument pack
- Instrument bracket fixings (right hand shown)
- Fall detection switch and bracket
6. Tighten the bracket fixings to 7 Nm.
7. Refit the cockpit.
8. Reconnect the battery, positive (red) lead first.
9. Refit the rider's seat.
Instrument Pack - Street Triple and Street Triple R
Removal
1. Remove the rider's seat.
2. Disconnect the battery, negative (black) lead first.
3. Remove the cover and gasket attached to the rear of the instruments.
Note:
- The cover is held in place by bayonet type fixings. Gently pull on the cover to release it.
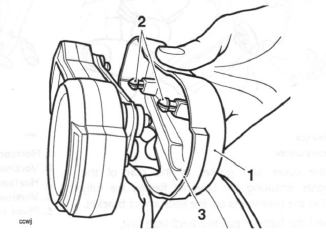
- Instrument cover
- Bayonet fixings
- Gasket
4. Disconnect the electrical connector from the instruments.
5. Remove the screw and release the instrument pack from the bracket bayonet fixings.
- Screw
- Washer
- Bayonet fixings
- Electrical connector
Installation
1. Position the instrument pack to the bracket.
2. Insert the bayonet fixings into the grommets.
3. Refit the fixing and tighten to 3 Nm.
4. Connect the instruments to the harness.

- Screw
- Washer
- Bayonet fixings
- Electrical connector
5. Install the cover and gasket to the rear of the instruments, ensuring the bayonet fixings are fully inserted in the grommets on the instrument bracket.
6. Reconnect the battery, positive (red) lead first.
7. Refit the rider's seat.
See also:
 Triumph Street Triple S - Service manual > Battery
Warning: The battery gives off explosive gases; keep sparks, flames away. Provide adequate ventilation when charging or using the battery in an enclosed space. The battery contains sulphuric acid (electrolyte). Contact with skin or eyes may cause severe burns. Wear protective clothing and a face shield. If electrolyte gets on your skin, flush with water immediately. If electrolyte gets in your eyes, flush with water for at least 15 minutes and SEEK MEDICAL ATTENTION IMMEDIATELY. If electrolyte is swallowed, drink large quantities of water and SEEK MEDICAL
Triumph Street Triple S - Service manual > Headlights
Headlights - Daytona 675 Headlight Adjustment Note: Each headlight can be adjusted by means of vertical and horizontal adjustment screws located on the rear of each headlight. Horizontal adjustment screw (left hand) Vertical adjustment screw (left hand) Horizontal adjustment screw (right hand) Vertical adjustment screw (right hand) Pivot screws (DO NOT adjust these screws)
 Benelli Imperiale 400
 BMW F900XR
 Honda CB500X
 KTM 390 Adventure
 Triumph Street Triple S
 Yamaha MT-03
 Kawasaki Z400
 Triumph Street Triple S
 Yamaha MT-03