 Triumph Street Triple S - Service manual > Battery
Warning: The battery gives off explosive gases; keep sparks, flames away. Provide adequate ventilation when charging or using the battery in an enclosed space.
The battery contains sulphuric acid (electrolyte). Contact with skin or eyes may cause severe burns. Wear protective clothing and a face shield.
- If electrolyte gets on your skin, flush with water immediately.
- If electrolyte gets in your eyes, flush with water for at least 15 minutes and SEEK MEDICAL ATTENTION IMMEDIATELY.
- If electrolyte is swallowed, drink large quantities of water and SEEK MEDICAL
ATTENTION IMMEDIATELY.
KEEP ELECTROLYTE OUT OF THE REACH OF CHILDREN.
Warning: The battery contains harmful materials. Always keep children away from the battery whether or not it is fitted in the motorcycle.
Do not jump start the battery, touch the battery cables together or reverse the polarity of the cables as any of these actions may cause a spark which would ignite battery gasses causing a risk of personal injury.
Warning: The battery electrolyte is corrosive and poisonous. Never swallow battery electrolyte or allow electrolyte to come into contact with the skin. Always wear eye and skin protection when adjusting the electrolyte level.
Battery Removal
Daytona 675
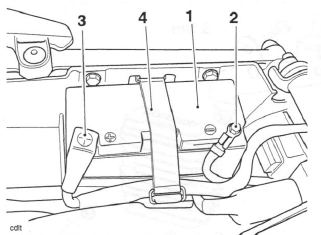
- Battery
- Negative (-) terminal
- Positive (+) terminal
- Battery strap
Street Triple and Street Triple R
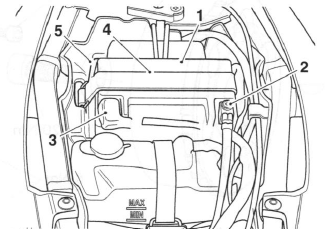
- Battery
- Negative (-) terminal
- Positive (+) terminal
- Battery strap
- Battery strap band
1. Remove the rider's seat.
2. Disconnect the battery, negative (black) lead first.
3. Remove the battery strap. On Street Triple, note the orientation of the strap and the fitted position of the band around the rear of the battery.
4. Take the battery out of the case.
Warning: Ensure that the battery terminals do not touch the motorcycle frame as this may cause a short circuit or spark which would ignite battery gases causing a risk of personal injury.
Battery Refit
Warning: Ensure that the battery terminals do not touch the motorcycle frame as this may cause a short circuit or spark which would ignite battery gases causing a risk of personal injury.
1. Place the battery in the battery case.
2. Reconnect the battery, positive (red) lead first.
3. Apply a light coat of grease to the terminals to prevent corrosion.
4. Cover the terminals with the protective caps.
5. Refit the battery strap. On Street Triple, ensure the strap is fitted with the band towards the rear of the motorcycle. Hook the battery strap band around the rear of the battery as noted on removal.
6. Refit the rider's seat.
Battery Commissioning and Charging
New Battery
In order to correctly and safely commission a new battery, the battery commissioning procedure listed below must be carefully followed. This is the only battery commissioning procedure that Triumph recommends.
The procedure is designed to ensure that the battery is at its best when fitted to the motorcycle, and will provide the best possible performance and reliability.
Failure to comply with this procedure may lead to reduced battery performance and/or shorten the life of the battery.
Warning: The battery gives off explosive gases; keep sparks, flames away. Provide adequate ventilation when charging or using the battery in an enclosed space.
The battery contains sulphuric acid (electrolyte). Contact with skin or eyes may cause severe burns. Wear protective clothing and a face shield.
- If electrolyte gets on your skin, flush with water immediately.
- If electrolyte gets in your eyes, flush with water for at least 15 minutes and SEEK MEDICAL ATTENTION IMMEDIATELY.
- If electrolyte is swallowed, drink large quantities of water and SEEK MEDICAL ATTENTION IMMEDIATELY.
KEEP ELECTROLYTE OUT OF THE REACH OF CHILDREN.
1. Ensure the VIN number printed on the anti-tamper label attached to the battery matches the motorcycle VIN.
2. Read the instructions and warnings delivered with the battery.
3. Place the battery on a flat level surface and remove the sealing foil.
Caution: Ensure the electrolyte container part number matches the battery part number to be filled. Battery life will be greatly reduced if the incorrect volume (either too little or too much) of acid is added to the battery.
4. Remove the battery sealing strip from the electrolyte container (if applicable) and save for later in this procedure. Place the sealing strip on a clean surface, with the upper side facing downwards to avoid contamination of the sealing strip. Do not break the seal on the electrolyte container.
5. Place the electrolyte container and adapter (if applicable) on the battery and fill the battery according to the manufacturers instructions.
6. After starting to fill the battery with electrolyte, allow the battery to stand for 30 minutes with the filling container in place.
7. Check that all of the electrolyte has drained from the container. Do not remove the container at this point.
If the container has not completely drained, tap the sides of the container to start the electrolyte flowing again.
8. After the electrolyte has drained into the battery, allow the battery to stand with the electrolyte container in place for a further 30 minutes for batteries 3Ah - 12Ah or 1 hour for batteries greater than 12Ah.
9. Remove the electrolyte container and adapter carefully, and dispose of immediately.
10. Place the sealing cap strip LOOSELY over the filling holes of the battery.
11. Charge the battery using the BatteryMate 150-9.
Refer to the instructions supplied with the BatteryMate 150-9.
Caution: The caps must be fitted (after charging) within two hours of filling the battery with acid. Leaving the battery open to the atmosphere for longer than is necessary will start to reverse the chemical reaction which takes place within the battery, greatly reducing the battery life.
12. After charging is complete, press down firmly with both hands to seat the caps (do not use tools or force the caps into position).
13. Disconnect the charger and allow the battery to stand for 1 hour before fitting to the motorcycle.
14. Fit the battery to the motorcycle, positive (red) lead first.
Battery Maintenance
The battery is a sealed type and does not require any maintenance other than routine recharging such as during storage.
It is not possible to adjust the electrolyte level in the battery.
Note:
- The charge level in the battery must be maintained to maximise the battery life.
With normal use of the motorcycle, the charging system will keep the battery charged. If the motorcycle is unused the battery will gradually discharge due to battery self discharge and the continuous current drain for the clock and the engine control module memory.
The rate of battery discharge can be greatly increased by the addition of electrical security systems or other accessories.
If the motorcycle is used for very short journeys, the alternator will not have enough time to replenish the charge used to start and run it. Therefore, the battery should be charged after each return journey following the instructions and advice given here and in the owner handbook under the sections Battery Discharge and Battery Discharge During Storage and Infrequent Use of the Motorcycle.
Allowing a battery to discharge, or leaving it discharged over a period of time, causes sulphation of the lead plates within the battery.
Sulphation is a normal chemical reaction inside the battery and over a period of time sulphate will crystallise on to the lead plates making charging difficult or impossible. The result is a permanently damaged battery, which would not be covered by the motorcycle warranty.
Keeping a battery at full charge reduces the chance of it freezing in cold conditions. Allowing a battery to freeze can cause serious internal damage to the battery.
When leaving the motorcycle standing for more than a few days, regularly check the battery Voltage using a digital multimeter. Should the battery Voltage fall below 12.8V, charge the battery using the BatteryMate 150-9.
Refer to the instructions supplied with the BatteryMate 150-9.
For extended periods of storage (beyond two weeks) the battery should be removed and the battery Voltage checked regularly and charged when below 12.8V
Battery Already in Service
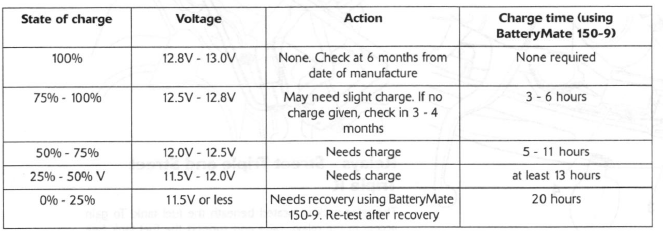
Use the guidelines in the table below for charging. Always verify the battery condition before charging, and 30 minutes after charging.
Note:
- A fully charged battery should read 12.8 volts or higher after the battery has been off the charger for 30 minutes or more.
Table of Batery Charging Times
Relays - Daytona 675
The relay pack is located beneath the left hand fairing infill panel, adjacent to the fuse box. To gain access to the relays, remove the left hand infill panel.
Relay Identification
- Cooling fan relay
- Engine management system (EMS) main relay
- Starter relay
- Fuse box
Direction Indicator Unit
The direction indicator unit is located behind the left hand lower fairing, adjacent to the vacuum reservoir for the intake air flap.
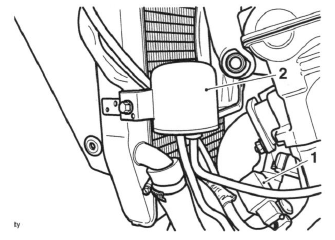
- Direction indicator unit
- Vacuum reservoir
Fuel Pump Relay
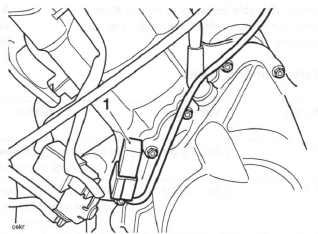
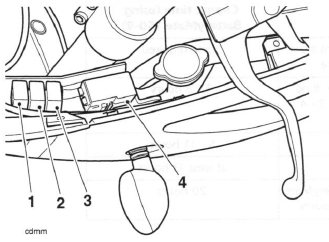
Relays - Street Triple and Street Triple R
The relay pack is located beneath the fuel tank. To gain access to the relays, raise and support the fuel tank.
Relay Identification
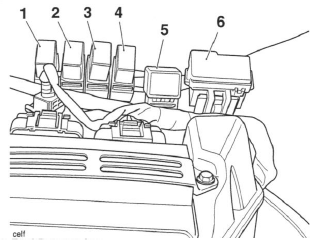
- Fuel Pump relay
- Cooling fan relay
- Engine management system (EMS) main relay
- Starter relay
- Direction indicator unit
- Fuse box
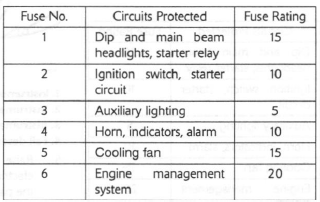
Fuses
If a fuse fails during operation, inspect the electrical system to determine the cause, and then replace it with a new fuse of the correct current rating.
A blown fuse is indicated when all of the systems protected by that fuse become inoperative. When checking for a blown fuse, use the table below to establish which fuse has blown.
Note:
- On both models, the starter solenoid has an additional 30 Amp fuse attached directly to the solenoid, beneath the rider's seat.
Warning: Always replace blown fuses with new ones of the correct current rating (as specified on the fuse box cover) and never use a fuse of higher rating. Although no spare 5 Amp. fuse is supplied in the fuse box, it is strongly recommended that a spare 5 Amp. fuse be carried.
Fuse Identification - Daytona 675
Fuses are arranged in the fuse box located beneath the left hand fairing infill panel.
To gain access to the fuse box, remove the left hand infill panel.
Arrowed: Fuse Box
The fuse identification numbers listed correspond with those printed on the fuse box cover.
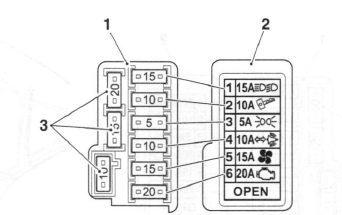
- Fuse box
- Fuse box cover
- Spare fuses
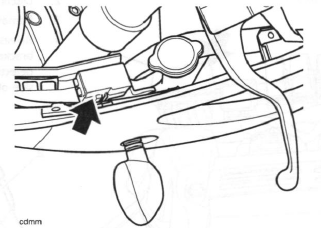
Fuse Identification - Street Triple and Street Triple R
Fuses are arranged in the fuse box located beneath the fuel tank.
To gain access to the fuse box, raise and support the fuel tank.
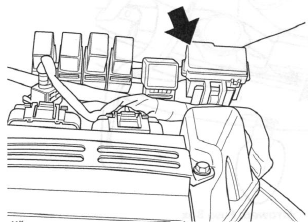
Arrowed: Fuse Box

The fuse identification numbers listed correspond with those printed on the fuse box cover.
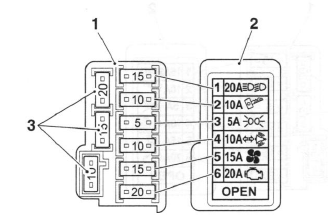
- Fuse box
- Fuse box cover
- Spare fuses
See also:
 Triumph Street Triple S - Service manual > Electrical
Exploded View - Instruments - Daytona 675
Triumph Street Triple S - Service manual > Instrument Pack
Instrument Pack - Daytona 675 Removal 1. Remove the rider's seat. 2. Disconnect the battery, negative (black) lead first.
 Benelli Imperiale 400
 BMW F900XR
 Honda CB500X
 KTM 390 Adventure
 Triumph Street Triple S
 Yamaha MT-03
 Kawasaki Z400
 Triumph Street Triple S
 Yamaha MT-03