 Triumph Street Triple S - Service manual > Front Brake Caliper
Front Brake Caliper - Daytona 675 up to VIN 381274 and Street Triple R
Removal
Warning: Before starting work, ensure the motorcycle is stabilised and adequately supported. This will help prevent it from falling and causing injury to the operator or damage to the motorcycle.
Caution: To prevent paint damage, do not spill brake fluid onto any area of the bodywork. Spilled brake fluid will damage paintwork.
1. Disconnect the brake hose at the caliper (two hoses on right hand caliper), and place the free end of the hose(s) in a suitable container to collect the brake fluid.
Note:
- If the calipers are to be removed for access only, do not remove the brake pads.
2. Remove the brake pads.
3. Remove the two caliper bolts.
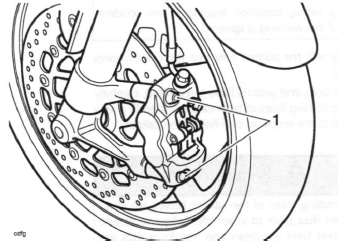
- Caliper bolts
4. Manoeuvre the caliper clear of the disc, taking care not to damage the wheel.
Disassembly
Warning: To prevent injury, never place fingers or hands inside the caliper opening when removing the pistons. Always wear eye, hand and face protection when using compressed air. Eye, face and skin damage will result from direct contact with compressed air.
1. Undo and remove the four bolts which secure the two halves of the brake caliper together. Discard the bolts.
2. Carefully split the two halves of the caliper then remove and discard the joint seal.
3. Cover a caliper half with a clean, heavy cloth and, using compressed air, remove the pistons one at a time.
Warning: Ensure the seal grooves in the caliper bores are not damaged during the removal of the seals. Damage to the seal grooves may allow brake fluid to leak past the seals resulting in a dangerous riding condition leading to loss of motorcycle control and an accident.
4. Remove the old piston seals and dust seals then thoroughly clean and dry the caliper bores and pistons. Discard the old seals, these must not be reused.
Inspection
1. Check the pistons and caliper bores for corrosion, scoring and damage. Renew as necessary.
Warning: Always renew caliper seals and pistons after removal from the caliper. An effective hydraulic seal can only be made if new components are used.
A dangerous riding condition leading to an accident could result if this warning is ignored.
2. Inspect the brake pads for damage and wear beyond the service limit. Renew as necessary.
Assembly
Warning: Never use mineral based grease (such as lithium or copper based grease) in any area where contact with the braking system hydraulic seals and dust seals is possible.
Mineral based grease will damage the hydraulic seals and dust seals in the calipers and master cylinders.
Damage caused by contact with mineral based grease may reduce braking efficiency resulting in an accident.
Warning: Before installation, all internal brake components should be cleaned and lubricated with clean new DOT 4 brake fluid.
Never use solvents, petrol (gasoline), engine oil, or any other petroleum distillate on internal brake components as this will cause deterioration of the hydraulic seals in the calipers and master cylinders.
A dangerous riding condition leading to loss of motorcycle control and an accident could result if this warning is ignored.
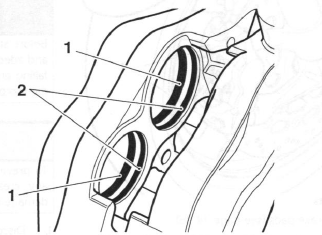
1. Lubricate the piston seals with clean DOT 4 brake fluid. Fit the piston seals and the dust seals to the caliper bores in the positions shown below.
Note:
- The piston seals are slightly thicker than the dust seals.

- Piston seals
- Dust seals
Warning: Ensure that the caliper bores do not become scratched during piston removal and assembly. Ensure that the pistons remain square to their bores during fitment otherwise damage to the caliper could result.
A dangerous riding condition leading to an accident could result if this warning is ignored.
2. Carefully refit the pistons fully into the caliper bores by hand.
3. Once all seals and pistons have been fitted, carefully clean the mating faces of both calipers, then fit a new joint seal to the recess in one half of the caliper.
Warning, Ensure the mating faces of the caliper halves are clean and free from dust prior to assembly. Failure to ensure that the mating faces are clean and free from dust will result in a dangerous riding condition leading to loss of motorcycle control and an accident.
4. Apply a small drop of Loctite Hydraulic Sealant 569 to the threads of new caliper bolts and secure the two halves of the caliper together. Tighten the caliper bolts to 22 Nm.
Installation
1. Position the caliper over the disc and tighten the caliper bolts to 35 Nm.
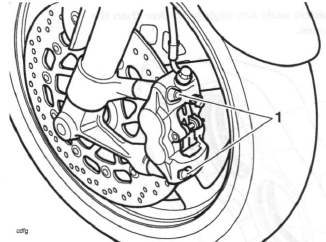
- Caliper bolts
2. Fit the brake pads.
3. Connect the brake hose(s) to the caliper incorporating new sealing washers on each side of all hose connections.
4. Tighten the banjo bolt to 25 Nm.
Warning: Use only DOT 4 specification brake fluid as listed in the general information section of this manual. The use of brake fluids other than those DOT 4 fluids listed in the general information section may reduce the efficiency of the braking system leading to loss of motorcycle control and an accident.
Observe the brake fluid handling warnings given earlier in this section of the manual.
5. Fill the master cylinder with new, DOT 4 brake fluid from a sealed container.
6. Bleed the front brake line.
7. Check for correct brake operation.
Warning: It is dangerous to operate the motorcycle with defective brakes; you must have your authorised Triumph dealer take remedial action before you ride the motorcycle again. Failure to take remedial action may result in reduced braking efficiency leading to loss of motorcycle control and an accident.
Front Brake Caliper - Daytona 675 from VIN 381275
Removal
Warning: Before starting work, ensure the motorcycle is stabilised and adequately supported. This will help prevent it from falling and causing injury to the operator or damage to the motorcycle
Caution: To prevent paint damage, do not spill brake fluid onto any area of the bodywork. Spilled brake fluid will damage paintwork.
1. Disconnect the brake hose at the caliper (two hoses on right hand caliper), and place the free end of the hose(s) in a suitable container to collect the brake fluid.
2. Remove the brake pads.
Disassembly
Warning: To prevent injury, never place fingers or hands inside the caliper opening when removing the pistons. Always wear eye, hand and face protection when using compressed air. Eye, face and skin damage will result from direct contact with compressed air.
Note:
- Only the top two pistons (near the brake hose) are Nymfron coated;
- The Nymfron coated pistons appear to have a matt finish compared to the Nickel plated pistons;
- Note the position of the Nymfron coated pistons.
1. Cover the caliper opening with a clean heavy cloth and using either compressed air or by reconnecting the master cylinder and pumping the brake lever, remove the pistons one at a time.
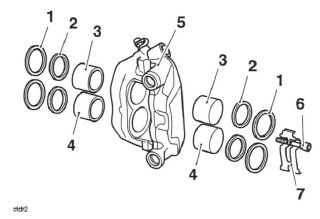
- Piston seal
- Dust seal
- Pistons with Nymfron coating
- Pistons with Nickle coating
- Caliper
- Pad retaining pin
- Anti-rattle spring
Warning: Ensure the seal grooves in the caliper bores are not damaged during the removal of the seals. Damage to the seal grooves may allow brake fluid to leak past the seals resulting in a dangerous riding condition leading to loss of motorcycle control and an accident.
2. Extract the dust seals and piston seals, taking care not to damage the caliper bores. Discard the old seals, these must not be re-used.
Note:
- The piston seals are slightly thicker than the dust seals.
- Piston seals
- Dust seals
3. Check the pistons, caliper and mounting bracket for signs of damage, paying particular attention to the caliper bores and pistons. If damage is present, renew the worn component or the complete caliper assembly.
Inspection
1. Check the pistons and caliper bores for corrosion, scoring and damage. Renew as necessary.
Warning: Always renew caliper seals and pistons after removal from the caliper. An effective hydraulic seal can only be made if new components are used.
A dangerous riding condition leading to an accident could result if this warning is ignored.
2. Inspect the brake pads for damage and wear beyond the service limit. Renew as necessary.
Assembly
1. If all components are serviceable, obtain a piston seal kit and reassemble the caliper as follows:
Warning: Never use mineral based grease (such as lithium or copper based grease) in any area where contact with the braking system hydraulic seals and dust seals is possible.
Mineral based grease will damage the hydraulic seals and dust seals in the calipers and master cylinders.
Damage caused by contact with mineral based grease may reduce braking efficiency resulting in an accident.
Warning: Before installation, all internal brake components should be cleaned and lubricated with clean new DOT 4 brake fluid.
Never use solvents, petrol (gasoline), engine oil, or any other petroleum distillate on internal brake components as this will cause deterioration of the hydraulic seals in the calipers and master cylinders.
A dangerous riding condition leading to loss of motorcycle control and an accident could result if this warning is ignored.
2. Ensure all components are clean, then fi t the new seals to their grooves in the caliper bores.
3. Lubricate the fluid seals, caliper bore and the outside of the pistons with clean DOT 4 brake fluid.
4. Ease the pistons squarely back into the bores as noted for removal, taking care not to displace the seals.
Installation
1. Fit the brake pads.
2. Connect the brake hose(s) to the caliper incorporating new sealing washers on each side of all hose connections.
3. Tighten the banjo bolt to 25 Nm.
Warning: Use only DOT 4 specification brake fluid as listed in the general information section of this manual. The use of brake fluids other than those DOT 4 fluids listed in the general information section may reduce the efficiency of the braking system leading to loss of motorcycle control and an accident.
Observe the brake fluid handling warnings given earlier in this section of the manual.
4. Fill the master cylinder with new, DOT 4 brake fluid from a sealed container.
5. Bleed the front brake line.
6. Check for correct brake operation.
Warning: It is dangerous to operate the motorcycle with defective brakes; you must have your authorised Triumph dealer take remedial action before you ride the motorcycle again. Failure to take remedial action may result in reduced braking efficiency leading to loss of motorcycle control and an accident.
Front Brake Caliper - Street Triple
Removal
Warning: Before starting work, ensure the motorcycle is stabilised and adequately supported. This will help prevent it from falling and causing injury to the operator or damage to the motorcycle.
Caution: To prevent paint damage, do not spill brake fluid onto any area of the bodywork. Spilled brake fluid will damage paintwork.
1. Remove the brake pads.
2. Disconnect the brake hose at the caliper (two hoses on right hand caliper), and place the free end of the hose(s) in a suitable container to collect the brake fluid.
Disassembly
Warning: To prevent injury, never place fingers or hands inside the caliper opening when removing the pistons. Always wear eye, hand and face protection when using compressed air. Eye, face and skin damage will result from direct contact with compressed air.
1. Separate the caliper and mounting bracket.
2. Cover the caliper opening with a clean, heavy cloth and, using either compressed air or by reconnecting the master cylinder and pumping the brake lever, eject both pistons from the caliper at the same time.

- Dust seals
- Piston seals
- Pistons
Warning: Ensure the seal grooves in the caliper bores are not damaged during the removal of the seals. Damage to the seal grooves may allow brake fluid to leak past the seals resulting in a dangerous riding condition leading to loss of motorcycle control and an accident.
3. Extract the dust seals and piston seals, taking care not to damage the caliper bores.
4. Check the pistons, caliper and mounting bracket for signs of damage, paying particular attention to the caliper bores and pistons. If damage is present, renew the worn component or the complete caliper assembly.
5. If all components are serviceable, obtain a piston seal kit and reassemble the caliper as follows:
Warning: Always renew caliper seals after removal of the pistons.
An effective hydraulic seal can only be made if new seals are fitted.
A dangerous riding condition leading to an accident could result if this warning is ignored.
Warning: Before installation, all internal brake components should be cleaned and lubricated with clean new DOT 4 brake fluid.
Never use solvents, petrol (gasoline), engine oil, or any other petroleum distillate on internal brake components as this will cause deterioration of the hydraulic seals in the calipers and master cylinders.
A dangerous riding condition leading to loss of motorcycle control and an accident could result if this warning is ignored.
6. Ensure all components are clean, then fit the new seals to their grooves in the caliper bores.
7. Lubricate the fluid seals, caliper bore and the outside of the pistons with clean DOT 4 brake fluid.
8. Ease the pistons squarely back into the bores, taking care not to displace the seals.
Warning: Never use mineral based grease (such as lithium or copper based grease) in any area where contact with the braking system hydraulic seals and dust seals is possible.
Mineral based grease will damage the hydraulic seals and dust seals in the calipers and master cylinders.
Damage caused by contact with mineral based grease may reduce braking efficiency resulting in an accident.
9. Lubricate the mounting bracket pins with a suitable silicone based brake grease then reassemble the bracket and caliper. Ensure the pin gaiters are correctly located on both the bracket and caliper.
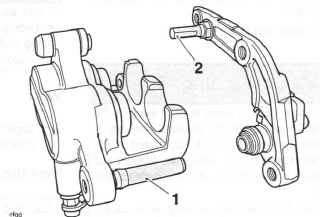
- Caliper sliding pin
- Caliper bracket sliding pin
Installation
1. Fit the brake pads.
2. Connect the brake hose(s) to the caliper incorporating new sealing washers on each side of all hose connections.
3. Tighten the banjo bolt to 25 Nm.
Warning: Use only DOT 4 specification brake fluid as listed in the general information section of this manual. The use of brake fluids other than those DOT 4 fluids listed in the general information section may reduce the efficiency of the braking system leading to loss of motorcycle control and an accident.
Observe the brake fluid handling warnings given earlier in this section of the manual.
4. Fill the master cylinder with new, DOT 4 brake fluid from a sealed container.
5. Bleed the front brake line.
6. Check for correct brake operation.
Warning: It is dangerous to operate the motorcycle with defective brakes; you must have your authorised Triumph dealer take remedial action before you ride the motorcycle again. Failure to take remedial action may result in reduced braking efficiency leading to loss of motorcycle control and an accident.
Front Discs - All Models
Warning: Before starting work, ensure the motorcycle is stabilised and adequately supported. This will help prevent it from falling and causing injury to the operator or damage to the motorcycle.
Wear
1. Replace any brake disc if worn beyond the service limit or that exceeds the disc run-out limit.
Front Disc Thickness
Standard: 4.0 mm
Service Limit: 3.5 mm
Disc Run-out
Service Limit: 0.3 mm
Measure disc run-out using an accurate dial gauge mounted on a surface plate.
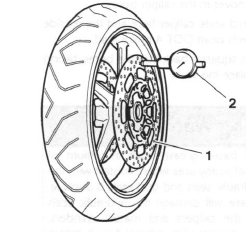
- Disc
- Dial gauge
Removal
Warning: Do not renew front brake discs individually. Discs must always be renewed in pairs even if one of a pair is serviceable.
A dangerous riding condition leading to an accident could result if this warning is ignored.
1. Remove the front wheel.
2. Support the wheel on blocks as illustrated to avoid damage to the wheel centre.
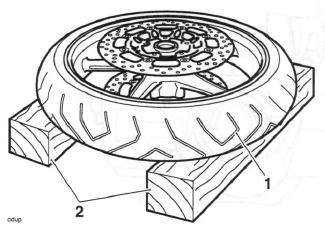
- Wheel
- Support blocks
3. Remove and discard the bolts.
4. Detach the disc.
5. Repeat for the other disc
Installation
1. Locate the first disc to the wheel.
2. Fit new bolts and tighten to 22 Nm.
3. Fit the other disc in the same way.
4. Refit the front wheel.
5. Check for correct brake operation. Rectify as necessary.
Warning: It is dangerous to operate the motorcycle with defective brakes; you must have your authorised Triumph dealer take remedial action before you ride the motorcycle again. Failure to take remedial action may result in reduced braking efficiency leading to loss of motorcycle control and an accident.
See also:
 Triumph Street Triple S - Service manual > Front Brake Pads
Front Brake Pads - Daytona 675 up to VIN 381274 and Street Triple R Removal Warning: Before starting work, ensure the motorcycle is stabilised and adequately supported. This will help prevent it from falling and causing injury to the operator or damage to the motorcycle.
Triumph Street Triple S - Service manual > Front Brake Master Cylinder
Front Brake Master Cylinder - Daytona 675 and Street Triple R Removal Warning: Before starting work, ensure the motorcycle is stabilised and adequately supported. This will help prevent it from falling and causing injury to the operator or damage to the motorcycle.
 Benelli Imperiale 400
 BMW F900XR
 Honda CB500X
 KTM 390 Adventure
 Triumph Street Triple S
 Yamaha MT-03
 Kawasaki Z400
 Triumph Street Triple S
 Yamaha MT-03