 Kawasaki Z400 - Service manual > Engine Oil and Oil Filter
Oil Level Inspection
WARNING
Vehicle operation with insufficient, deteriorated, or contaminated engine oil will cause accelerated wear and may result in engine seizure, accident, and Injury. Check the oil level before each use and change the oil and fitter according to the periodic maintenance chart.
Oil Level inspection
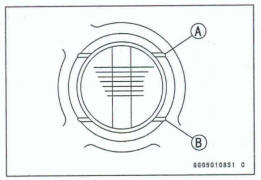
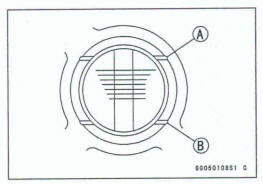
- Check that the engine oil level is between the upper [A] and lower [B] levels in the oil level inspection window
NOTE
- Situate the motorcycle so that it is perpendicular to the ground.
- If the motorcycle has just been used, wait several minutes for all the oil to drain down.
- If the oil has just been changed, start the engine and run it for several minutes at idle speed. This fills the oil filter with oil. Stop the engine, then wait several minutes until the oil settles
NOTICE
Racing the engine before the oil reaches every part can cause engine seizure.
If the engine oil gets extremely low or if the oil pump or oil passages clog up or otherwise do not function properly, the oil pressure warning indicator light will light. If this light stays on when the engine Is running above Idle speed, stop the engine immediately and find the cause.
*If the oil level is too high, remove the excess oil, using a syringe or some other suitable device.
*If the oil level is too low, add the correct amount of oil through the oil filler opening. Use the same type and make of oil that is already in the engine
NOTE
If the engine oil type and make are unknown, use any brand of the specified oil to top off the level in preference to running the engine with the oil level low. Then at your earliest convenience, change the oil completely.
Engine Oil Change
- Refer to the Engine Oil Change in the Periodic Maintenance chapter.
Oil Filter Replacement
- Refer to the Oil Filter Replacement in the Periodic Maintenance chapter.
Oil Pan
Oil Pan Removal
- Drain the engine oil (see Engine Oil Change in the Periodic Maintenance chapter).
- Remove: Exhaust Pipe (see Exhaust Pipe Removal in the Engine Top End chapter) Left Lower Fairing (see Lower Fairing Removal in the Frame chapter)
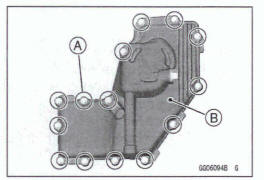
- Remove: Oil Pan Bolts [A] : Oil Pan [B] Gascet
Oil Pan Installation
- Install the following parts if removed.
Oil Pressure Relief Valve( see oil Pressure Relief Valve Installation) Oil Screen (see Oil Screen Installation)
- Replace the oil pan gasket with a new one.
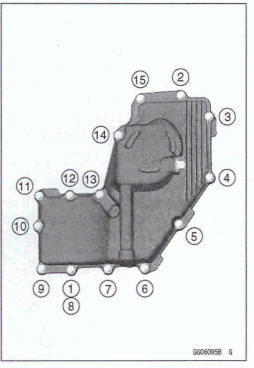
- Tighten the oil pan bolts following the specified tightening sequence [1 ~ 15].
Torque - Oil Pan Bolts: 9.8 Nm (1.0 kgf*m, 87 In*lb)
Install the removed parts (see appropriate chapters).
Oil Screen
Oil Screen Removal
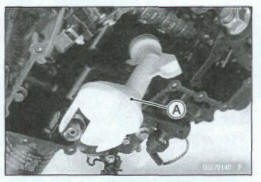
- Remove: Oil Pan (see Oil Pan Removal) Oil Screen [A]
Oil Screen Installation
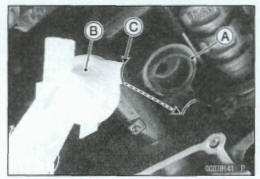
- Clean the oil screen (see Oil Screen Cleaning).
- Replace the O-ring [A] with a new one, and install it.
- Apply grease to the O-ring.
- Install the oil screen [B].
Fit the guide portion [C] to the crankcase.
Oil Screen Cleaning
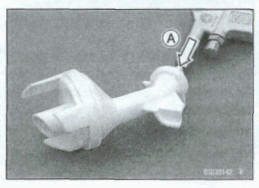
- Remove the oil screen (see Oil Screen Removal).
- Clean the oil screen with a high Rash-point solvent and remove the particles stuck.
- Blow away the particles by applying compressed air [A] from the inside to the outside (from the dean side to the dirty side).
WARNING
Gasoline and low flash-point solvents can be flammable and/or explosive and cause severe burns. Clean the screen in a well-ventilated area, and take care that there are no sparks or flame anywhere near the working am; this includes any appliance with a pilot light Do not use gasoline or a low flash-point solvent to clean the screen
NOTE
While cleaning the sawn, cheek hr any metal particles that might indicate internal engine damage
- Check the screens carefully for any damage
*If the screen is damaged, replace the oil screen
Oil Pressure Relief Valve Removal
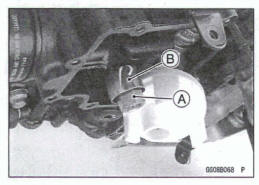
- Remove: Oil Pan (see Oil Pan Removal) Oil Pressure Relief Valve [A] Cover [B]
Oil Pressure Relief Valve Installation
- Apply a non-permanent locking agent to the threads of the oil pressure relief valve, and tighten it.
NOTICE
Do not apply too much nonpermanent locking agent to the threads. This may block the oil passage.
Torque - oil Pressure Relief Valve: 15 Nm (1.5 kgf*m, 11 ft*lb)
- Install the removed parts (see appropriate chapters).
Oil Pressure Relief Valve Inspection
- Remove: Oil Pressure Relief Valve (see Oil Pressure Relief Valve Removal)
- Check to see if the valve [A] slides smoothly when pushing it in with a wooden or other soft d, and see if it comes back to its seat by spring [B] pressure.
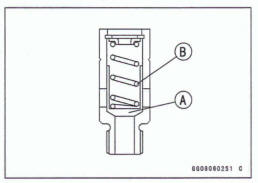
NOTE
Inspect the valve, its assembled state. Disassembly and assembly may change the valve performance.
*If any rough spots are found during above inspection, wash the valve dean with a high flash-point solvent and blow out any foreign particles that may be in the valve with compressed air.
WARNING
Gasoline and low flash-point solvents can be flammable and/or explosive and cause severe bums. Clean the oil pressure relief valve in a well-ventilated area, and take care that them are no sparks or flame anywhere near the working area; this includes any appliance with a pilot light. Do not use gasoline or a low flash-point solvent to clean the oil pressure relief valve.
*If cleaning does not solve the problem, replace the oil pressure relief valve as an assembly. The oil pressure relief valve is precision made with no allowance for replacement of individual parts.
See also:
 Kawasaki Z400 - Service manual > Oil Pump
Oil Pump Removal Remove: Clutch (see Clutch Removal in the Clutch chapter) Oil Pump Driven Gear Bolt [A] Oil Pump Driven Gear [B] Hold the gear steady with the gear holder [C].

 Benelli Imperiale 400
 BMW F900XR
 Honda CB500X
 KTM 390 Adventure
 Triumph Street Triple S
 Yamaha MT-03
 Kawasaki Z400
 Triumph Street Triple S
 Yamaha MT-03