 Kawasaki Z400 - Service manual > Clutch cover
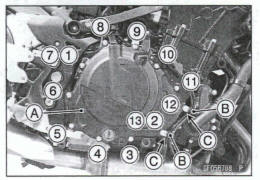
Clutch Cover Removal
- Drain the engine oil (see Engine Oil Change in the Periodic Maintenance chapter).
- Disconnect the clutch cable lower end.
- Remove: Right Middle Fairing (see Middle Fairing Removal in the Frame chapter)
- Clutch Cover Bracket Bolts [A]
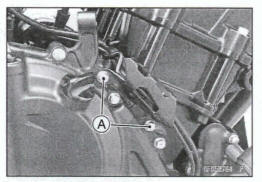
- Remove: Clutch Cover Bolts [A]
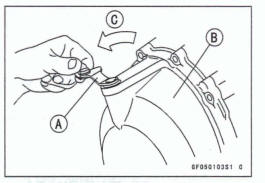
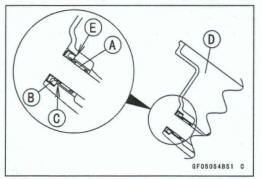
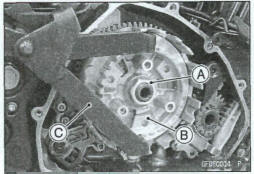
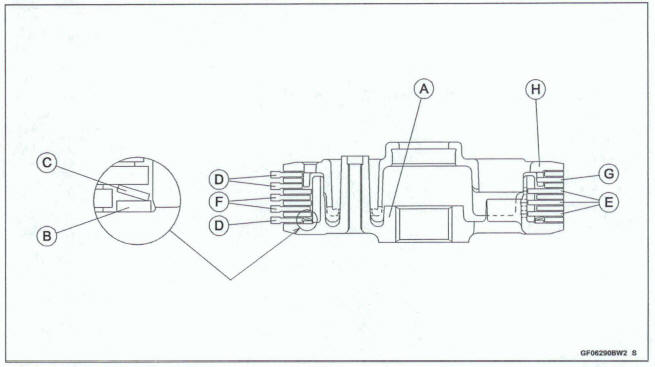
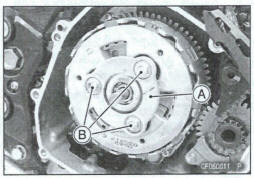
- Turn the release lever [A] outward, and remove the clutch
cover [B].
About 90º [C]
Clutch Cover Installation
- Be sure to dowel pins [A].
- Clean off any oil or dirt and apply liquid gasket to the area [B] where the mating surface of the crankcase touches the clutch cover gasket.
- Replace the clutch cover gasket with a new one and install it.
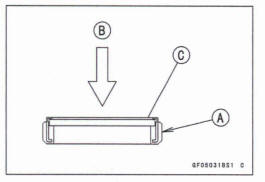
- Install: Clutch Cover [A] Clamps [B]
- Apply a non-permanent locking agent to the clutch cover bolt [11].
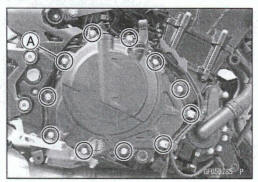
- Tighten the clutch cover bolts following the specified tightening sequence [1 - 13].
Toque -Clutch Cover Bob: 9.8 N*m (1.0 kgf*m, 87 in*lb) Clutch Cover Bracket Bolts: 9.8 N*m (1.0 kgf*m, 87 In-lb)
When tightening the clutch cover bolts, contact the damps to the stoppers [C].
- Install the removed parts (see appropriate chapters).
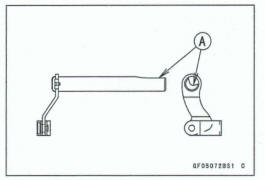
Release Shaft Removal

- Disconnect the clutch cable lower end
- Turn the release shaft [A] outward.
- Pull the release shaft straight out of the clutch cover.
Release Shaft Installation
- Replace the oil seal [A] with a new one.
- Apply grease to the oil seal lips on the upper ridge of the clutch cover.
- Apply engine oil to the needle bearing [B] in the hole of the clutch cover.
- Apply molybdenum disulfide grease to the pusher-holding portion [A] on the release shaft.
- Insert the release shaft straight into the upper hole of the clutch cover.
NOTICE
When inserting the release shaft, be careful not to remove the spring of the oil seal.
Clutch Cover Disassembly
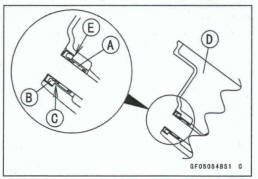
- Remove: Oil Seal [A] Needle Bearing [B] Oil Level Inspection Window

Clutch Cover Assembly
- Replace the needle bearing and oil seal with new ones.
NOTE
Install the needle bearing so that the manufacture's mark face out.
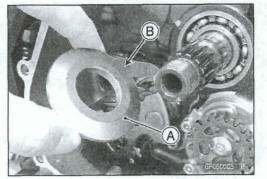
Install the needle bearing [A] and oil seal [B] position as shown.
Press the needle bearing so that the bearing surface [C] is flush with the housing end of clutch cover [D].
Press the oil seal until the bottom [E]
- Apply grease to the oil seal lips.
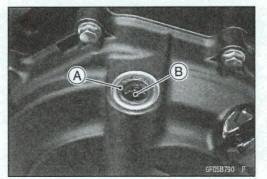
Apply water to the rubber of the oil level inspection window [A] and press (81 it so that the ring [C] faces outside.
Clutch
Clutch Removal
Remove:
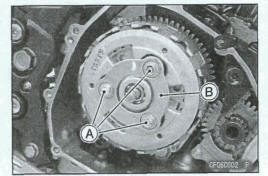
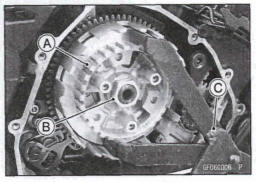
Clutch Cover (see Clutch Cover Removal) Clutch Stopper Bolts [A]
Loosen the clutch stopper bolts evenly with little by lie to prevent tilting the clutch stopper plate.
NOTICE
Do not loosen the one or two clutch stopper plate bolt at once to prevent clutch stopper plate warpage by the spring force
- Remove: Clutch Stopper Plate [B] Clutch Springs
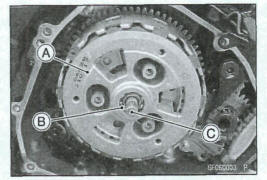
- Remove: Clutch Pressure Plate [A] Ball Bearing [B] Pusher [C] Friction Plates and Steel Plates Judder Spring and Spring Sheet
- Remove: Clutch Hub Nut [A] and Washer
Holding the clutch hub [B], remove them.
Special Tool - Clutch Holder [C]: 57001-1243
- Remove: Clutch Hub Spacer Bushing Clutch Housing Thrust Spacer
Clutch Installation
- Install the thrust spacer [A] so that the tapered side [B] faces inward.
- Apply engine oil to the bushing [A].
- Install: Bushing Oil Pump Drive Gear [B] Clutch Housing [C] spacer [D] Clutch Hub [E] Washer [F] Clutch Hub Nut [G]

- Holding the clutch hub [A], tighten the clutch hub nut [B].
Special Tool - Clutch Holder [C]: 57001- 1243 Toque -Clutch Hub Nut. 132 Nm (13.5 kgf*m, 97.4 ft-lb)
NOTE
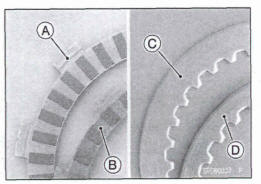
There are several kinds of the friction plates and steel plates.
Friction Plates: Wide Plate [A] Nam Plate [B]
Steel Plates: Wide Plate [C] Narrow Plate [D]
- Install the friction plates and steel plate alternately as
shown.
Clutch Hub [A] Spring Seat [B] Judder Spring [C] Narrow Friction Plates [D] Wide Steel Plates [E] Wide Friction Plates [F] Narrow Steel Plate [G] Clutch Pressure Plate [W]
Install the last friction plate and steel plate later with the clutch pressure plate.
NOTICE
If new dry friction plates and steel plates are installed, apply engine oi1 to the surfaces of each plate to avoid clutch plate seizure.
NOTICE
High pressure air blasts may detach clutch friction material from the friction plate. To prevent material detachment, set air pressure lower than 0.5 MPa (5 kgf/cm², 73 psi), do not place air nozzle closer than 30 cm (12 in.) to friction plate and only blow air at a right angle to the plate, facing the friction material.
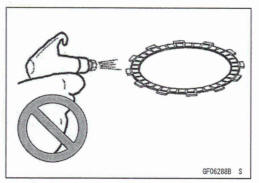
Do not blow air from the sid4 (horizontally) of the plate since it is mom likely to detach the friction material
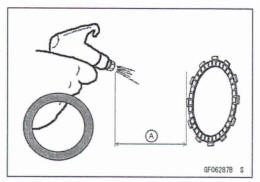
more than 30 an (12 in.) [A]
- Apply molybdenum disulfide grease to the pusher end [A].
- Install the pusher [B] into the drive shaft [C].

- Make sure the spring seats [A] are in position
- Apply engine oil to the sliding surfaces of the bearing [A].
- Put the remaining friction plate [B] and steel plate [C] on to the clutch pressure plate [D], and install them.

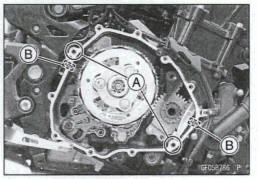
- Install: Clutch Springs Clutch Stopper Plate [A] Clutch Stopper Bolts [B]
- Tighten the clutch stopper bolts evenly with little by little to prevent tilting the clutch stopper plate.
- Tighten: Toque -Clutch Stopper Bolts: 10 N-m (1.0 kgf-m, 89 In-lb)
- Install the clutch cover (see Clutch Cover Installation).
Clutch Plate Wear and Damage Inspection
- Visually inspect the friction and steel plates for signs of seizure, overheating (discoloration), or uneven wear.
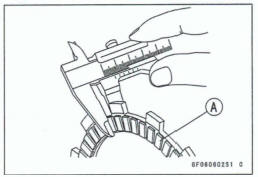
- Measure the thickness of each friction plate [A] at several points.
*If any plates show signs of damage, or if they have worn past the service limit, replace them with new ones.
Friction Plate Thickness Standard: 2.92 - 3.08 mm (0.115 - 0.121 In.) Service Limit: 2.6 mm (0.10 in.)
Clutch Plate Warp inspection
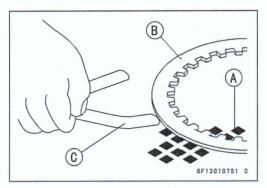
Place each friction plate or steel plate on a surface plate and measure the gap between the surface plate [A] and each friction plate or steel plate [B] with a thickness gauge [C]. The gap is the amount of friction or steel plate warp.
*If any plate is warped over the service limit, replace it with a new one.
Friction and Steel Plate Warp Standard: 0.15 mm (0.0059 in.) or less Service Limit: 0.3 mm (0.01 in.)
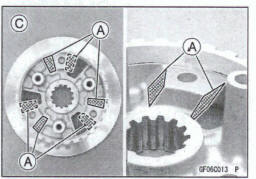
Clutch Housing Finger Inspection
- Visually inspect the clutch housing fingers [A] where the friction plate tangs [B] hi.
*If they are badly worn or if there are groove cuts where the tangs hit, replace the housing. Also, replace the friction plates if their tangs are damaged.
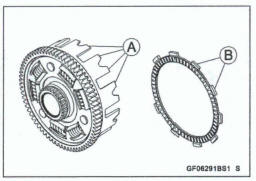
Clutch Housing Spline Inspection
- Visually inspect where the teeth [A] on the steel plates wear against the clutch hub splines [B].
*If there are notches worn into the splines, replace the clutch hub. Also, replace the steel plates if their teeth are damaged.

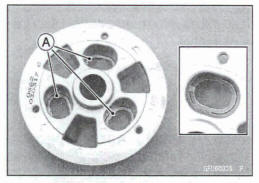
Clutch Pressure Plate and Clutch Hub Inspection
- Visually inspect the contact areas [A] of the clutch pressure plate [B] and clutch hub [C] for damage
*If the contact areas are damaged replace them with new ones.

Clutch Spring Inspection
*If all the components are good, but the problem still exists, replace the clutch springs (see Clutch Removal/Clutch Installation).
See also:
 Kawasaki Z400 - Service manual > Clutch Lever and Cable
Clutch Lever Free Play Inspection Refer to the Clutch Operation Inspection in the Periodic Maintenance chapter. Clutch Lever Free Play Adjustment Refer to the Clutch Operation Inspection in the Periodic Maintenance chapter
 Benelli Imperiale 400
 BMW F900XR
 Honda CB500X
 KTM 390 Adventure
 Triumph Street Triple S
 Yamaha MT-03
 Kawasaki Z400
 Triumph Street Triple S
 Yamaha MT-03