 BMW F900XR - Owner's Manual > Air filter
Removing air filter
- Remove the seat.
- Remove the tank cover.
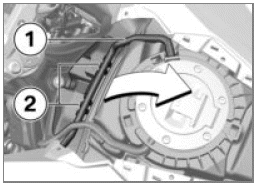
- Unclip hose 1 from retaining lugs 2.
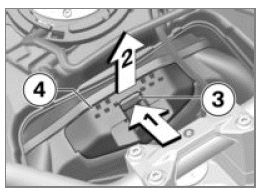
- To unlock, press button 3 in direction of arrow 1 and hold it in this position.
- Pull frame 4 in direction of arrow 2 out of the holder.
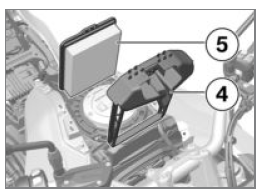
- Remove frame 4.
- Remove air filter insert 5.
Installing air filter
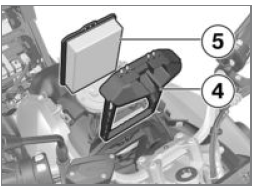
- Install air filter 5 in frame 4.
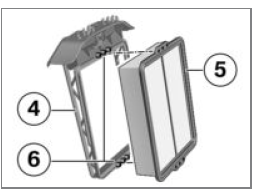
- Make sure that air filter 5 is correctly seated on lugs 6 on frame 4.
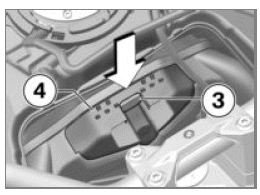
- Install the frame 4.
Button 3 latches.
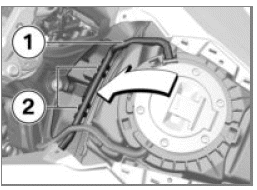
- Clip the hose 1 into the retaining lugs 2.
Lighting
Replacing LEDs for low-beam and high-beam headlight
- LED low-beam headlight and LED high-beam headlight can be replaced only as a complete unit. Consult a specialist workshop, preferably an authorised BMW Motorrad retailer.
Replacing LED for side light
- The LED side light can be replaced only as a complete unit. Consult a specialist workshop, preferably an authorised BMW Motorrad retailer.
Replacing LEDs for brake light and tail light
- The LED rear light can be replaced only as a complete unit. Consult a specialist workshop, preferably an authorised BMW Motorrad retailer.
Replacing bulbs for front and rear turn indicators
- LED turn indicators can be replaced only as a complete unit. Consult a specialist workshop, preferably an authorised BMW Motorrad retailer.
Replacing auxiliary headlight
- with LED additional headlight OA
- An auxiliary headlight can be replaced only as a complete unit. Consult a specialist workshop, preferably an authorised BMW Motorrad retailer.
Jump-starting
ATTENTION Excessive current flowing when the motorcycle is jump-started
Wiring smoulders/ignites or damage to the on-board electronics
- If the motorcycle has to be jump-started connect the leads to the battery terminals; never attempt to jump-start the engine by connecting leads to the on-board socket.
ATTENTION Contact between crocodile clips of jump leads and vehicle
Risk of short-circuit
- Use jump leads fitted with fully insulated crocodile clips at both ends.
ATTENTION Jump-starting with a voltage greater than 12 V
Damage to the on-board electronics
- Make sure that the battery of the donor vehicle has a voltage rating of 12 V.
- Remove the seat.
- When jump-starting the engine, do not disconnect the battery from the on-board electrical system.
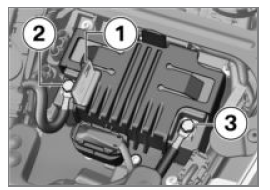
- Press in the lock and flip open positive terminal cover 1.
- Begin by connecting one end of the red jump lead to the positive terminal of the discharged battery and the other end to the positive terminal of the donor battery (positive on this vehicle: position 2).
- Then connect one end of the black jump lead to the negative terminal of the donor battery and the other end to the negative terminal of the discharged battery (negative on this vehicle: position 3).
NOTICE The spring-strut screw can be used as an alternative to the battery's negative terminal.
- Run the engine of the donor vehicle during jump-starting.
- Start the engine of the vehicle with the discharged battery in the usual way; if the engine does not start, wait a few minutes before repeating the attempt in order to protect the starter motor and the donor battery.
- Allow both engines to idle for a few minutes before disconnecting the jump leads.
- Disconnect the jump lead from the negative terminals first, then disconnect the second lead from the positive terminals.
NOTICE Do not use proprietary start-assist sprays or other products to start the engine.
- Install the seat.
Battery
Maintenance instructions
Correct upkeep, recharging and storage will prolong the life of the battery and are essential if warranty claims are to be considered.
Compliance with the points below is important in order to maximise battery life:
- Keep the surface of the battery clean and dry.
- Do not open the battery.
- Do not top up with water.
- Be sure to read and comply with the instructions for charging the battery on the following pages.
- Do not turn the battery upside down.
ATTENTION On-board electronics (e.g. clock) draining connected battery
Battery is deep-discharged; this voids the guarantee
- Connect a float charger to the battery if the motorcycle is to remain out of use for more than four weeks.
NOTICE BMW Motorrad has developed a float charger specially designed for compatibility with the electronics of your motorcycle. Using this charger, you can keep the battery charged during long periods of disuse, without having to disconnect the battery from the motorcycle's on-board systems.
You can obtain additional information from your authorised BMW Motorrad dealer.
Charging battery when connected
- Disconnect devices plugged into the sockets.
ATTENTION Charging the battery that is connected to the vehicle via the battery terminals
Damage to the on-board electronics
- Disconnect the battery at the battery terminals before charging.
ATTENTION Unsuitable chargers connected to a socket
Damage to charger and vehicle electronics
- Use suitable BMW chargers.
The suitable charger is available from your authorised BMW Motorrad dealer.
ATTENTION Recharging a fully discharged battery via the power socket or extra socket
Damage to the vehicle electronics
- If a battery has discharged to the extent that it is completely flat (battery voltage less than 12 V, indicator lights and multifunction display remain off when the ignition is switched on) always charge the disconnected battery with the charger connected directly to the battery terminals.
- With the battery connected to the vehicle's on-board electrical system, charge via the power socket.
NOTICE The motorcycle's on-board electronics know when the battery is fully charged. The on-board socket is switched off when this happens.
- Comply with the operating instructions of the charger.
NOTICE If you are unable to charge the battery through the on-board socket, you may be using a charger that is not compatible with your motorcycle's electronics. In this case, directly charge the battery at the terminals of the battery that has been disconnected from the vehicle.
Charging battery when disconnected
- Charge the battery using a suitable charger.
- Comply with the operating instructions of the charger.
- After charging, disconnect the charger's terminal clips from the battery terminals.
NOTICE The battery has to be recharged at regular intervals in the course of a lengthy period of disuse.
See the instructions for caring for your battery. Always fully recharge the battery before restoring it to use.
Removing battery
- Remove the seat.
- Make sure the ground is level and firm and place the motorcycle on its
stand.
- with anti-theft alarm (DWA) OE
- If applicable, switch off the antitheft alarm.
- Switch off the ignition.
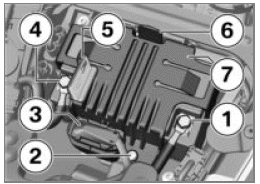
ATTENTION Battery not disconnected in accordance with correct procedure
Risk of short-circuit
- Always proceed in compliance with the specified disconnection sequence.
- First disconnect negative battery cable 1.
- Press in the lock and flip open positive terminal cover 5.
- Then disconnect positive battery cable 4.
- Disconnect connector 3.
- Remove screw 2.
- Push lock 6 to the rear.
- Remove battery holder 7.
- Lift the battery up and out; work it slightly back and forth if it is difficult to remove.
Installing battery
NOTICE If the vehicle has been disconnected from the battery for a significant time, the current date will have to be entered in the instrument cluster to guarantee correct operation of the service display.
- Switch off the ignition.
- Insert the battery into the battery compartment, with the positive terminal on the right in the direction of travel.
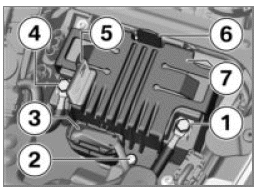
- Hold battery holder 7 in position.
Holder 6 engages with an audible click.
- Install screw 2.
- Connect connector 3.
- Flip open positive terminal cover 5.
ATTENTION Battery not connected in accordance with correct procedure
Risk of short-circuit
- Always proceed in compliance with specified installation sequence.
- Connect positive battery cable 4.
- Close positive terminal cover 5.
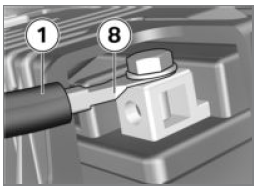
- Connect negative battery cable 1 aligned in direction 8.
- with anti-theft alarm (DWA) OE
- If applicable, switch on the antitheft alarm.
- Install the seat.
- Set the clock.
- Set the date.
Fuses
Replacing main fuse
ATTENTION Jumpering of blown fuses
Risk of short-circuit and fire
- Never attempt to jumper a blown fuse.
- Always replace a defective fuse with a new fuse of the same amperage.
- Switch off the ignition.
- Make sure the ground is level and firm and place the motorcycle on its stand.
- Remove the seat.
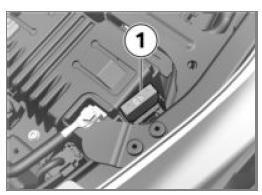
- Replace blown fuse 1.
NOTICE If fuse defects recur frequently have the electric circuits checked by a specialist workshop, preferably an authorised BMW Motorrad dealer.
 Main fuse
- 40 A (Voltage regulator)
- Install the seat.
Replacing fuses
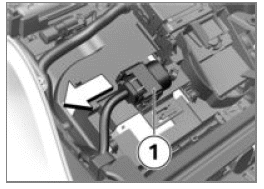
- Switch off the ignition.
- Remove the seat.
- Disconnect connector 1.
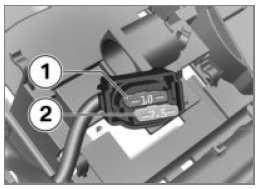
ATTENTION Jumpering of blown fuses
Risk of short-circuit and fire
- Never attempt to jumper a blown fuse.
- Always replace a defective fuse with a new fuse of the same amperage.
- Consult the fuse assignment diagram and replace blown fuse 1 or 2.
NOTICE If fuse defects recur frequently have the electric circuits checked by a specialist workshop, preferably an authorised BMW Motorrad dealer.
 Fuse box
- 10 A (Slot 1: instrument cluster, alarm system (DWA), ignition lock, diagnostic socket, coil main relay)
- 7.5 A (Slot 2: multifunction switch left, tyre pressure control (RDC) )
- Re-connect the connector.
- Install the seat.
Diagnostic connector
Disengaging diagnostic socket
CAUTION Incorrect procedure followed when loosening the diagnostic connector for the on-board diagnosis
Motorcycle experiences malfunctions
- Only have the diagnostic connector loosened by a specialist workshop or other authorised persons during your next BMW Service appointment.
- Have the work performed by appropriately trained staff.
- Refer to the vehicle manufacturer specifications.
- Remove the seat.
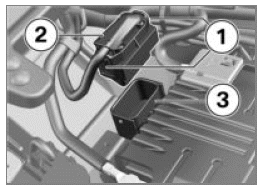
- Press locks 1 on both sides.
- Disengage diagnostic socket 2 from holder 3.
The interface to the diagnosis and information system can be connected to the diagnostic connector 2.
Securing diagnostic socket
- Disconnect the interface for the diagnosis and information system.
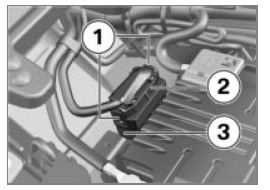
- Insert diagnostic socket 2 into holder 3.
The locks 1 engage.
- Install the seat.
Chain
Lubricating chain
ATTENTION Inadequate cleaning and lubrication of the drive chain
Accelerated wear
- Clean and lubricate the drive chain at regular intervals.
- Lubricate the drive chain every 800 km at the latest. Lubricate the chain more frequently if the motorcycle is ridden in wet, dusty or dirty conditions.
- Switch the ignition off and select neutral.
- Clean the drive chain with a suitable cleaning product, dry it and apply chain lubricant.
NOTICE BMW Motorrad recommends that you use the chain cleaning products and chain lubricants obtainable from your authorised BMW Motorrad dealer.
- Wipe off excess lubricant.
Checking chain sag
- Make sure the ground is level and firm and place the motorcycle on its stand.
- Turn the rear wheel until it reaches the position with the lowest amount of chain sag.
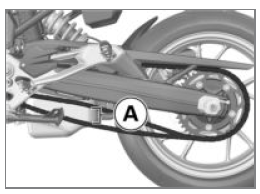
- Use a screwdriver to push the chain up and down and measure difference A.
 Chain deflection
- 35...45 mm (Motorcycle with no weight applied, supported on its side stand) - with low-slung OE
- 30...40 mm (Motorcycle with no weight applied, supported on its side stand)
If measured value is outside permitted tolerance:
- Adjust the chain sag.
Adjusting chain sag
- Make sure the ground is level and firm and place the motorcycle on its stand.
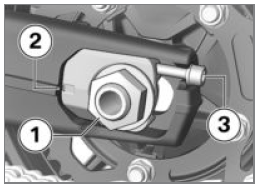
- Loosen the axle nut 1.
- Use the adjusting screws 3 on left and right to adjust chain sag.
- Check chain sag.
- Make sure that scale readings 2 are the same on left and right.
- Tighten quick-release axle nut 1 to the specified torque.
 Rear quick-release axle in
swinging arm
- Thread-locking compound: mechanical
- 100 Nm
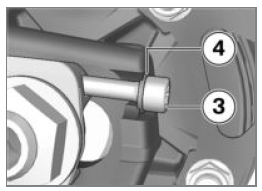
- Check that the washer 4 is lying flat against the screw head 3, correct as necessary.
Checking chain wear
Requirement
Chain tension is set correctly.
- Make sure the ground is level and firm and place the motorcycle on its stand.
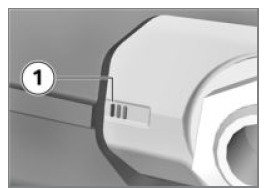
- Check whether the third marker line 1 can be fully seen.
Check chain length if the third marker line 1 can be fully seen:
- Engage 1st gear.
- Turn the rear wheel in the normal direction of travel until the chain is tensioned.
- Measure the length of the chain, rivet centre to rivet centre, over 10 rivets below the rear wheel swinging arm.
- Turn the rear wheel in the forward direction of travel and measure chain length at 3 different points.
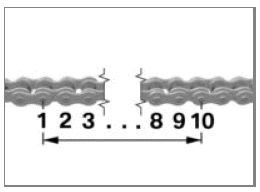
 Permissible chain length
- max 144 mm (measured centre to centre over 10 pins, chain pulled taut)
If the chain has stretched to the maximum permissible length:
- Consult a specialist workshop, preferably an authorised BMW Motorrad retailer.
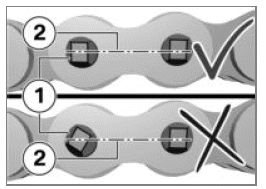
- Check whether a rivet head 1 has twisted out of line.
Rivet heads are parallel to the chain centreline 2.
- Chain riveting is OK.
If one or more rivet heads have twisted out of line:
- Consult a specialist workshop, preferably an authorised BMW Motorrad retailer.
See also:
 BMW F900XR - Owner's Manual > Wheels
Tyre recommendation For each size of tyre, BMW Motorrad tests and classifies as roadworthy certain makes. BMW Motorrad cannot assess the suitability or provide any guarantee of road safety for other tyres.
 BMW F900XR - Owner's Manual > Accessories
General notes CAUTION Use of other-make products Safety risk BMW Motorrad cannot examine or test each product of outside origin to ensure that it can be used on or in connection with BMW vehicles without constituting a safety hazard.

 Benelli Imperiale 400
 BMW F900XR
 Honda CB500X
 KTM 390 Adventure
 Triumph Street Triple S
 Yamaha MT-03
 Kawasaki Z400
 Triumph Street Triple S
 Yamaha MT-03