 Yamaha MT-03 - Service manual > Swingarm
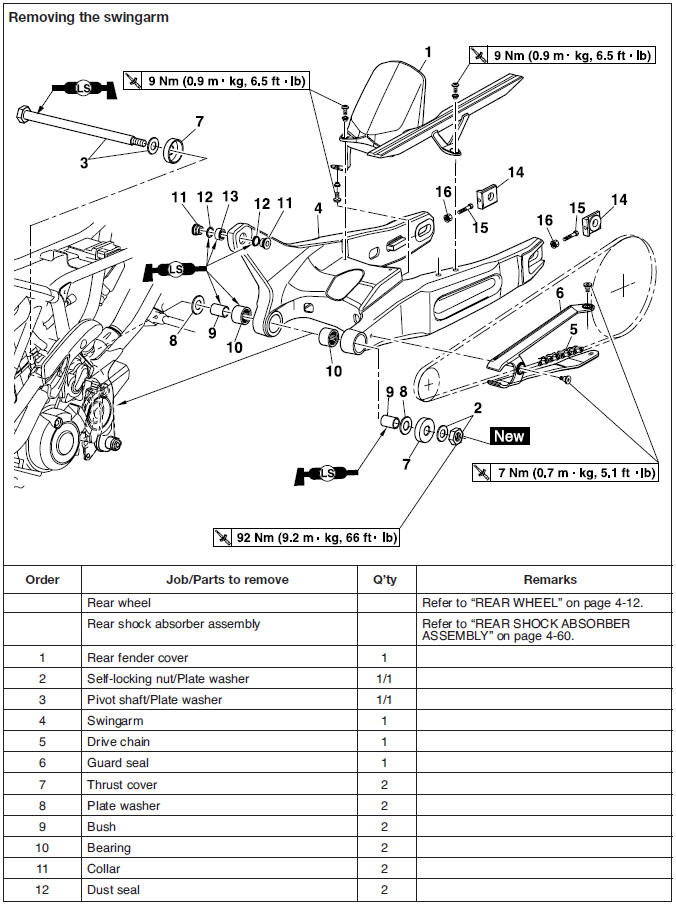
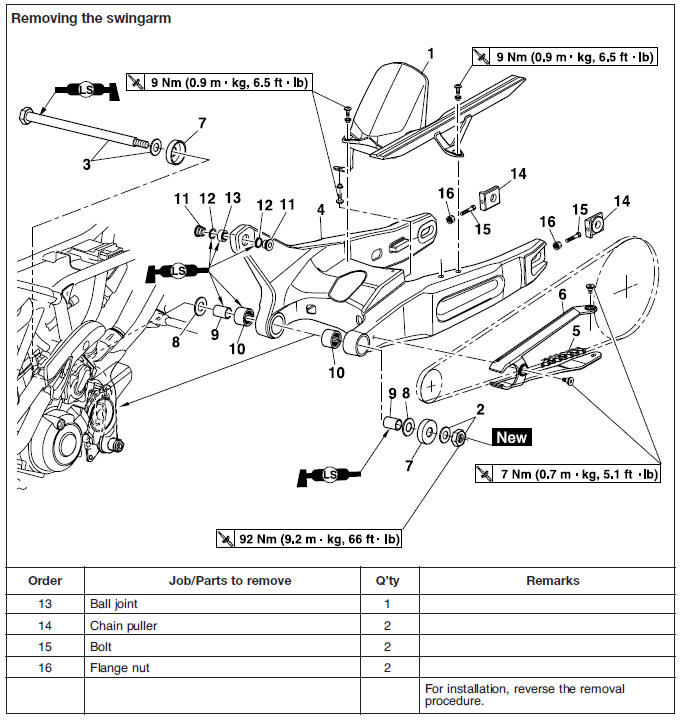
Removing the swingarm
1. Stand the vehicle on a level surface.
WARNING
Securely support the vehicle so that there is no danger of it falling over.
NOTE:
Place the vehicle on a suitable stand so that the rear wheel is elevated.
2. Remove:
- Rear wheel
- Rear shock absorber assembly
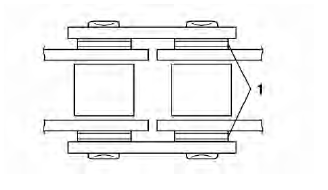
3. Measure:
- Swingarm side play
- Swingarm vertical movement
a. Measure the tightening torque of the pivot shaft nut.
 Swingarm pivot shaft nut
92 Nm (9.2 m*kg, 66 ft*lb)
Swingarm pivot shaft nut
92 Nm (9.2 m*kg, 66 ft*lb)
b. Measure the swingarm side play "a" by moving the swingarm from side to side.
c. If the swingarm side play is out of specification, check the spacers, bearings, washers, and dust covers.
 Swingarm side play
(at the end of the swingarm)
1.0 mm (0.04 in)
Swingarm side play
(at the end of the swingarm)
1.0 mm (0.04 in)
d. Check the swingarm vertical movement "b" by moving the swingarm up and down. If swingarm vertical movement is not smooth or if there is binding, check the spacers, bearings, washers, and dust covers.

4. Remove:
- Swingarm shaft nut
- Pivot shaft
- Swingarm
Checking the swingarm
1. Check:
- Swingarm
Bends/cracks/damage → Replace.
2. Check:
- Pivot shaft
Roll the pivot shaft on a flat surface.
Bends → Replace.
WARNING
Do not attempt to straighten a bent pivot shaft.
3. Wash:
- Pivot shaft
- Dust seal
- Thrust covers
- Spacer
- Washer
- Bearings
- Bush
- Ball joint
- Collars
 Recommended cleaning solvent
Kerosene
Recommended cleaning solvent
Kerosene
4. Check:
- Thrust covers
- Dust seal
- Oil seals Damage/wear → Replace.
- Ball joint
- Bearings Damage/pitting → Replace.
- Collars
- Spacers/Bush Damage/scratches → Replace.
Installing the swingarm
1. Lubricate:
- Bearings
- Ball joint
- Spacers/Bush
- Pivot shaft
 Recommended lubricant
Lithium-soap-based grease
Recommended lubricant
Lithium-soap-based grease
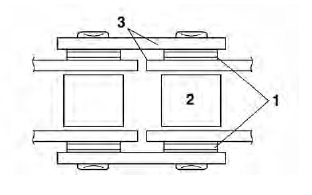
2. Press in their seats
- Bearings "1"
 Location "a" of bearings
(right and left)
9 mm (0.354 in)
Location "a" of bearings
(right and left)
9 mm (0.354 in)
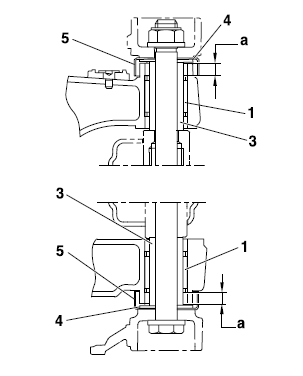
- Ball joint "2"
 Location "b" of ball joint
5 +- 0.5 mm (0.196 +- 0.0196 in)
Location "b" of ball joint
5 +- 0.5 mm (0.196 +- 0.0196 in)
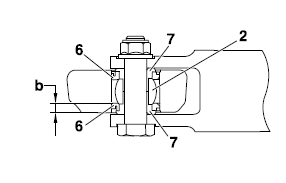
3. Install:
- Bushes "3"
- Plate washers "4"
- Thrust covers "5"
- Dust seals "6"
- Collars "7"
4. Install:
- Swingarm (locate it in its position on frame)
- Plate washer
- Pivot shaft
- Self-locking nut

5. Tighten:
- Self-locking nut
 Pivot shaft self-locking nut
92 Nm (9.2 m*kg, 66 ft*lb)
Pivot shaft self-locking nut
92 Nm (9.2 m*kg, 66 ft*lb)
6. Install:
- Rear shock absorber assembly
- Rear wheel
7. Adjust:
- Drive chain slack
 Drive chain slack
40.0-50.0 mm (1.57-1.97 in)
Drive chain slack
40.0-50.0 mm (1.57-1.97 in)
Chain drive
Removing the drive chain
1. Stand the vehicle on a level surface.
WARNING
Securely support the vehicle so that there is no danger of it falling over.
NOTE:
Place the vehicle on a suitable stand so that the rear wheel is elevated.
2. Remove:
- Swingarm
- Drive chain
Checking the drive chain
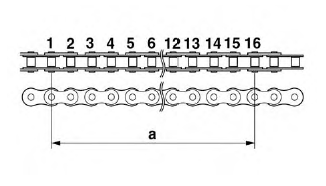
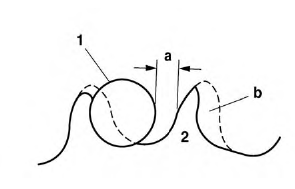
1. Measure:
15-link section "a" of the drive chain.
Out of specification → Replace the drive chain.
 15-link length limit
240.5 mm (9.46 in)
15-link length limit
240.5 mm (9.46 in)
NOTE:
- While measuring the 15-link section, push down on the drive chain to increase its tension.
- Measure the length between drive chain roller "1" and "16" as shown.
- Perform this measurement at two or three different places.
2. Check:
- Drive chain
Stiffness → Clean and lubricate or replace.

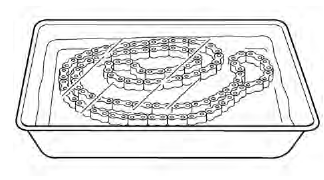
3. Clean:
- Drive chain
a. Wipe the drive chain with a clean cloth.
b. Put the drive chain in kerosene and remove any remaining dirt.
c. Remove the drive chain from the kerosene and completely dry it.
CAUTION:
- This vehicle has a drive chain with small rubber O-rings "1" between the drive chain side plates. Never use high-pressure water or air, steam, gasoline, certain solvents (e.g., benzine), or a coarse brush to clean the drive chain. High-pressure methods could force dirt or water into the drive chain's internals, and solvents will deteriorate the O-rings. A coarse brush can also damage the O-rings. Therefore, use only kerosene to clean the drive chain.
- Do not soak the drive chain in kerosene for more than ten minutes, otherwise the Orings can be damaged.
4. Check:
- O-rings "1" Damage -Replace the drive chain.
- Drive chain rollers "2" Damage/wear → Replace the drive chain.
- Drive chain side plates "3"
Damage/wear → Replace the drive chain.
Cracks → Replace the drive chain and make sure the battery breather hose is properly routed away from the drive chain and below the swingarm.
5. Lubricate:
- Drive chain
 Recommended lubricant
Engine oil or chain lubricant
suitable for O-ring chains
Recommended lubricant
Engine oil or chain lubricant
suitable for O-ring chains
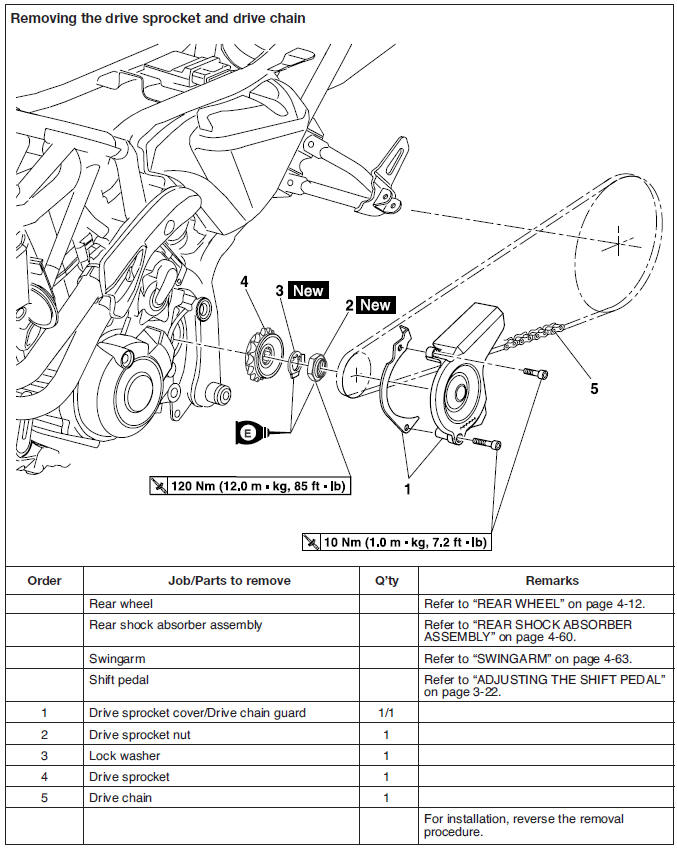
Removing the drive sprocket
NOTE:
Loosen the drive sprocket nut before removing the rear wheel.
1. Remove:
- Drive sprocket cover
- Drive chain guard
2. Straighten the lock washer tab "a"
3. Remove:
- Drive sprocket nut "1"
- Lock washer "2"
- Drive sprocket "3"
Checking the drive sprocket
1. Check:
- Drive sprocket
More than 1/4 tooth "a" wear → Replace the drive chain sprockets as a set.
Bent teeth → Replace the drive chain sprockets as a set.
b. Correct
1. Drive chain roller
2. Drive chain sprocket
Checking the rear wheel sprocket
Refer to "CHECKING AND REPLACING THE REAR WHEEL SPROCKET"
Checking the rear wheel drive hub
Refer to "CHECKING THE REAR WHEEL DRIVE HUB"
Installing the drive chain
1. Lubricate:
- Drive chain
 Recommended lubricant
Engine oil or chain lubricant
suitable for O-ring chains
Recommended lubricant
Engine oil or chain lubricant
suitable for O-ring chains
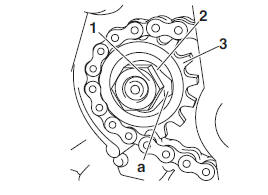
2. Install:
- Drive sprocket "1"
- Lock washer "2"

- Drive sprocket nut "3"
 Drive sprocket nut
120 Nm (12.0 m*kg, 85 ft*lb)
Drive sprocket nut
120 Nm (12.0 m*kg, 85 ft*lb)
NOTE:
- Install the drive sprocket "1" and drive sprocket nut "3" in the direction shown.
- While applying the rear brake, tighten the drive sprocket nut.
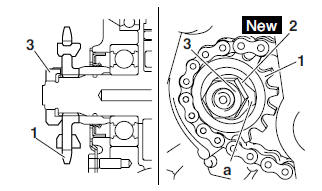
3. Bend the lock washer tab "a" along a flat side of the nut.
4. Install:
- Shift pedal
5. Adjust:
- Drive chain slack
 Drive chain slack
40.0-50.0 mm (1.57-1.97 in)
Drive chain slack
40.0-50.0 mm (1.57-1.97 in)
See also:
 Yamaha MT-03 - Service manual > Steering head
Removing the lower bracket
Yamaha MT-03 - Service manual > Engine
Engine removal
 Benelli Imperiale 400
 BMW F900XR
 Honda CB500X
 KTM 390 Adventure
 Triumph Street Triple S
 Yamaha MT-03
 Kawasaki Z400
 Triumph Street Triple S
 Yamaha MT-03