 Triumph Street Triple S - Service manual > Safety Instructions
Jacking and Lifting
Warning: Always ensure that any lifting apparatus has adequate load and safety capacity for the weight to be lifted.
Ensure the motorcycle is well supported to prevent any possibility of the machine falling during lifting or jacking, or while repairs and servicing are carried out.
Never rely on a single means of support when working with the motorcycle. Use additional safety supports and straps to prevent toppling.
Do not leave tools, lifting equipment, spilt oil, etc. in a place where they could become a hazard to health.
Always work in a clean, tidy area and put all tools away when the work is finished.
Precautions against Damage
Avoid spilling brake fluid or battery acid on any part of the bodywork. Wash spillages off with water immediately.
Disconnect the battery earth lead before starting work, see ELECTRICAL PRECAUTIONS.
Always use the recommended service tool where specified.
Protect exposed bearing and sealing surfaces, and screw threads from damage.
Coolant
Warning: Coolant mixture, which is blended with anti-freeze and corrosion inhibitors contains toxic chemicals which are harmful to the human body. Never swallow anti-freeze, corrosion inhibitors or any of the motorcycle coolant.
Warning: Do not remove the radiator cap when the engine is hot.
When the engine is hot, the coolant inside the radiator is hot and also under pressure. Contact with the pressurised coolant will cause scald s and skin damage.
Caution: The coolant anti-freeze contains a corrosion inhibitor which helps prevent damage to the metal surfaces inside the cooling system. Without this inhibitor, the coolant would 'attack the metals and the resulting corrosion would cause blockages in the cooling system leading to engine overheating and damage. Always use the correct anti-freeze as specified in the Owner's Handbook.
Never use a methanol based anti-freeze as this does not contain the required corrosion inhibition properties.
Caution: Distilled water must be used with the anti-freeze (see specification for anti-freeze) in the cooling system.
If hard water is used in the system, it causes scale accumulation in the water passages, and considerably reduces the efficiency of the cooling system. Reduced cooling system efficiency may lead to the engine overheating and engine damage.
Cleaning Components
A high flash-point solvent is recommended to reduce fire hazard.
Always follow container directions regarding the use of any solvent.
Always use the recommended cleaning agent or equivalent.
Do not use degreasing equipment for components containing items which could be damaged by the use of this process. Whenever possible, clean components and the area surrounding them before removal. Always observe scrupulous cleanliness when cleaning dismantled components.
Lubrication
The majority of engine wear occurs while the engine is warming up and before all the rubbing surfaces have an adequate lubrication film. During assembly, oil or grease (whichever is more suitable) should be applied to any rubbing surface, which has lost its lubrication film. Old grease and dirty oil should be cleaned off. This is because used lubricants will have lost some lubrication qualities and may contain abrasive foreign particles.
Use recommended lubricants. Some oils and greases in particular should be used only in certain applications and may be harmful if used in an application for which they are not intended. This manual makes reference to molybdenum disulphide grease in the assembly of certain engine and chassis parts. Always check manufacturer recommendations before using such special lubricants.
Joints and Joint Faces
Assemble joints dry unless otherwise specified in this manual.
If gaskets and/or jointing compound is recommended for use, remove all traces of old jointing material prior to reassembly.
Do not use a tool which will damage the joint faces and smooth out any scratches or burrs on the joint faces using an oil stone. Do not allow dirt or jointing material to enter any tapped holes.
Gaskets, O-rings
Do not re-use a gasket or O-ring once it has been in service. The mating surfaces around the gasket should be free of foreign matter and perfectly smooth to avoid oil or compression leaks.
Liquid Gasket, Non-permanent Locking Agent
Follow manufacturer's directions for cleaning and preparing surfaces where these compounds will be used.
Apply sparingly as excessive amounts of sealer may block engine oil passages and cause serious damage.
Prior to re-assembly, blow through any pipes, channels or crevices with compressed air.
Warning: To prevent injury, always use eye, face and ear protection when using compressed air. Always wear protective gloves if the compressed air is to be directed in proximity to the skin.
Screw Threads
Metric threads to ISO standard are used.
Damaged nuts, bolts and screws must always be discarded.
Castellated nuts must not be slackened back to accept a split-pin, except in those recommended cases when this forms part of an adjustment.
Do not allow oil or grease to enter blind threaded holes.
The hydraulic action on screwing in the bolt or stud could split the housing.
Always tighten a nut or bolt to the recommended torque figure. Damaged or corroded threads can affect the torque reading.
Unless specified, threaded fixings must always be fitted dry (no lubrication).
Warning: Never lubricate a thread unless instructed to do so.
When a thread of a fixing is lubricated, the thread friction is reduced. When the fixing is tightened, reduced friction will cause overtightening and possible fixing failure.
A fixing which fails in service could cause component detachment leading to loss of control and an accident.
Locking Devices
Always release locking tabs and fit new locking washers, do not re-use locking tabs.
Fitting a Split Pin
Always fit new split-pins of the correct size for the hole in the bolt or stud. Do not slacken back castle nuts when fitting split pin, except in those recommended cases when this forms part of an adjustment.
Always fit new roll pins of an interference fit in the hole.
Circlips, Retaining Rings
Replace any circlips and retaining rings that are removed.
Removal weakens and deforms circlips causing looseness in the circlip groove. When installing circlips and retaining rings, take care to compress or expand them only enough to install them.
Always use the correct replacement circlip as recommended in the Triumph Parts Catalogue.
Self Locking Nuts
Self-locking nuts can be re-used, providing resistance can be felt when the locking portion passes over the thread of the bolt or stud.
DO NOT re-use self-locking nuts in critical locations, e.g. suspension components. Always use the correct replacement self-locking nut.
Encapsulated Bolts
An encapsulated bolt can be identified by a coloured section of thread which is treated with a locking agent.
Unless a specified repair procedure states otherwise, encapsulated bolts cannot be reused and MUST be replaced if disturbed or removed.
Warning: Failure to replace an encapsulated bolt could lead to a dangerous riding condition. Always replace encapsulated bolts.
Oil and Grease Seals
Replace any oil or grease seals that are removed.
Removal will cause damage to an oil seal which, if re-used, would cause an oil leak.
Ensure the surface on which the new seal is to run is free of burrs or scratches. Renew the component if the original sealing surface cannot be completely restored.
Protect the seal from any surface which could cause damage to the seal lips when it is being fitted. Use a protective sleeve or tape to cover the relevant surface and avoid touching the sealing lip.
Lubricate the sealing lips with a recommended lubricant.
This will help to prevent damage in initial use. On dual lipped seals, smear the area between the lips with appropriate grease.
When pressing in a seal which has manufacturer's marks, press in with the marks facing out.
Seals must be pressed into place using a suitable driver.
Use of improper tools will damage the seal.
Press
A part installed using a press or driver, such as a wheel bearing, should first be coated with oil or grease on its outer or inner circumference so that it will locate smoothly.
Ball Bearings
When installing a ball bearing, the bearing race which is an interference fit should be pushed by a suitable driver.
This prevents severe stress or damage to the load carrying components. Press a ball bearing until it touches the shoulder in the bore or on the shaft.
Press or drift seals to the depth of its housing, with the sealing lip facing the lubricant to be retained if the housing is shouldered, or flush with the face of the housing where no shoulder is provided.
Chassis Bearing Lubrication
Note:
- This information relates only to bearing lubrication. For the procedures necessary to replace a bearing, always refer to the relevant section of this service manual.
- Bearings installed in engine and transmission applications are not covered by this information. Refer to the lubrication chapter or the relevant engine chapter for additional information.
General
For a bearing to be serviceable for its anticipated life span it must be checked, adjusted and lubricated at regular intervals, as specified in the service schedules given in the owner's handbook and this service manual.
A correctly lubricated bearing will have a film of lubrication that separates the moving parts, disperses heat and protects the bearing surfaces from corrosion.
Note:
- In all cases, use the lubricant recommended in the service manual.
- Grease the bearing, not the cavity where it is located.
- A bearing that is not regularly checked and lubricated will have a reduced life span.
New Bearings
New bearings are typically protected with an oil preservative to prevent corrosion etc. during storage. This is NOT the lubrication for the bearing but DOES NOT need to be washed off prior to assembly and in-service lubrication.
When lubricating a new bearing with grease the following steps should be taken:
1. Do not clean off the oil preservative.
2. Grease must be forced between the roller elements and the roller cage.
3. Rotate the bearing to ensure that the grease is distributed over the entire circumference of the internal parts.
4. Any excess grease should be smeared on the outside of the rollers.
Lubrication and Checks While Servicing a Bearing
1. Disassemble parts as necessary to access the bearing. Refer to the relevant service manual.
2. Inspect the old grease covering the bearing, looking for signs of bearing damage, i.e. flakes or specks of metal.
3. Remove the old grease.
4. Check the bearing for smooth operation and visually check for corrosion, dents and flaking in the bearing race, rollers or cage. Replace if necessary. Refer to the relevant service manual.
Below/overleaf several common bearing types and the lubrication procedures for each are identified:

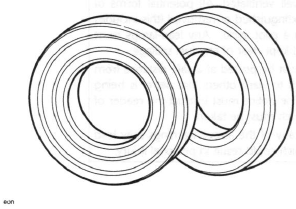
Sealed bearings (wheel bearings & swinging arm, depending on the model)
Note:
- Sealed bearings can be identified by their integrated seals.
- Sealed bearings are lubricated for life by the manufacturer.
- Any attempt to change the grease in a sealed bearing will damage the integrated seals. If the seals are damaged dirt and water will ingress and the life of the bearing will be greatly reduced.

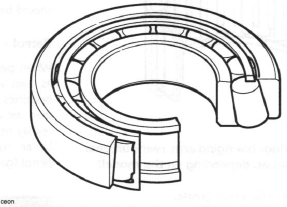
Taper bearings (swinging arm & headstock, depending on the model)
1. Grease must be forced between the inner race and the roller carrier.
2. Rotate the bearing to ensure that the grease is distributed over the entire circumference of the internal parts.
3. Any excess grease should be smeared on the outside of the rollers.

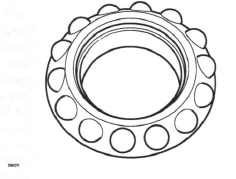
Angular contact and ball bearings (headstock)
1. Grease the bearing races and the ball bearing carrier.
2. Rotate the bearing to ensure that the grease is distributed over the entire circumference of the internal parts.

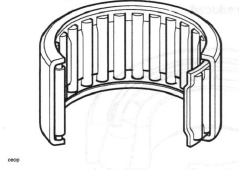
Needle roller bearings (swinging arm, rear hub, rear suspension
linkages, depending on the model)
1. Coat the needle rollers with grease.
2. Ensure the needle rollers turn so that the grease is distributed over the entire circumference of the internal parts.
3. Assemble the parts, adjust and check as necessary.
Metal bushes
1. Disassemble the parts as necessary to access the bush. Refer to the relevant service manual.
2. Remove the old grease.
3. Apply fresh grease to the metal bush.
See also:
 Triumph Street Triple S - Service manual > Ignition System Safety Precautions
Warning: The ignition system produces extremely high voltages. Do not touch any part of the ignition system or any cables while the engine is running. An electric shock caused by contact with the ignition system may lead to illness, injury or death.
 Triumph Street Triple S - Service manual > Fuel Handling Precautions
General The following information provides basic precautions which must be observed if petrol (gasoline) is to be handled safely. It also outlines other areas of risk which must not be ignored. This information is issued for basic guidance only and, if in doubt, appropriate enquiries should be made of your local Fire Officer.

 Benelli Imperiale 400
 BMW F900XR
 Honda CB500X
 KTM 390 Adventure
 Triumph Street Triple S
 Yamaha MT-03
 Kawasaki Z400
 Triumph Street Triple S
 Yamaha MT-03