 Yamaha MT-03 - Owner's Manual > Replacing the headlight bulb
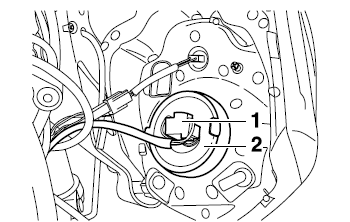
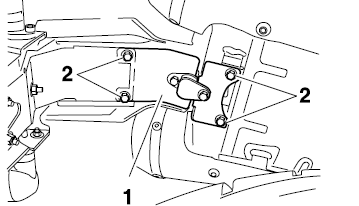
- Headlight coupler
- Headlight bulb cover
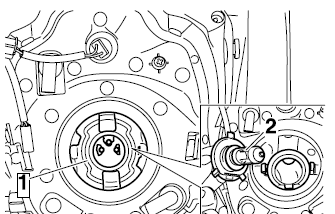
- Headlight bulb holder
- Headlight bulb
This model is equipped with a quartz bulb headlight. If the headlight bulb burns out, replace it as follows.
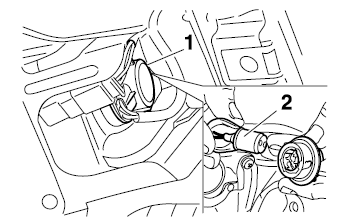
1. Turn the handlebar to the left side to access the headlight coupler.
2. Disconnect the headlight coupler, and then remove the bulb cover.
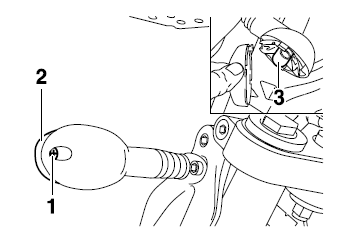
3. Unhook the headlight bulb holder, and then remove the defective bulb.
WARNING
Headlight bulbs get very hot. Therefore, keep flammable products away from a lit headlight bulb, and do not touch the bulb until it has cooled down.
4. Place a new headlight bulb into position, and then secure it with the bulb holder.
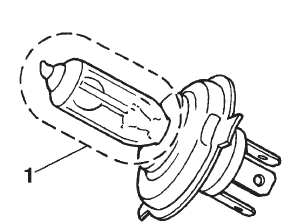
- Do not touch this area
CAUTION:
Take care not to damage the following parts:
- Headlight bulb
- Do not touch the glass part of the headlight bulb to keep it free from oil, otherwise the transparency of the glass, the luminosity of the bulb, and the bulb life will be adversely affected. Thoroughly clean off any dirt and fingerprints on the headlight bulb using a cloth moistened with alcohol or thinner.
- Headlight lens
- Do not affix any type of tinted film or stickers to the headlight lens.
- Do not use a headlight bulb of a wattage higher than specified.
5. Install the headlight bulb cover, and then connect the coupler.
6. Have a Yamaha dealer adjust the headlight beam if necessary.
Replacing an auxiliary light bulb

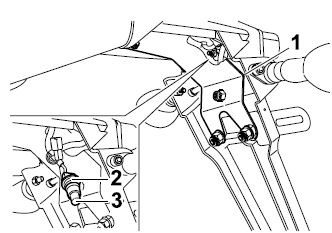
- Auxiliary light socket
- Auxiliary light
If the auxiliary light bulb burns out, replace it as follows.
1. Turn the handlebar to the right or left side to access the auxiliary light socket.
2. Remove the auxiliary light socket (together with the bulb) by pulling it.
3. Remove the defective bulb by pulling it out.
4. Insert a new bulb into the socket.
5. Install the auxiliary light socket (together with the bulb) by pushing it in.
Replacing the tail/brake light bulb
- Tail/brake light bulb cover
- Cover bolts
- Tail/brake light socket
- Tail/brake light bulb
1. Remove the tail/brake light bulb cover by removing the bolts.
2. Remove the socket (together with the bulb) by turning it counterclockwise.
3. Remove the defective bulb by pushing it in and turning it counterclockwise.
4. Insert a new bulb into the socket, push it in, and then turn it clockwise until it stops.
5. Install the socket (together with the bulb) by turning it clockwise.
6. Place the tail/brake light bulb cover in its original position, insert the bolts and then tighten them to the specified torque.
Tightening torque:
Tail/brake light bulb cover bolt: 10 Nm (1.0 m-kgf, 7.2 ft-lbf)
Replacing a turn signal light bulb
- Screw
- Turn signal light lens
- Turn signal light bulb
1. Remove the turn signal light lens by removing the screw.
2. Remove the defective bulb by pushing it in and turning it counterclockwise.
3. Insert a new bulb into the socket, push it in, and then turn it clockwise until it stops.
4. Install the lens by installing the screw.
CAUTION: Do not overtighten the screw, otherwise the lens may break.
Replacing the license plate light bulb
- Reinforcement plate
- Bulb socket
- License plate light bulb
1. Remove the reinforcement plate by removing the bolts and nuts.
2. Remove the license plate light bulb socket by pulling it out.
NOTE: When removing the license plate light bulb socket, be careful not to pull too hard.
3. Remove the defective bulb by pulling it out of the socket.
4. Insert a new bulb into the socket.
5. Install the bulb socket by pushing it in.
6. Install the reinforcement plate in the original position, and then tighten bolts and nuts to the specified torque.
Tightening torque:
Reinforcement plate nut: 7 Nm (0.7 m-kgf, 5.1 ft-lbf)
Reinforcement plate bolt (centre): 10 Nm (1.0 m-kgf, 7.2 ft-lbf)
Reinforcement plate bolt (upper): 10 Nm (1.0 m-kgf, 7.2 ft-lbf)
See also:
 Yamaha MT-03 - Owner's Manual > Battery
This model is equipped with a sealed-type (MF) battery, which does not require any maintenance. There is no need to check the electrolyte or to add distilled water. CAUTION: Never attempt to remove the battery cell seals, as this would permanently damage the battery.
Yamaha MT-03 - Owner's Manual > Supporting the motorcycle
Since this model is not equipped with a centerstand, follow these precautions when removing the front and rear wheel or performing other maintenance requiring the motorcycle to stand upright. Check that the motorcycle is in a stable and level position before starting any maintenance. A strong wooden box can be placed under the engine for added stability.
 Benelli Imperiale 400
 BMW F900XR
 Honda CB500X
 KTM 390 Adventure
 Triumph Street Triple S
 Yamaha MT-03
 Kawasaki Z400
 Triumph Street Triple S
 Yamaha MT-03