 Yamaha MT-03 - Owner's Manual > Battery
This model is equipped with a sealed-type (MF) battery, which does not require any maintenance. There is no need to check the electrolyte or to add distilled water.
CAUTION: Never attempt to remove the battery cell seals, as this would permanently damage the battery.
To access the battery
1. Remove the passenger seat and rider seat.
2. Remove panels A and B.
- Fuel tank rear bolt
- Fuel tank front bolt (RH)
- Fuel tank front bolt (LH)
- Fuel tank couplers
- Fuel hose
- Fuel tank breather/overflow hoses
- Clamps
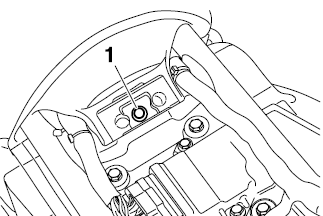
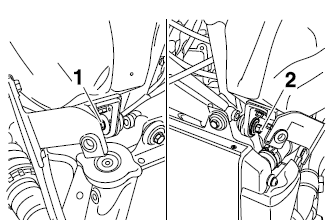
3. Remove the fuel tank, by removing the bolt and the washer at the rear of the fuel tank, and the two bolts at the front of the fuel tank.
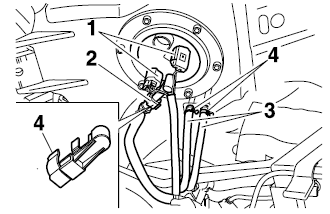
4. Remove the clamp shown, and then remove the fuel hoses.
5. Remove the fuel tank by pulling it upward.
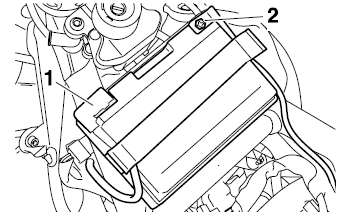
6. Remove the battery cover by pulling it upward.
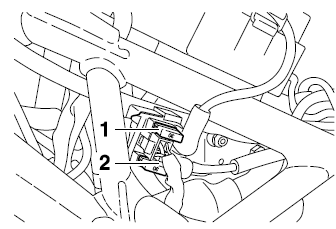
- Positive battery terminal
- Negative battery terminal
To charge the battery
Have a Yamaha dealer charge the battery as soon as possible if it seems to have discharged. Keep in mind that the battery tends to discharge more quickly if the vehicle is equipped with optional electrical accessories.
WARNING
- Electrolyte is poisonous and dangerous since it contains sulfuric acid, which causes severe burns. Avoid any contact with skin, eyes or clothing and always shield your eyes when working near batteries. In case of contact, administer the following FIRST AID.
- EXTERNAL: Flush with plenty of water.
- INTERNAL: Drink large quantities of water or milk and immediately call a physician.
- EYES: Flush with water for 15 minutes and seek prompt medical attention.
- Batteries produce explosive hydrogen gas. Therefore, keep sparks, flames, etc., away from the battery and provide sufficient ventilation when charging it in an enclosed space.
- KEEP THIS AND ALL BATTERIES OUT OF THE REACH OF CHILDREN.
To store the battery
1. If the vehicle will not be used for more than one month, remove the battery, fully charge it, and then place it in a cool, dry place.
2. If the battery will be stored for more than two months, check it at least once a month and fully charge it if necessary.
3. Fully charge the battery before installation.
4. After installation, make sure that the battery leads are properly connected to the battery terminals.
CAUTION:
- Always keep the battery charged. Storing a discharged battery can cause permanent battery damage.
- To charge a sealed-type (MF) battery, a special
(constant-voltage) battery charger is required.
Using a conventional battery charger will damage the battery. If you do not have access to a sealed-type (MF) battery charger, have a Yamaha dealer charge your battery.
Replacing the fuses
- Main fuse
- Reserve fuse
- Parking lighting fuse
- Signaling system fuse
- Headlight fuse
- Ignition fuse
- Electronic fuel injection fuse
- Radiator fan fuse
- Backup fuse
- Reserve fuses
The main fuse is located under the fuel tank. The fuse box which contains the fuses for the individual circuits is located under the rider seat.
If a fuse is blown, replace it as follows.
1. Turn the key to "OFF" and turn off the electrical circuit in question.
2. Remove the blown fuse, and then install a new fuse of the specified amperage.
Specified fuses:
Main fuse: 30 A
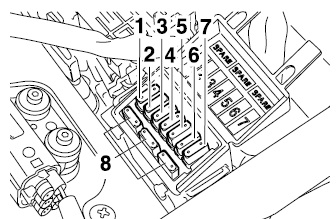
Fuse box:
Parking lighting fuse: 10 A
Signaling system fuse: 10 A
Headlight fuse: 20 A
Ignition fuse: 10 A
Electronic fuel injection fuse: 10 A
Radiator fan fuse: 7.5 A
Fuel injection system fuse: 10 A
Backup fuse (for odometer, clock and immobilizer): 10 A
CAUTION: Do not use a fuse of a higher amperage rating than recommended to avoid causing extensive damage to the electrical system and possibly a fire.
3. Turn the key to "ON" and turn on the electrical circuit in question to check if the device operates.
4. If the fuse immediately blows again, have a Yamaha dealer check the electrical system.
See also:
 Yamaha MT-03 - Owner's Manual > Checking and lubricating the cables
The operation of all control cables and the condition of the cables should be checked before each ride, and the cables and cable ends should be lubricated if necessary. If a cable is damaged or does not move smoothly, have a Yamaha dealer check or replace it.
Yamaha MT-03 - Owner's Manual > Replacing the headlight bulb
Headlight coupler Headlight bulb cover Headlight bulb holder Headlight bulb
 Benelli Imperiale 400
 BMW F900XR
 Honda CB500X
 KTM 390 Adventure
 Triumph Street Triple S
 Yamaha MT-03
 Kawasaki Z400
 Triumph Street Triple S
 Yamaha MT-03