 Kawasaki Z400 - Service manual > Lighting System
This motorcycle adopt the daylight system and have a headlight circuit relay in the relay box. The headlight does not go on when the ignition switch and the engine stop switch are first turned on. The headlight comes on after the starter button is released and stays on until the ignition switch is turned off. The headlight will go out momentarily whenever the starter button is pressed and come back on when the button is released.
Headlight Beam Horizontal Adjustment
- Refer to the Headlight Aiming Inspection in the Periodic Maintenance chapter.
Headlight Beam Vertical Adjustment
- Refer to the Headlight Aiming Inspection in the Periodic Maintenance chapter.
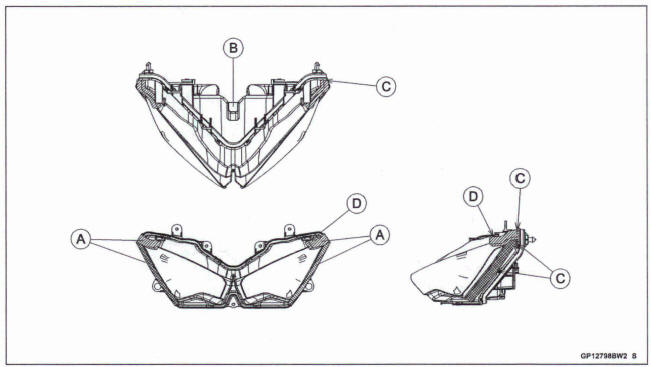
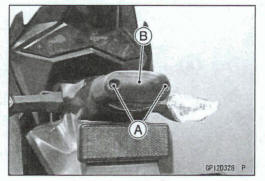
Headlight (LED) Assembly Removal/Installation
- Remove: Upper Fairing (sea Upper Fairing Removal in the Frame chapter) Bolt [A] screws [B]

- Installation is the reverse of removal.
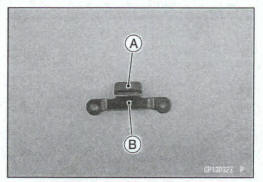
- When installing the pads [A], install them as shown.
[B] Headlight [C] Fit the pads to the edge of the headlight.
[D] Fit the pads under the rib of the headlight.
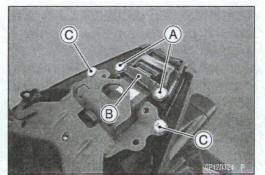
Brake/Tail Light (LED) Removal
- Remove: Seat Covers (see Seat Cover Removal chapter) Screws [A] Bracket [B] screws [C]
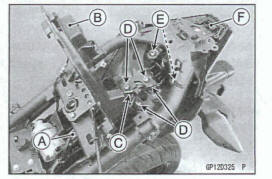
- Disconnect the brakehi1 light lead connector [A].
- Lift up the compartment cover [B].
- Clear the brakehi1 light lead [C].
- Remove the hits [D].
- Remove the screws [E] and brake/tail light (LED) [F]
Brake/Tail Light (LED) Installation
- Installation the reverse of removal.
- Fit the grommets [A] to the projections [B].
- Install the damper [A] to the bracket [B].
License Plate Light Bulb Replacement
- Remove: License Plate Light Cover Screws [A] License Plate Light Cover [B] and Lens
- Pull the bulb [A] out of the socket [B].
Notice
Do not turn the bulb. Pull the bulb out to prevent damage to the bulb. Do not use bulb rated for greater wattage then the specified value
- Replace the bulb with a new one.
- Insert the bulb into the socket.
- Install the license plate light cover.
- Tighten the license plate light cover screws securely.
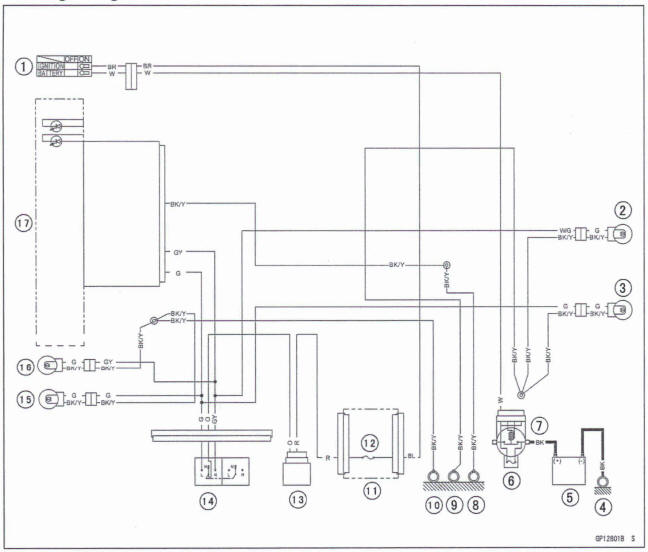
Headlight/Tail Light Circuit
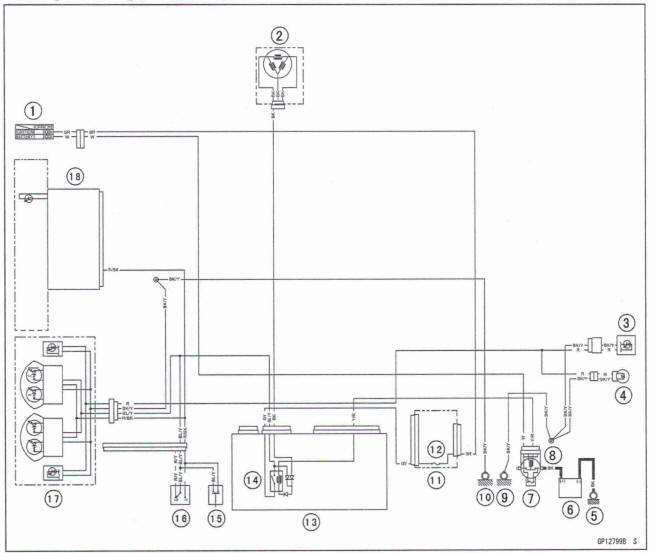
- Ignition Switch
- Alternator
- Brake/Tail Light (LED)
- License Plate Light 12 V5W
- Engine Ground
- Battery
- Main Fuse 30 A
- Starter Relay
- Frame Ground (1)
- Frame Ground (2)
- Fuse Box (1)
- Headlight Fuse 10 A
- Relay Box
- Headlight Circuit Relay
- Passing Button
- Dimmer Switch
- Headlight (LED)
- Meter Unit
Turn Signal Light Bulb Replacement
Front Turn Signal Light

- Remove the lower inner fairing (see Lower Inner Fairing Removal in the Frame chapter).
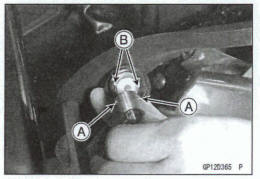
- Turn the socket [A] counterclockwise and remove it.
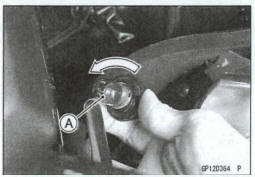
- Push and turn the bulb [A] counterclockwise and remove it.
- Insert the new bulb by aligning its pins [A] with the grooves [B] in the socket.
- Push and turn the bulb clockwise.
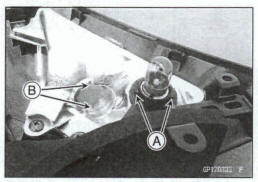
- Fit the projections [A] of the socket to the grooves [B] of the turn signal light body.
In this photo, the middle fairing has been removed for clarity
- Turn the socket clockwise
- Install the lower inner fairing (see Lower Inner Fairing Installation in the Frame chapter)
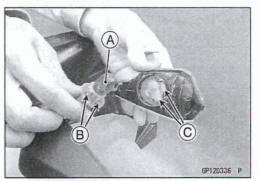
Rear Turn Signal Light
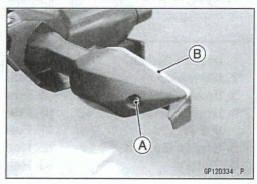
- Remove: Turn Signal tight Lens Screw [A] Turn Signal Light Lens Housing [B]
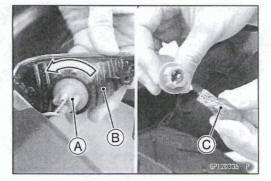
- Turn the socket [A] counter clock wise and remove it from the lens housing [B]
- Pull out the bulb [C] straight from the socket
Notice
Do not turn the bulb. Pull the bulb out to prevent damage to the bulb. Do not use bulb rated for greater wattage then the specified value.
- Replace the buld [A] with a new one
- Insert the new buld into the socket
- Insert the socket by aligning its tabs [B] with the cutouts [C] of the lens housing
- Turn the socket clockwise until it stops
- Fit the lens housing [A] to the light case [B] by inserting the projection [C] on the lens housing to the inside of the light case.
- Tighten:
Torque -Turn Signal Light Lens Screw: 1 .O N*m (0.10 kgf-m, 8.9 in*lb)
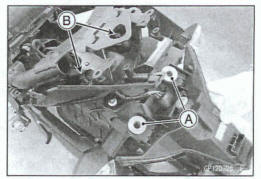
Turn Signal Relay Inspection
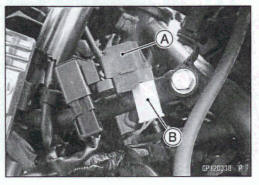
- Remove: Left Middle Fairing (see Middle Fairing Removal in the Frame chapter) Turn Signal Relay [A]
- Disconnect the turn signal relay connector [B]
- Connect one 12 V battery and turn signal lights as indicated,
and count how many times the lights blink for one
minute.
Turn Signal Relay [A] Turn Signal Lights [B] 12 V Battery [C]
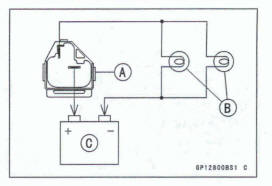
*If the lights do not blink as specified, replace the turn signal relay.
Testing Turn Signal Relay 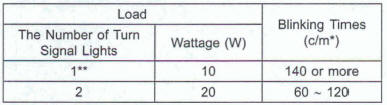
(*): Cycle (s) per minute
(**): Correspond to 'one light burned out."
Turn Signal Light Circuit
- Ignition Switch
- Rear Right Turn Signal light 12 V 10 W
- Rear Left Turn Signal Light 12 V 10 W
- Engine Ground
- Battery
- Main Fuse 30 A
- Starter Relay
- Frame Ground (4)
- Frame Ground (1)
- Frame Ground (2)
- Frame Box (2)
- Turn Signal Relay Fuse 10 A
- Turn Signal Relay
- Turn Signal Switch
- Front Left Turn Signal Light 12V 10 W
- Front Right Turn Signal Light 12 V 10 W
- Meter Unit
See also:
 Kawasaki Z400 - Service manual > Electric Starter System
Starter Motor Removal NOTICE Do not tap the starter motor shaft or body. Tapping the shaft or body could damage the motor. Remove: Right Middle Fairing (see Middle Fairing Removal in the Frame chapter) Frame Bracket Bolts [A] Right Frame Bracket [B] Slide back the rubber cap [A] and remove the starter motor cable terminal nut [B]. Remove: Starter Motor Mounting Bolts [C] Starter Motor [D]
Kawasaki Z400 - Service manual > Air Switching Valve
Air Switching Valve Operation Test Refer to the Air Suction System Damage Inspection in the Periodic Maintenance chapter Air Switching Valve Unit Test Remove the air switching valve (see Air Switching Valve Removal in the Engine Top End chapter). Connect a digital meter [A] to the air witching valve terminals as shown.
 Benelli Imperiale 400
 BMW F900XR
 Honda CB500X
 KTM 390 Adventure
 Triumph Street Triple S
 Yamaha MT-03
 Kawasaki Z400
 Triumph Street Triple S
 Yamaha MT-03