 BMW F900XR - Owner's Manual > Intelligent emergency call
- with intelligent emergency call OE
Emergency call via BMW
Press the SOS button in an emergency only.
Even if an emergency call using BMW is not possible, the system may make an emergency call to a public emergency call number.
This depends on the respective mobile phone network and the national regulations.
The emergency call is not able to be ensured because of technical reasons due to unfavourable conditions, e.g. in areas where there is no mobile phone reception.
Language for emergency call
Each vehicle has a language assigned to it depending on the market for which it is intended.
The BMW Call Center answers in this language.
NOTICE A changeover of the language for the emergency call can only be performed by the BMW Motorrad partner. The language assigned to the vehicle varies from the selectable language the driver can choose as the display language in the multifunction display.
Manual emergency call Requirement
An emergency call has occurred.
The vehicle is at a standstill. The ignition is switched on.
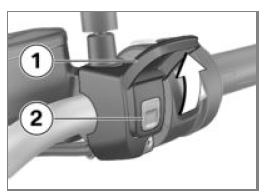
- Open cover 1.
- Briefly press SOS button 2.
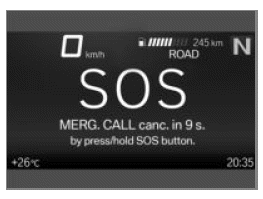
The time until transmission of the emergency call is displayed.
During that time, it is possible to cancel the emergency call.
- Operate the emergency-off switch to stop the engine.
- Remove helmet.
After expiry of the timer, a voice contact to the BMW Call Center is established.
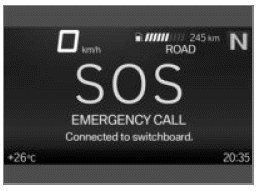
The connection was established.
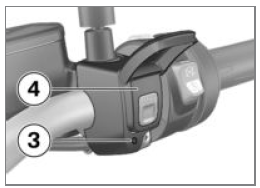
- Provide information to the emergency services using the microphone 3 and speaker 4.
Automatic emergency call
The intelligent emergency call is active after the ignition is switched on and reacts if a fall or crash occurs.
Emergency call in the event of a light fall
- A minor fall or a crash is detected.
An acoustic signal is sounded.
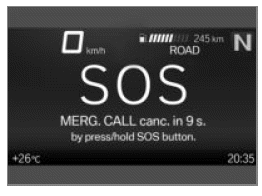
The time until transmission of the emergency call is displayed.
During that time, it is possible to cancel the emergency call.
- If possible, remove helmet and stop engine.
A voice contact connection to the BMW Call Center is established.
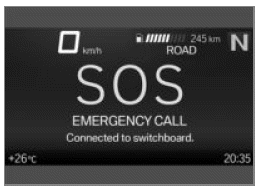
The connection was established.
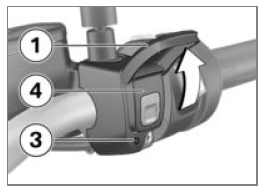
- Open cover 1.
- Provide information to the emergency services using the microphone 3 and speaker 4.
Emergency call in the event of a severe fall
- A severe fall or a crash is detected.
The emergency call is placed automatically without delay.
Lights
Low-beam headlight and sidelights
The side lights switch on automatically when the ignition is switched on.
NOTICE The side lights place a strain on the battery. Do not switch the ignition on for longer than absolutely necessary.
The low-beam headlight switches on automatically under the following conditions:
- When the engine is started.
- If the vehicle is pushed while the ignition is on.
NOTICE When the engine is not running you can switch on the lights by switching on the ignition and either switching on the high-beam headlight or operating the headlight flasher.
- with daytime riding light OE
In daytime the daytime riding light can be switched on as an alternative to the low-beam headlight.
High-beam headlight and headlight flasher
- Switch on the ignition.
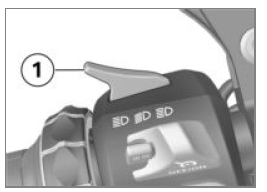
- Push switch 1 forward to switch on the high-beam headlight.
- Pull switch 1 back to operate the headlight flasher.
Headlight courtesy delay feature
- Switch off the ignition.
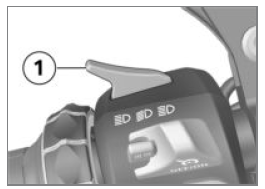
- Immediately after switching off the ignition, pull switch 1 back and
hold it in that position until the headlight courtesy delay feature comes
on.
The vehicle's lights come on for one minute and then switch off automatically.
This can be used to light up the path to the house door after the vehicle has been parked, for example.
Parking lights
- Switch off the ignition.
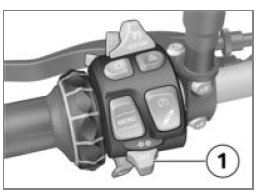
- Immediately after switching off the ignition, push button 1 to the left and hold it in that position until the parking lights come on.
- Switch the ignition on and off again to switch off the parking lights.
Daytime riding light
- with daytime riding light OE
Manual daytime riding light
Requirement
Automatic daytime riding light is switched off.
WARNING Switching on the daytime riding light in the dark.
Risk of accident
- Do not use the daytime riding light in the dark.
NOTICE By comparison with the low-beam headlight, the daytime running light makes the vehicle more visible to oncoming traffic.
This improves daytime visibility.
- Start the engine.
- Navigate to Settings, Vehicle settings, Lights and switch off the Auto.
daytime light function.
(For mode detailed information on how to operate the Multi-Controller, see the section headed "TFT display".)
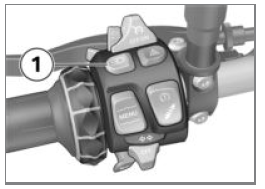
- Press button 1 to switch on the daytime riding light.
 The indicator light for the
daytime riding light lights up.
The low-beam headlight and the front side lights are switched off.
- In the dark or in tunnels: Press button 1 again to switch off the daytime riding light and switch on the low-beam headlight and front side light.
NOTICE If the high-beam headlight is switched on while the daytime riding light is on, the daytime riding light is switched off after approx. 2 seconds and the high-beam headlight, low-beam headlight and front side light are switched on.
If the high beam headlight is switched off again, the daytime running light is not automatically reactivated, but must be switched on again if required.
Automatic daytime riding light
WARNING The automatic daytime riding light does not replace the personal assessment of the light conditions
Risk of accident
- Switch off the automatic daytime riding light in poor light conditions.
NOTICE The changeover between daytime riding light and low-beam headlight including front side lights can be effected automatically.
- Navigate to Settings, Vehicle settings, Lights and switch on the Auto. daytime light function.
 The indicator light for the
automatic daytime riding light lights up.
If the ambient brightness decreases below a certain value, the low-beam headlight is automatically switched on (e.g. in a tunnel). When sufficient ambient brightness is detected, the daytime riding light is switched back on.
 The indicator light for the
daytime riding light shows if the daytime riding light is active.
Manual operation of the light when the automatic system is switched on
- If you press the button for the daytime riding light the daytime riding light is switched off and the low-beam headlight and front side lights are switched on (e. g. when you ride into a tunnel, and the response of the automatic daytime riding light to the change in ambient brightness is delayed).
- If you press the button again the daytime riding light is reactivated, in other words the daytime riding light is switched on again when ambient light is bright enough.
Hazard warning lights
Operating hazard warning flashers
- Switch on the ignition.
NOTICE The hazard warning flashers place a strain on the battery.
Do not use the hazard warning flashers for longer than absolutely necessary.
NOTICE The indicator function replaces the hazard warning lights function while the indicator button is pressed once operating readiness is switched on. The hazard warning lights function becomes active again once the indicator button is released.
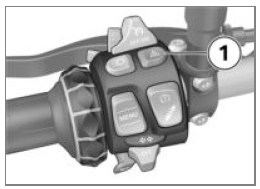
- Press button 1 to switch on the hazard warning lights system.
Ignition can be switched off.
- To switch off the hazard warning lights system, switch on the ignition if necessary and press button 1 again.
Turn indicators
Operating the turn indicators
- Switch on the ignition.
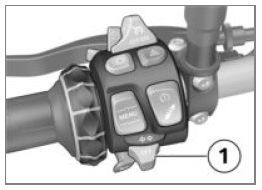
- Push button 1 to the left to switch on the left turn indicators.
- Push button 1 to the right to switch on the right turn indicators.
- Centre button 1 to cancel the turn indicators.
Comfort turn indicator
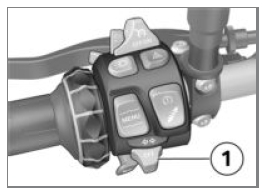
If button 1 has been pressed to the right or left, the turn indicators are automatically switched off under the following circumstances:
- Speed below 30 km/h: after 50 m distance covered.
- Speed between 30 km/h and 100 km/h: after a speed-dependent distance covered or in case of acceleration.
- Speed over 100 km/h: after flashing five times.
If button 1 is pressed to the right or left slightly longer, the turn indicators only switch off automatically once the speed-dependent distance covered is reached.
Traction control (ASC/DTC)
Switch off the ASC/DTC function
- Switch on the ignition.
NOTICE You have the option of deactivating the ASC/DTC function while the motorcycle is on the move.
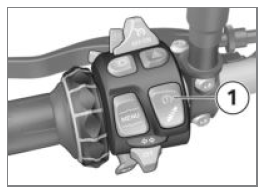
- Press and hold down button 1 until the ASC/DTC indicator and warning light changes its status.
The ASC/DTC system status ON is displayed immediately after button 1 is pressed.
 ASC/DTC indicator and warning
light comes on.
Possible ASC system status OFF! is displayed.
- Release button 1 after the ASC/DTC system status changes.
 ASC/DTC indicator and warning
light remains on.
The new ASC/DTC system status OFF! is displayed briefly.
The ASC/DTC function is switched off.
Switch on the ASC/DTC function
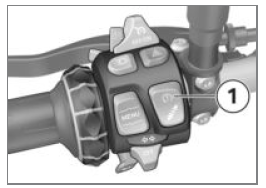
- Press and hold down button 1 until the ASC/DTC indicator and warning light changes its status.
The ASC/DTC system status OFF! is displayed immediately after button 1 is pressed.
 ASC/DTC indicator and warning
light goes out; if self-diagnosis has not completed the warning light starts
flashing.
Possible ASC system status ON is displayed.
- Release button 1 once the status has changed.
 ASC/DTC indicator and warning
light remains off or continues to flash.
The new ASC/DTC system status ON is displayed briefly.
The ASC/DTC function is switched on.
- If the coding plug is not inserted, you have the alternative of switching the ignition off and then on again.
 If the ASC/DTC indicator and
warning light remains on even though the vehicle has accelerated past the
minimum speed stated below after the ignition was switched off and then on
again, an ASC/DTC fault has occurred.
- min 5 km/h
- See the section entitled "Engineering details" for more information on
traction control ASC/DTC.
How does traction control work?
See also:
 BMW F900XR - Owner's Manual > Ignition with Keyless Ride
- with Keyless Ride OE Keys NOTICE The telltale light for the radio-operated key flashes while the search for the radio-operated key is in progress.
 BMW F900XR - Owner's Manual > Electronic Suspension Adjustment (D-ESA)
- with Dynamic ESA OE Possibilities for adjustment Dynamic ESA (electronic chassis and suspension adjustment) provides a convenient way of adapting the damping characteristic of the rear suspension to the surface over which you intend riding. Two damper settings and three spring preload stages are available.

 Benelli Imperiale 400
 BMW F900XR
 Honda CB500X
 KTM 390 Adventure
 Triumph Street Triple S
 Yamaha MT-03
 Kawasaki Z400
 Triumph Street Triple S
 Yamaha MT-03