 Triumph Street Triple S - Service manual > Headstock Bearing Check/Adjustment
Check
1. Raise and support the front of the motorcycle.
Warning: Before starting work, ensure the motorcycle is stabilised and adequately supported. This will help prevent it from falling and causing injury to the operator or damage to the motorcycle.
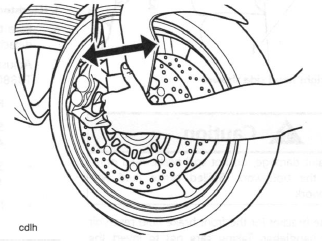
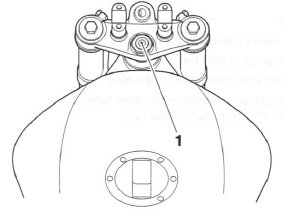
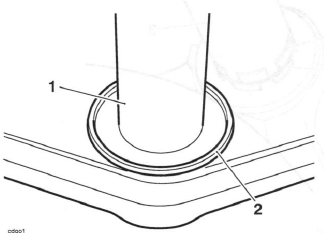
Checking Headstock Bearing Adjustment (Daytona 675 shown)
2. Hold the lower end of the front forks as illustrated and 'rock' with a front-to-rear motion. If free play can be detected, the headstock bearings require adjustment.
Adjustment - Daytona 675
1. Raise and support the front of the motorcycle.
2. Release the fixing securing each handlebar to the top yoke.
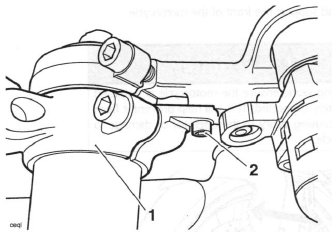
- Handlebar (right hand side shown)
- Fixing
Caution: To prevent paint damage, do not spill brake fluid onto any area of the bodywork. Spilled brake fluid will damage paintwork.
3. Detach the bracket for the front brake fluid reservoir from the handlebar. Taking care not to invert the brake fluid reservoir, move it to one side.
4. Slacken the top yoke clamp bolts.
Warning: If the lower yoke fixings are also slackened, the forks will no longer support the weight of the motorcycle.
Do not slacken the lower yoke fixings as, in this condition, the motorcycle could topple over causing damage and/or risk of injury.
Caution: Care must be taken when removing the headstock top nut, to ensure that the top nut and top yoke do not become scratched. Protect the surfaces with a suitable cloth or tape to prevent scratching.
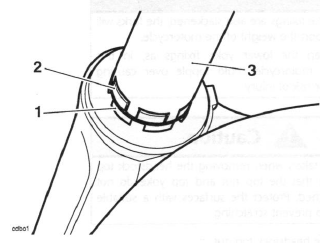
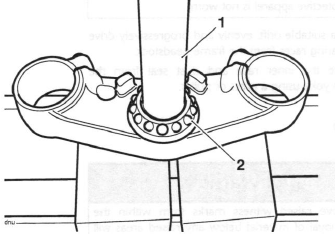
5. Slacken the headstock top nut.
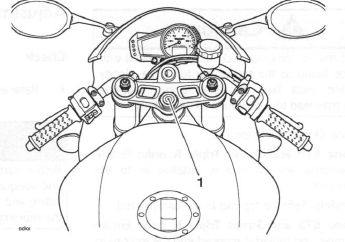
- Headstock top nut (Daytona 675 shown)
6. Ease the top yoke from the forks and support while detached.
7. Adjust the bearing free-play as follows, all using tool T3880023:
- Remove the locknut and tab washer.
- Slacken the adjuster nut then tighten to 40 Nm.
- Slacken the adjuster nut, then retighten to 15 Nm.
- Fit the tab washer and lock nut.
Warning: It is essential that the adjuster nut is not over-tightened.
If the adjuster is over-tightened it will cause a pre-load on the headstock bearings. This will introduce tight steering, which could cause loss of control and an accident.
- Hold the adjuster nut in position while tightening the locknut to 40 Nm.
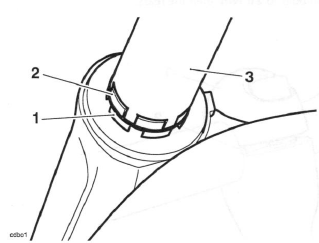
- Adjuster nut
- Locknut
- Tool T3880023
8. Refit the top yoke to the forks.
9. Tighten the top nut to 90 Nm.
10. Install the handlebar to top yoke fixings and tighten to 5 Nm.
11. Tighten the top yoke clamp bolts to 26 Nm.
12. Fit the bracket for the front brake fluid reservoir and tighten the fixing to 15 Nm.
13. Recheck the bearing adjustment.
Adjustment - Street Triple and Street Triple R
1. Raise and support the front of the motorcycle.
2. Release the fixings securing the handlebar clamps to the risers, detach the clamps and release the handlebar.
3. As an assembly, raise the handle bars until clear of the top yoke. Rest the assembly forward of the steering stem such that access to the headstock top nut and the adjustment nuts is unrestricted. Ensure the master cylinder remains in an upright position.
4. Slacken the top yoke clamp bolts.
Warning: If the lower yoke fixings are also slackened, the forks will no longer support the weight of the motorcycle.
Do not slacken the lower yoke fixings as, in this condition, the motorcycle could topple over causing damage and/or risk of injury.
Caution: Care must be taken when removing the headstock top nut, to ensure that the top nut and top yoke do not become scratched. Protect the surfaces with a suitable cloth or tape to prevent scratching.
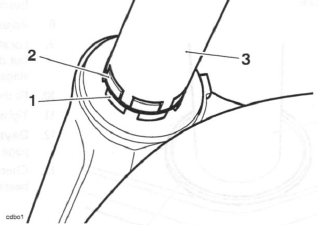
5. Slacken the headstock top nut.
- Headstock top nut
6. Ease the top yoke from the forks and support while detached.
7. Adjust the bearing free-play as follows, all using tool T3880023:
- Remove the locknut and tab washer.
- Slacken the adjuster nut then tighten to 40 Nm.
- Slacken the adjuster nut, then retighten to 15 Nm.
- Fit the tab washer and lock nut.
Warning: It is essential that the adjuster nut is not over-tightened.
If the adjuster is over-tightened it will cause a pre-load on the headstock bearings. This will introduce tight steering, which could cause loss of control and an accident.
- Hold the adjuster nut in position while tightening the locknut to 40 Nm.
- Adjuster nut
- Locknut
- Tool T3880023
8. Refit the top yoke assembly to the forks.
9. Tighten the top nut to 90 Nm.
10. Tighten the top yoke clamp bolts to 26 Nm.
11. Locate the handlebar assembly in the lower halves of the clamps. Fit the upper clamps and bolts.
12. Align the handlebar punch mark with the front right hand split line of the clamp/riser, then tighten the front clamp bolts to 26 Nm, then the rears.
- Right hand front clamp split line
- Handlebar punch mark
13. Recheck the bearing adjustment.
Headstock Bearing Removal
Warning: Before starting work, ensure the motorcycle is stabilised and adequately supported. This will help to prevent it falling and causing injury to the operator or damage to the motorcycle.
1. Daytona 675 only: Remove the steering damper.
2. All models: Remove both forks.
Caution: Care must be taken when removing the headstock top nut, to ensure that the top nut and headstock do not become scratched. Protect the surfaces with a suitable cloth or tape to prevent scratching.
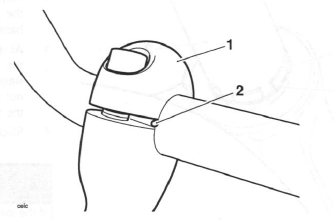
3. Remove the headstock top nut.

- Headstock top nut (Daytona 675 shown)
4. As an assembly, raise the top yoke and handle bars until clear of the steering stem. Rest the assembly forward of the steering stem such that access to the adjustment nuts is unrestricted. Ensure the master cylinder remains in an upright position.
5. Using tool T3880023, remove the locknut and tab washer. Discard the tab washer.
- Locknut
- Adjuster nut
6. Using the same tool, remove the adjuster nut.
7. Remove the bottom yoke from below the frame headstock.
Warning: Always wear eye, hand and face protection when using a hammer and drift. Use of a hammer and drift can cause bearings to fragment. Pieces of fragmented bearing could cause eye and soft tissue injuries if suitable protective apparel is not worn.
8. Using a suitable drift, evenly and progressively drive the bearing races from the frame headstock.
9. Remove the inner race and dust seal from the bottom yoke using a press or puller.
Inspection
Warning: Only remove raised witness marks from within the frame. Removal of material below any raised areas will reduce the level of interference between the frame and the bearings. Loss of interference could cause the bearing to become loose in the frame leading to loss of motorcycle control and an accident.
1. Examine the frame for any raised witness marks caused by the removal process. Remove any such marks with fine emery paper or a gentle file.
Installation
1. Fit a new dust seal to the steering stem on the bottom yoke.
- Steering stem
- Dust shield
Caution: Protect the threads of the bottom yoke when using a press or puller as damaged threads may mean replacing the yoke completely.
2. Press a new lower bearing inner race onto the steering stem of the bottom yoke.
- Bearing
- Bottom yoke
- Press bed
3. Evenly and progressively drive a new complete upper bearing into the frame headstock.
4. Lubricate the lower bearing using multi-purpose grease.
5. Drive a new lower outer bearing into the frame headstock.
6. Lubricate the upper bearing using multi-purpose grease.
7. Insert the lower yoke to the frame, fit the upper bearing and race, and retain with the adjuster nut.
8. Adjust the headstock bearings.
9. Locate the upper yoke to the steering stem. Install but do not fully tighten the headstock top nut at this stage.
10. Fit the forks.
11. Tighten the headstock top nut to 90 Nm.
12. Daytona 675 only: Refit the steering damper.
13. Check that no freeplay exists in the headstock bearings. Adjust as necessary.
Steering Damper - Daytona 675 only
Removal
Warning: Before starting work, ensure the motorcycle is stabilised and adequately supported. This will help to prevent it falling and causing injury to the operator or damage to the motorcycle.
1. Reposition the damper rod boot and remove the steering damper lower fixing. Noting its position, collect the steel washer located between the damper and the frame bracket.
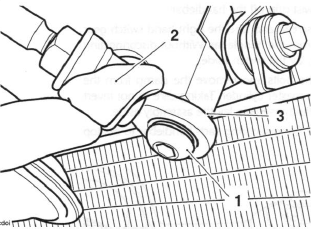
- Steering damper lower fixing
- Damper rod boot
- Steel washer position
2. Release the steering damper upper fixing and remove the steering damper. Noting its orientation, collect the flanged sleeve located between the damper body and the lower yoke.
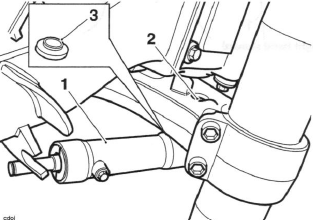
- Steering damper
- Upper fixing
- Flanged sleeve
Installation
1. Installation is the reverse of removal noting the following:
Note:
- Refit the steel washer as noted during removal.
- Refit the flanged sleeve as noted during removal.
- Tighten the fixings to 18 Nm.
- Refit the boot over the damper rod fixing.
See also:
 Triumph Street Triple S - Service manual > Front Suspension/Fork
Front Suspension The Daytona 675 and street Triple R are equipped with hydraulic, adjustable, telescopic front forks. Both forks are adjustable for spring pre-load, compression damping and rebound damping. From VIN 3 the Daytona 675 front forks have low stroke speed and high stroke speed compression damping adjusters.
Triumph Street Triple S - Service manual > Handlebars - Daytona 675
Warning: Before starting work, ensure the motorcycle is stabilised and adequately supported. This will help prevent it from falling and causing injury to the operator or damage to the motorcycle.
 Benelli Imperiale 400
 BMW F900XR
 Honda CB500X
 KTM 390 Adventure
 Triumph Street Triple S
 Yamaha MT-03
 Kawasaki Z400
 Triumph Street Triple S
 Yamaha MT-03