 Triumph Street Triple S - Owner's Manual > Gear Position Display
The gear position display indicates which gear (one to six) has been engaged. When the transmission is in neutral (no gear selected), the display will show N.
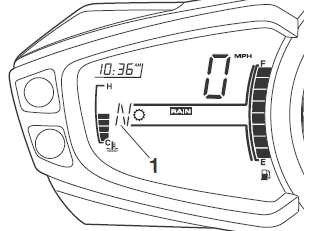
- Gear position display (neutral position displayed)
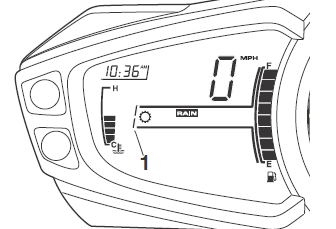
- Gear position display (first gear displayed)
Coolant Temperature Gage
The coolant temperature gage indicates the temperature of the engine coolant.
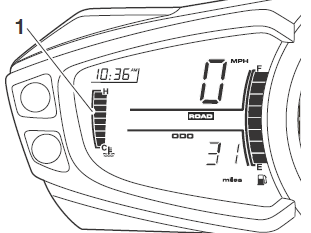
- Coolant temperature gage
When the ignition is switched on, all eight bars of the display will be shown.
When the engine is started from cold the display will show one bar. As the temperature increases more bars in the display will be shown. When the engine is started from hot the display will show the relevant number of bars, dependent on engine temperature.
The normal temperature range is between three and five bars.
If the coolant temperature becomes too high the display will show eight bars and will start to flash. The high coolant temperature light in the tachometer will also be illuminated.
Caution: Do not continue to run the engine if either of the high temperature warnings are displayed as severe engine damage may result.
Fuel Gage
The fuel gage indicates the amount of fuel in the tank.
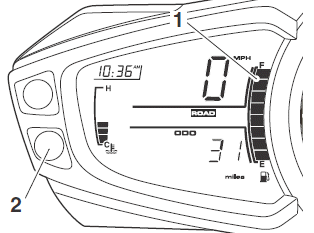
- Fuel gage
- SET Button
With the ignition switched on, the number of bars shown in the display indicates the level of fuel.
When the fuel tank is full all eight bars are displayed and when empty, no bars are displayed. Other gage markings indicate intermediate fuel levels between full and empty.
When two bars are displayed the low fuel warning light will illuminate. This indicates there are approximately 1.19 gallon (4.5 liters) of fuel remaining in the tank and you should refuel at the earliest opportunity. If a trip meter display is shown, the range to empty display can be selected by pressing and releasing the SET button until it is shown.
After refueling, the fuel gage and range to empty information will be updated only while riding the motorcycle.
Depending on the riding style, updating could take up to five minutes.
Instrument SCROLL/SET Buttons
SCROLL Button
When the SCROLL button is pressed and released it will scroll through the menu shown in the instrument display screen.
The SCROLL button is used to operate the following functions of the instruments:
- Set Up (SEtUP)
- Traction Control (ttc)
- Clock Adjustment (t-SEt)
- Auto - Self-canceling Turn Signals (Ind)
- Service Interval Announcement (SIA)
- Gear Shift Lights (SHIFt)
- Units (UnitS)
- Return (REtURn)
SET Button
When the SET button is pressed it will select the menu shown in the instrument display screen.
Traction Control (TC) Disable
Warning: If the traction control is disabled, the motorcycle will handle as normal but without traction control. In this situation accelerating too hard on wet/slippery road surfaces may cause the rear wheel to slip, and may result in loss of motorcycle control and an accident.
It is possible to temporarily disable the Traction Control (TC) system. The TC system cannot be permanently disabled, it will be automatically enabled when the ignition is turned off and then on again.
To Disable Traction Control
To access the traction control disable function:
- Press and release the SCROLL button until SEtUP is shown in the display screen then press the SET button.
- The display screen will show ttc.
- Press the set button and ON or OFF will be shown.
- Press and release the scroll button until OFF is shown in the display screen.
- Pressing the set button will disable the TC system; the message TTC OFF will be shown for 2 seconds, and the TC warning light will be illuminated.
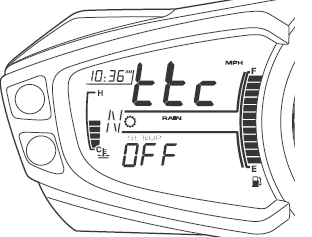
Traction Control Off Shown
To Enable Traction Control
To enable the traction control system again:
- Repeat the traction control disable procedure and select ON.
- An alternative way to enable the TC is to turn the ignition off and on.
Clock
Warning: Do not attempt to adjust the clock with the motorcycle in motion as this may lead to loss of motorcycle control and an accident.
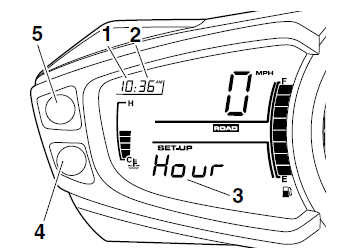
- Hours
- Minutes
- Display screen (Hour selected for adjustment)
- SET button
- SCROLL button
Adjusting the Clock - t-SEt
To set the clock time format:
- Press and release the SCROLL button until SEtUP is shown in the display screen. Press the SET button until t-SEt is shown.
- Press the SET button again and either 24 Hr or 12 Hr clock format will be shown.
- Press the SCROLL button to select the required clock display and then press the SET button. The hour display will start to flash and the word Hour is shown in the display screen.
To set the hour and minute display:
- Make sure that the hour display is still flashing and the word Hour is shown.
- Press the SCROLL button to change the setting. Each individual button press will change the setting by one digit. If the button is held, the display will continuously scroll through in single digit increments.
- When the correct hour display is shown, press the SET button. The minutes display will begin to flash and the word Min is shown in the display screen. The minutes display is adjusted in the same way as for the hours.
- Once both hours and minutes are correctly set, press the SET button to confirm and t-SEt will be shown in the display screen.
- Press and release the SCROLL button until REtURn is shown then press the SET button.
Auto - Self-canceling Turn Signals - Ind (Street Triple R only)
The motorcycle has a self-canceling turn signal function that can be disabled or enabled.
To disable or enable the self-canceling function:
- Press and release the SCROLL button until SEtUP is shown in the display screen. Press the SET button until ttc is shown.
- Press and release the SCROLL button until Ind is shown in the display screen.
- Press and release the SET button and Auto or MAnUAL will flash on and off.
- Press and release the SCROLL button to select Auto or MAnUAL then press
the SET button.
- Auto - The self-canceling function.
- MAnUAL - The self-canceling function is off. The turn signals must be manually canceled.
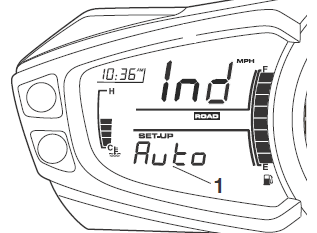
- Display screen (Auto selected)
To exit the Auto - Self-canceling Turn Signals menu:
- Press and release the SCROLL button until the display shows REtURn.
- Press the SELECT button. The trip 1 menu will be shown in the display screen.
Service Interval Announcement (SIA)
The Service Interval Announcement (SIA) shows the total distance that the motorcycle has remaining before a service is required.
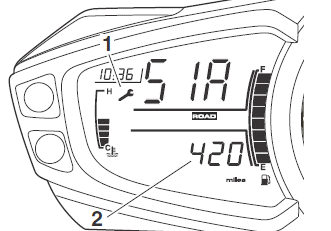
- Service symbol
- Remaining distance
When the remaining distance is 0 miles, the service symbol will remain on until the service has been carried out and the system has been reset by your authorized Triumph dealer.
If the service is overdue, the distance will be shown as a negative number.
When the ignition is switched on and the distance to the next service is 500 miles (800 km) or less, the service symbol will be shown for three seconds and the clock will show the distance remaining before the next service.
Gear Shift Lights
Note: The gear shift lights will not operate below 3,500 rpm to avoid the lights operating at idle.
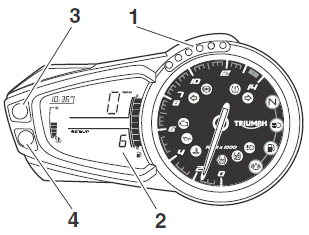
- Gear shift lights
- Display screen (6 mode shown)
- SCROLL Button
- SET Button
Changing the Gear Shift Light Modes
To change the gear shift light modes:
- Press and release the SCROLL button until SEtUP is shown in the display screen then press the SET button.
- Press and release the SCROLL button until SHIFt is shown then press the SET button. The current mode will be shown and the corresponding gear shift lights will illuminate.
- Press and release the SCROLL button until the required gear shift light
mode is shown then press the SET button. The display will scroll through in
the following order:
- 6 (6 LED mode);
- 3 (3 LED mode);
- SE (Sequential mode);
- OFF (Gear shift lights off).
Note: The motorcycle is delivered from the factory with the gear shift light set to the 6 LED mode at 3,500 rpm.
When the gear shift light mode has been selected, the tachometer needle will move round to the current set position. The rpm will be shown in the display screen with the current set units flashing.
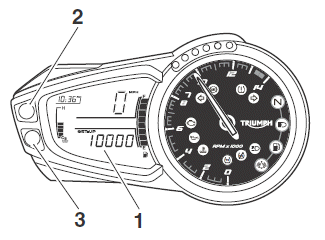
- Current set units
- SCROLL button
- SET button
Changing the Set Engine Speed
To change the engine speed setting:
- Press the scroll button. Each individual press of the SCROLL button will increase the setting in increments of 500 rpm, up to the maximum rpm limit. When the maximum rpm limit is reached, the setting will return to 3,500 rpm.
- When the correct setting is shown, press the SET button to confirm the setting, SHIFt will be shown in the display screen and all the gear shift lights will flash.
- Press and release the SCROLL button until REtURn is shown in the display screen then press the SET button.
Setting the Gear Shift Lights to Off
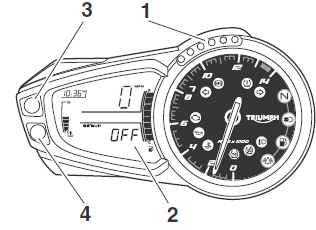
- Gear shift lights
- Display screen (OFF mode shown)
- SCROLL Button
- SET Button
To turn the gear shift lights to OFF:
- Press and release the SELECT button until OFF is shown then press the SET button.
- Press the SET button and SHIFt will be shown in the display screen.
- Press and release the SCROLL button until REtURn is shown in the display screen then press the SET button.
UnitS (Imperial, US or Metric)
Units has four selectable display modes.
Each display provides the following information:
mpg (Imperial gallons)
The speedometer and odometer will read in miles. The fuel consumption will be measured in imperial gallons.
mpg US (US gallons)
The speedometer and odometer will read in miles. The fuel consumption will be measured in US gallons.
L/100 km (Metric)
The speedometer and odometer will read in kilometers. The fuel consumption will be measured in liters of fuel per 100 km.
km/L (Metric)
The speedometer and odometer will read in kilometers. The fuel consumption will be measured in kilometers per liter of fuel.
Changing the Units Display
Warning: Do not attempt to change the units display with the motorcycle in motion as this may lead to loss of motorcycle control and an accident.
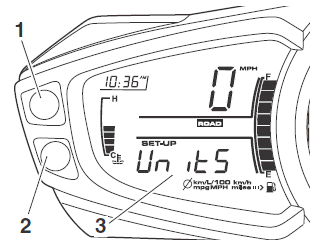
- Scroll button
- SET button
- Display screen
To access the units display:
- Press and release the SCROLL button until SEtUP is shown in the display screen then press the SET button.
- Press and release the SCROLL button until UnitS is shown then press the SET button.
- Press and release the SCROLL button until the required display is shown.
The display will scroll through in the following order when pressing down on
the SCROLL button (it will scroll through in the reverse order when pressing
up on the SCROLL button):
- mpg - Imperial gallons
- mpg US - US gallons
- L/100 km - Metric
- km/L - Metric.
Tire Pressure Units - only if TPMS is equipped
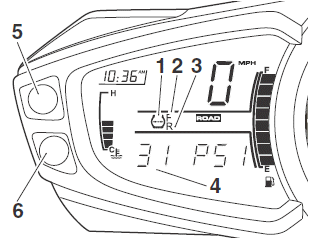
- TPMS symbol
- Front tire indicator
- Rear tire indicator
- Tire pressure display
- Scroll button
- Set button
To access the tire pressure display:
- Press and release the SCROLL button until SEtUP is shown in the display screen.
- Press and release the SET button.
- Press and release the SCROLL button until UnitS is shown in the display screen.
- Press and release the SET button to select the pressure display.
- Press and release the SCROLL button to scroll between BAR or PSI.
- Press and release the SET button to select either BAR or PSI.
- When the tire pressure monitoring system has been selected, -- PSI or bAR will be shown in the display screen until the motorcycle is traveling at a speed greater than 12 mph (20 km) and the tire pressure signal is received.
To exit the tire pressure display:
- Press and release the SCROLL button until REtURn is shown.
- Press and release the SET button to return to the TRIP screen
Return
Select REtURn to return to the main display.
Trip Meter
Warning: Do not attempt to switch between trip meter display modes or reset the trip meter with the motorcycle in motion as this may lead to loss of motorcycle control and an accident.
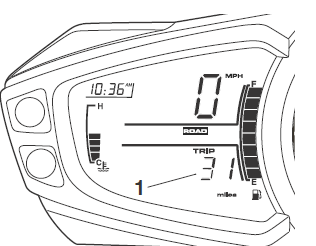
- Trip meter display
To access the trip meter information press and release the TRIP button on the left handlebar switch housing until the required display is shown.
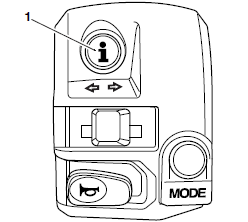
- TRIP button
The display will scroll through in the following order:
- Trip time
- Average fuel consumption
- Instantaneous fuel consumption
- Average speed
- Odometer
- Front Tire Pressure Display (if TPMS is equipped)
- Rear Tire Pressure Display (if TPMS is equipped)
- Trip distance
- Range to empty.
Each display provides the following information all calculated since the trip meter was last reset to zero:
Trip Time
The total time elapsed.
Average Fuel Consumption
An indication of the average fuel consumption. After being reset the display will show dashes until 0.1 miles/ km has been covered.
Instantaneous Fuel Consumption
An indication of the fuel consumption at an instant in time.
Average Speed
The average speed is calculated from when the trip computer was last reset.
After being reset the display will show dashes until 1 mile/km has been covered.
Odometer
The odometer shows the total distance that the motorcycle has traveled.
Front Tire Pressure Display
Displays the current front tire pressure.
Rear Tire Pressure Display
Displays the current rear tire pressure.
Trip Distance
The total trip distance traveled.
Range to Empty
This is an indication of the predicted distance that can be traveled on the remaining fuel in the tank.
Trip Meter Reset
To reset the trip meter, select and display the trip meter then press the TRIP button for one second. After one second, the trip meter will reset to zero.
Note: When the trip meter is reset to zero, the trip time, average fuel consumption and average speed will also be set to zero.
See also:
 Triumph Street Triple S - Owner's Manual > Instrument Panel Layout, Warning Lights
Instrument Panel Layout Clock Service interval indicator Speedometer Fuel gage Engine management Malfunction Indicator Light (MIL) Gear shift lights Left hand turn signal light ABS warning light Tachometer red zone Tire pressure warning light (if equipped with Tire Pressure Monitoring System (TPMS) ) Right hand turn signal light Neutral indicator light High beam indicator light Low fuel level indicator light Alarm/immobilizer status indicator light (alarm is an accessory kit) Traction control (TC) disabled warning light Traction control (TC) indicator light Tachometer High coolant temperature warning light Low oil pressure warning light Trip meter indicator Riding modes indicator light Tire pressure display (if Tire Pressure Monitoring System (TPMS) is equipped) Gear position symbol Coolant temperature display SET Button SCROLL Button
 Triumph Street Triple S - Owner's Manual > Riding Mode Selection
Warning: After selecting a riding mode, operate the motorcycle in an area free from traffic to gain familiarity with the new settings. Do not loan your motorcycle to anyone as they may change the riding mode settings from the one you are familiar with, causing loss of motorcycle control and an accident.

 Benelli Imperiale 400
 BMW F900XR
 Honda CB500X
 KTM 390 Adventure
 Triumph Street Triple S
 Yamaha MT-03
 Kawasaki Z400
 Triumph Street Triple S
 Yamaha MT-03