 Triumph Street Triple S - Service manual > Fuel Tank
Removal
Warning: Observe the warning advice given in the general information section on the safe handling of fuel and fuel containers.
A fire, causing personal injury and damage to property, could result from spilled fuel or fuel not handled or stored correctly.
1. Remove the rider's seat.
2. Disconnect the battery, negative (black) lead first.
3. Release the bolts securing the fuel tank to the frame.
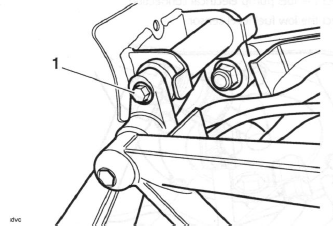
- Rear fuel tank to frame bolt
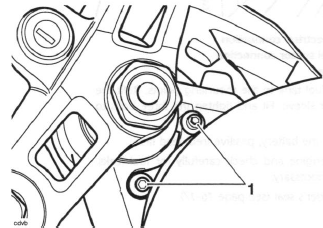
- Front fuel tank to frame bolts
4. Withdraw the spacer sleeve from the frame.
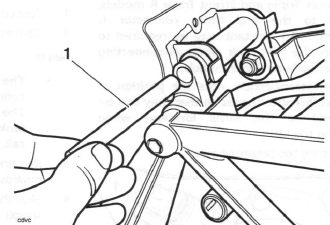
- Spacer sleeve
5. Raise the fuel tank and disconnect the electrical connections to the fuel pump and the low fuel level sensor.
Warning: When disconnected, the fuel tank is self-sealing but a small amount of fuel may escape causing clothing and components to be coated with fuel.
This would represent a serious fire hazard which could lead to burn injuries and damage to property.
6. On models fitted with a double check clip (from early 2007), ease the latch away from the connector until the release buttons are exposed.
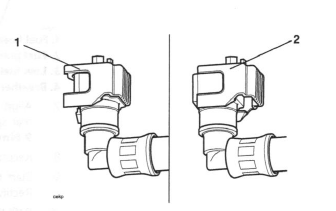
- Locked Position
- Unlocked Position
7. Disconnect the fuel hose by squeezing the sides of the connector and pulling the hose free from its spigot on the fuel pump plate.
Note:
- On Street Triple and Street Triple R models, access to the fuel hoses connector is restricted. An assistant may be required to support the fuel tank whilst disconnecting the fuel hose on these models.
- Before disconnection, note the position of the two breather hoses so that they can be returned to the same locations when refitting the tank.
8. Disconnect the two breather hoses.
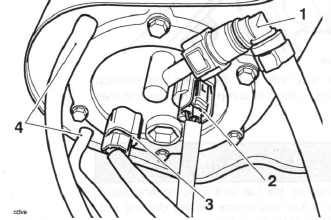
- Fuel hose
- Fuel pump electrical connection
- Low fuel level sensor connection
- Breather hoses
9. Remove the fuel tank from the frame.
Installation
1. Position the fuel tank to the frame.
2. Connect the two breather hoses as previously noted.
Note:
- The fuel hose has different coloured connectors on each end,
to aid orientation.
The orange end must be fitted to the fuel tank, the grey end must be fitted to the fuel rail.
3. Reconnect the fuel feed hose by gently pushing inwards until the hose engages with a click.
4. Slide the double check latch down (i.e. towards the spigot) until the release buttons are covered. If the latch will not slide into position, then the fuel hose is not fully home on its spigot and must therefore be refitted correctly.
5. Reconnect the fuel pump electrical connection.
6. Reconnect the low fuel level sensor.
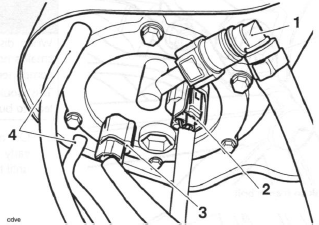
- Fuel hose
- Fuel pump electrical connection
- Low fuel level sensor connection
- Breather hoses
7. Align the fuel tank to the mounting points. Refit the rear spacer sleeve. Fit and tighten the three bolts to 9 Nm.
8. Reconnect the battery, positive (red) lead first.
9. Start the engine and check carefully for fuel leaks.
Rectify as necessary.
10. Refit the rider's seat.
Fuel Tank - Raising and Supporting - Street Triple and Street Triple R only
Note:
- The fuel tank may be raised without being removed completely, for access to fuse box and relays.
1. Remove the rider's seat.
2. Disconnect the battery, negative (black) lead first.
3. Remove the fuel tank support from its location under the seat base.
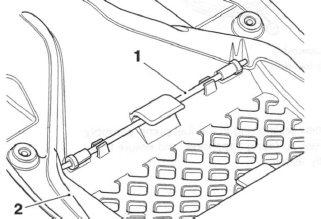
- Fuel tank support
- Seat base
4. Remove the front fuel tank fixings and pivot the fuel tank upwards at the front.
Note:
- It is permissible to use either the left hand or right hand fixing holes to support the fuel tank.
5. While supporting the fuel tank in the raised position, locate the fuel tank support into the fixing hole in the frame and into the fixing hole in the fuel tank bracket.
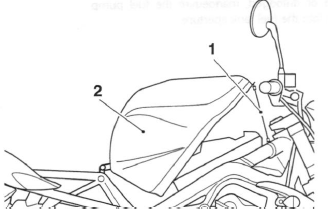
- Fuel tank support
- Fuel tank
Fuel Tank - Lowering and Securing - Street Triple and Street Triple R only
1. Support the fuel tank and remove the tank support.
2. Lower the fuel tank into position and secure with the two fixings. Tighten to 9 Nm.
3. Refit the fuel tank support to its location under the seat base.
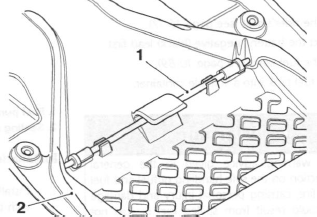
- Fuel tank support
- Seat base
4. Reconnect the battery, positive (red) lead first.
5. Refit the seat.
Fuel Pump, Fuel Filter and Low Fuel Level Sensor
Removal
Note:
- The fuel pump, fuel filter and low fuel level sensor assembly is a sealed for life unit and must be replaced as a complete assembly.
1. Remove the rider's seat.
2. Disconnect the battery, negative (black) lead first.
3. Remove the fuel tank.
4. Drain the fuel tank into a suitable container.
Warning: Observe the warning advice given in the general information section on the safe handling of fuel and fuel containers. A fire, causing personal injury and damage to property, could result from spilled fuel or fuel not handled or stored correctly.
5. Invert the fuel tank and place on a protective surface to prevent paint damage.
6. Remove the fixings securing the fuel pump mounting plate to the fuel tank.
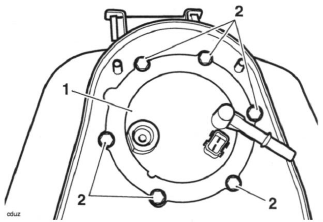
- Mounting plate
- Mounting plate fixings
7. Lift the fuel pump assembly and manoeuvre it from the fuel tank aperture.
8. Noting its orientation, remove and discard the sealing ring from the fuel pump assembly.
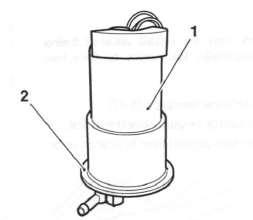
- Fuel pump assembly
- Sealing ring location
Installation
1. Install a new sealing ring in the fuel pump assembly, with the seal lip facing uppermost, and ensure that it is correctly seated.
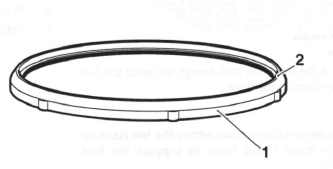
- Sealing ring
- Seal lip
2. Taking care to ensure the sealing ring is not damaged or dislodged, manoeuvre the fuel pump assembly into the fuel tank aperture.
3. Ensure the locating peg on the fuel pump assembly is located in the cut out on the mounting plate and the offset hole is positioned as shown below.
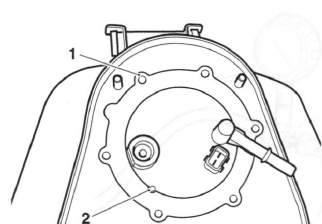
- Offset hole position
- Locating peg
4. In the sequence shown below, tighten the mounting plate fixings to 9 Nm.
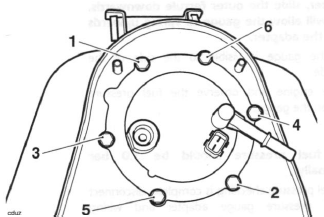
Fuel pump mounting plate torque sequence
5. Refit the fuel tank.
6. Reconnect the battery, positive (red) lead first.
7. Refit the rider's seat.
Fuel Pressure Checking
Warning: Observe the fuel handling precautions given in the general information section.
Fuel pressure is checked using service tool T3880001.
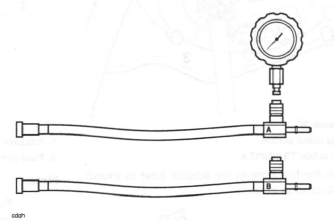
Tool T3880001
1. Remove the rider's seat.
2. Remove the fuel tank and place on a suitable support, close to the motorcycle.
3. Using the extension cable T3880123, carefully connect the fuel pump connection on the main harness to the fuel tank. Connect the other end of the extension cable to the motorcycle main harness.
4. Select the fuel pressure gauge adapter marked 'B' from service tool T3880001.
Warning: Always us the correct fuel pressure gauge adapter (adapter 'B' for Daytona 675, Street Triple and Street Triple R). Use of an incorrect adapter will result in a fuel leak. A fuel leak can result in a fire causing damage to property and injury to persons.
5. Connect the adapter hose to the fuel pump plate outlet as shown in the illustration below.
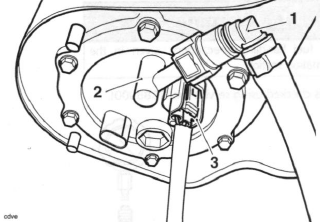
- Adaptor hose 'B'
- Fuel pump plate outlet
- Extension cable T3880123
6. Connect the fuel hose to the adaptor hose as shown in the illustration below.
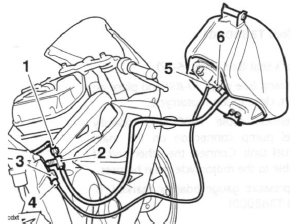
- Motorcycle fuel hose (Daytona 675 shown)
- Adaptor hose 'B'
- Fuel pump connection
- Wiring extension T3880123
- Fuel pump connection
- Fuel pump plate outlet
7. Connect the fuel pressure gauge to the adaptor hose as shown below by pushing the gauge spigot in to adapter until a click can be heard.
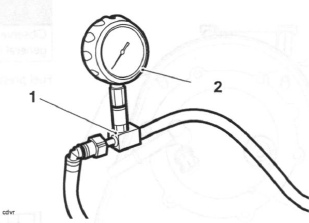
- Adaptor hose
- Fuel pressure gauge
Note:
- To release the fuel pressure gauge from the adapter, slide
the outer ferrule downwards.
This will allow the gauge to spring upwards from the adapter.
8. Ensure the gauge is visible to the side of the motorcycle.
9. Start the engine and observe the fuel pressure reading on the gauge.
Note:
- The fuel pressure should be 3.0 bar nominally.
10. When fuel pressure checking is complete, disconnect the fuel pressure gauge adapter and wiring extension.
11. Refit the fuel tank.
12. Refit the rider's seat.
Fuel Delivery System
Fuel is delivered to the injectors by a pump located inside the fuel tank. Fuel flows in the direction of the arrows shown in the diagram below.
Incorporated in the fuel pump assembly is a filter, a pressure regulator and a pick-up strainer. The fuel pump assembly also contains the low fuel level sensor.
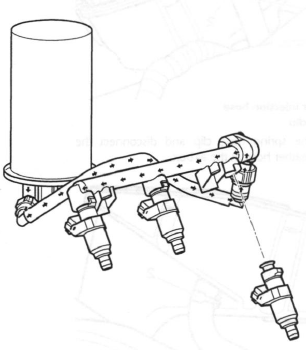
Direction of Fuel Flow
See also:
 Triumph Street Triple S - Service manual > Electrical Connectors
Before beginning any diagnosis, the following connector related information should be noted: Note: A major cause of hidden electrical faults can be traced to faulty electrical connectors. For example: Dirty/corroded terminals. Damp terminals. Broken or bent cable pins within multi-plugs.
 Triumph Street Triple S - Service manual > Airbox
Removal 1. Remove the rider's seat. 2. Disconnect the battery, negative (black) lead first. 3. Remove the fuel tank. 4. Disconnect the ECM connectors.

 Benelli Imperiale 400
 BMW F900XR
 Honda CB500X
 KTM 390 Adventure
 Triumph Street Triple S
 Yamaha MT-03
 Kawasaki Z400
 Triumph Street Triple S
 Yamaha MT-03