 Triumph Street Triple S - Service manual > Engine Removal/Refit
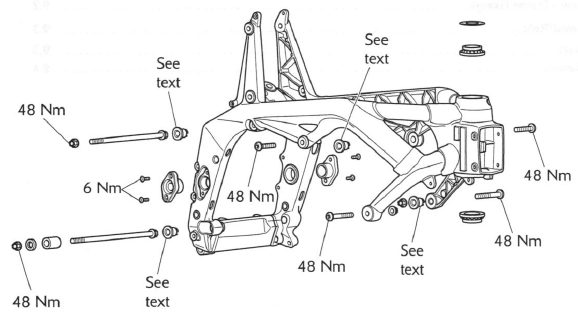
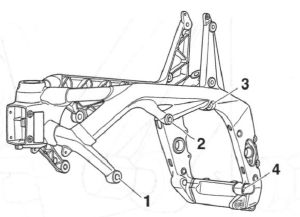
Exploded View - Frame Fixings
Engine Removal/Refit
Removal
1. Remove the seat(s).
2. Disconnect the battery, negative (black) lead first and remove the battery.
3. Place the motorcycle on a paddock stand.
Warning: Before starting work, ensure the motorcycle is stabilised and adequately supported. This will help prevent it from falling and causing injury to the operator or damage to the motorcycle.
4. Remove the rear panel(s).
5. Daytona 675 only: Remove the lower fairings.
6. Remove the fuel tank.
7 Remove the airbox.
8. Remove the throttle bodies.
9. Drain the engine oil.
10. Drain the coolant.
11. Remove the radiator.
Note:
- Secure the coolant hoses to prevent damage as the engine is removed.
12. Remove the exhaust system completely.
13. Set the drive chain adjustment to allow maximum free play in the chain.
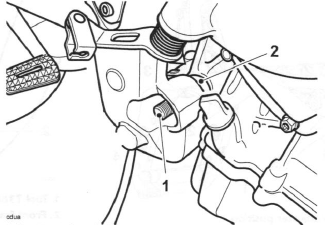
14. Disconnect the gearchange linkage at the gearbox shaft.
15. Remove the sprocket cover.
Caution: To prevent chain damage, do not allow the chain to come into contact with dirt, road grit etc.
16. Disconnect all electrical connections from the main harness to the engine.
17. Disconnect the clutch cable.
18. Place a support beneath the engine and ensure that the frame is still adequately and securely supported.
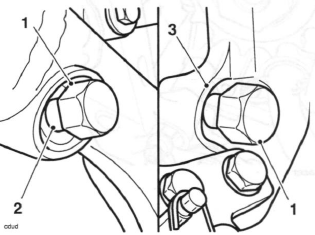
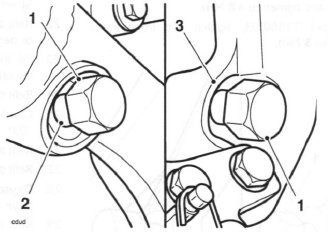
19. Note the position of the two spacers installed to the lower gearbox bolt, one on either side of the engine.
20. Release the nuts securing the rear gearbox mounting bolts and remove the two bolts. Collect the two spacers from the lower bolt.
- Rear gearbox bolt
- Right hand spacer
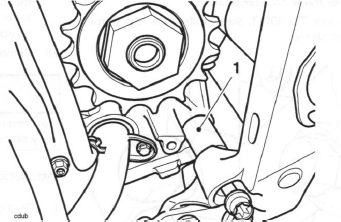
- Left hand spacer
Note:
- The frame is fitted with four frame adjuster sleeves, located on the left hand side of the frame, as shown below.
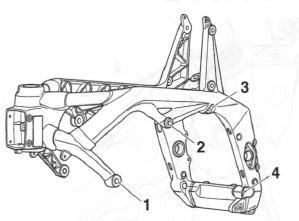
- Front frame adjuster position
- Centre frame adjuster position
- Rear upper frame adjuster position
- Rear lower frame adjuster position
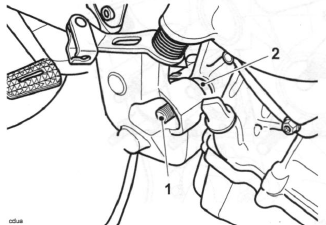
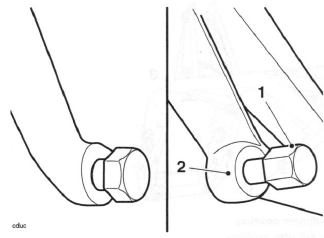
21. Using tool T3880103, slacken the two rear frame adjuster sleeves.
- Tool T3880103
- Rear upper frame adjuster
- Rear lower frame adjuster
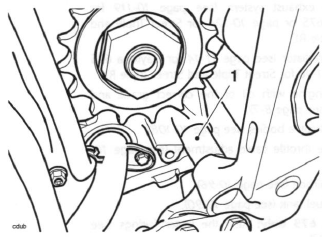
22. Release the nuts securing the left hand centre and front engine mounting bolts and remove the bolts.
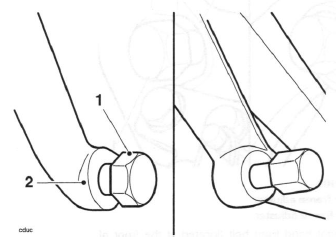
23. Using tool T3880103, slacken the centre and front frame adjuster sleeves.
- Tool T3880103
- Front frame adjuster
- Centre frame adjuster
24. Remove the two remaining (right hand) engine mounting bolts and lower the engine sufficiently to allow the drive chain to be detached from the output sprocket.
25. Remove the engine from the frame.
Caution: To prevent damage to components, lower the engine very carefully.
Installation
1. Position the engine beneath the frame.
2. Raise the engine, looping the drive chain over the output sprocket as it is raised.
Caution: Unless the following engine mounting bolt installation/ tightening sequence is precisely followed, severe frame damage can occur.
3. Align the engine to the frame and carefully fit the right hand centre engine mounting bolt (located at the rear of the cylinder head) ensuring the engine is still adequately and securely supported.
4. Align the left hand centre engine mounting and using tool T3880103, tighten the frame adjuster to 3 Nm. Carefully fit the bolt but do not fully tighten at this stage.
5. Temporarily insert the lower rear (gearbox) bolt from the left hand side, ensuring the two spacers are installed as noted during removal,
The bolt should only be inserted far enough to support the two spacers, as fully inserting the bolt will restrict access to the frame adjuster sleeve. Do not fit the nut.
- Rear gearbox bolt
- Right hand spacer
- Left hand spacer
Note:
- The frame is fitted with four frame adjuster sleeves, located on the left hand side of the frame, as shown below.
- Front frame adjuster position
- Centre frame adjuster position
- Rear upper frame adjuster position
- Rear lower frame adjuster position
6. Using tool T3880103, tighten the two rear frame adjuster sleeves to 10 Nm.
- Tool T3880103
- Rear upper frame adjuster
- Rear lower frame adjuster
7. Fit the right hand front bolt (located at the front of the cylinder head), fit a new nut and tighten to 48 Nm.
8. Remove the left hand centre engine mounting bolt fitted earlier and recheck the torque on the frame adjuster, using tool T3880103. Re-tighten the adjuster to 3 Nm. Refit the bolt, and tighten to 48 Nm.
- Tool T3880103
- Centre frame adjuster
9. Tighten the right hand centre bolt to 48 Nm.
10. Remove the lower rear (gearbox) bolt from the right hand side and insert it from the left hand side. Fit a new nut and tighten to 48 Nm.
11. Using tool T3880103, tighten the front frame adjuster to 3 Nm.
- Tool T3880103
- Front upper frame adjuster
12. Fit the upper rear (gearbox) bolt from the left hand side. Fit a new nut and tighten to 48 Nm.
13. Fit the left hand front bolt and fit a new nut. Tighten to 48 Nm.
14. Remove the support from beneath the engine.
15. Refit the clutch cable.
16. Reconnect all electrical connections to the engine.
17. Set the drive chain adjustment.
18. Refit the gearchange linkage.
19. Refit the sprocket cover and tighten the bolts to 9 Nm.
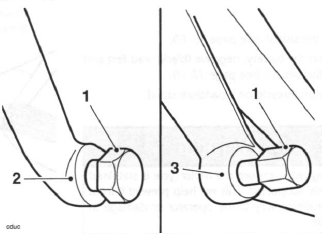
20. Fit new seals to the cylinder head. Ensure that the face of the seal with the tab is facing the cylinder head.
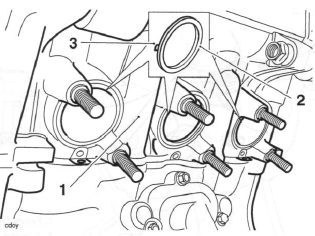
- Cylinder head
- Seal
- Seal tab
21. Refit the exhaust system.
22. Refit the radiator.
23. Fill the engine with oil of the correct grade and viscosity.
24. Refit the throttle bodies.
25. Check the throttle cable adjustment.
26. Refit the airbox.
27. Refit the fuel tank.
28. Daytona 675 only: Refit the lower fairings.
29. Refit the rear panel(s).
30. Refit the battery to the battery box and reconnect, positive (red) lead first.
31. Refill the cooling system.
32. Remove the motorcycle from the paddock stand and place on the side stand.
33. Refit the seats.
See also:
 Triumph Street Triple S - Service manual > Lubrication
Exploded View - Sump Exploded View - Oil Pump/Water Pump, Gears and Heat Exchanger
Triumph Street Triple S - Service manual > Fuel System/Engine Management
Exploded View - Fuel Tank and Fuel Pump Exploded View - Fuel Rail, Throttles and Injectors
 Benelli Imperiale 400
 BMW F900XR
 Honda CB500X
 KTM 390 Adventure
 Triumph Street Triple S
 Yamaha MT-03
 Kawasaki Z400
 Triumph Street Triple S
 Yamaha MT-03