 Honda CB500X - Owner's Manual > Engine Oil
Checking the Engine Oil
1. If the engine is cold, idle the engine for 3 to 5 minutes.
2. Turn the ignition switch to the OFF position and wait for 2 to 3 minutes.
3. Place your motorcycle in an upright position on a firm, level surface.
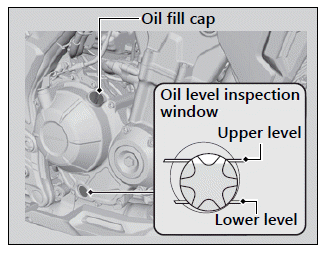
4. Check that the oil level is between the upper level and lower level marks on the oil level inspection window.
Adding Engine Oil
If the engine oil is below or near the lower level mark, add the recommended engine oil.
1. Remove the oil fill cap. Add the recommended oil until it reaches the upper level mark.
- Place your motorcycle in an upright position on a firm, level surface when checking the oil level.
- Do not overfill above the upper level mark.
- Make sure no foreign objects enter the oil filler opening.
- Wipe up any spills immediately.
2. Securely reinstall the oil fill cap.
NOTICE Overfilling with oil or operating with insufficient oil can cause damage to your engine. Do not mix different brands and grades of oil. They may affect lubrication and clutch operation.
For the recommended oil and oil selection guidelines, see "Maintenance Fundamentals."
Changing Engine Oil & Filter
Changing the oil and filter requires special tools. We recommend that you have your motorcycle serviced by your dealer.
Use a new Honda Genuine oil filter or equivalent specified for your model.
NOTICE Using the wrong oil filter can result in serious damage to the engine.
1. If the engine is cold, idle the engine for 3 to 5 minutes.
2. Turn the ignition switch to the OFF position and wait for 2 to 3 minutes.
3. Place your motorcycle on a firm, level surface.
4. Place a drain pan under the drain bolt.
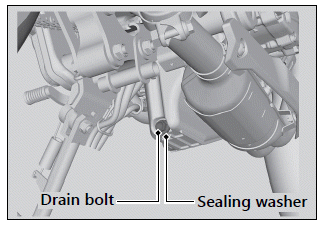
5. Remove the oil fill cap, drain bolt, and sealing washer to drain the oil.
6. Remove the oil filter with a filter wrench and let the remaining oil drain out. Make sure the prior seal is not stuck to the engine.
- Discard the oil and oil filter at an approved recycling center.
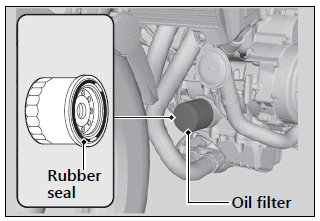
7. Apply a thin coat of engine oil to the rubber seal of a new oil filter.
8. Install the new oil filter and tighten.
Torque: 19 lbf-ft (26 N-m, 2.7 kgf-m)
9. Install a new sealing washer onto the drain bolt. Tighten the drain bolt.
Torque: 22 lbf-ft (30 N-m, 3.1 kgf-m)
10.Fill the crankcase with the recommended oil and install the oil fill cap.
Required oil
When changing oil & engine oil filter: 2.7 US qt (2.6 L)
When changing oil only: 2.5 US qt (2.4 L)
11.Check the oil level.
12.Check that there are no oil leaks.
Air Cleaner
Changing Air Cleaner Element
Use a new Honda Genuine air cleaner element or an equivalent specified for your motorcycle.
NOTICE Using the wrong air cleaner element may cause premature engine wear or performance problems.
1. Remove the seat.
2. Remove the battery.
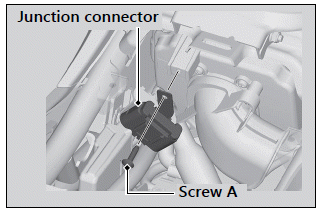
3. Remove the junction connector by removing the screw A.
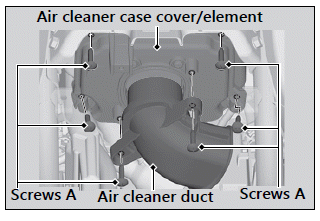
4. Remove the air cleaner duct and air cleaner case cover/element by removing the screws A.
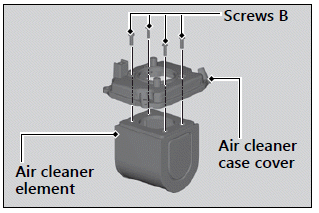
5. Remove the air cleaner element from the air cleaner case cover by removing the screws B.
6. Install the new air cleaner element.
- Make sure the air cleaner element is installed securely.
7. Install the parts in the reverse order of removal.
- Tighten the screws A.
Torque: 0.8 lbf-ft (1.1 N-m, 0.1 kgf-m)
Coolant
Checking the Coolant
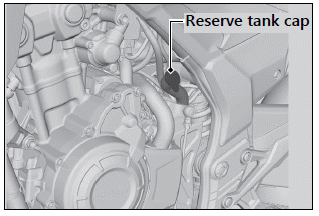
Check the coolant level in the reserve tank while the engine is cold.
1. Place your motorcycle on a firm, level surface.
2. Hold your motorcycle in an upright position.
3. Check that the coolant level is between the UPPER level and LOWER level marks on the reserve tank.
If the coolant level is dropping noticeably or the reserve tank is empty, you likely have a serious leak. Have your motorcycle inspected by your dealer.

Adding Coolant
If the coolant level is below the LOWER level mark, add the recommended coolant until the level reaches the UPPER level mark.
Add fluid only from the reserve tank cap and do not remove the radiator cap.
1. Remove the reserve tank cap and add fluid while monitoring the coolant level.
- Do not overfill above the UPPER level mark.
- Make sure no foreign objects enter the reserve tank opening.
2. Securely reinstall the reserve tank cap.
WARNING Removing the radiator cap while the engine is hot can cause the coolant to spray out, potentially scalding you.
Always let the engine and radiator cool down before removing the radiator cap.
Changing Coolant
Have your dealer change the coolant unless you have the proper tools and are mechanically qualified.
See also:
 Honda CB500X - Owner's Manual > Removing & Installing Body Components
Battery Removal Make sure the ignition switch is in the OFF position.
Honda CB500X - Owner's Manual > Brakes
Checking Brake Fluid 1. Place your motorcycle in an upright position on a firm, level surface. 2. Front Check that the brake fluid reservoir is horizontal and that the fluid level is above the LWR mark.
 Benelli Imperiale 400
 BMW F900XR
 Honda CB500X
 KTM 390 Adventure
 Triumph Street Triple S
 Yamaha MT-03
 Kawasaki Z400
 Triumph Street Triple S
 Yamaha MT-03