 Triumph Street Triple S - Service manual > Drive Chain
For safety and to prevent excessive wear, the drive chain must be checked, adjusted and lubricated in accordance with scheduled maintenance requirements. Checking, adjustment and lubrication must be carried out more frequently for extreme conditions such as salty or heavily gritted roads.
If the chain is badly worn or incorrectly adjusted (either too loose or too tight) the chain could jump off the sprockets or break.
Warning: A chain that breaks or lumps off the sprockets could snag on the engine sprocket or lock the rear wheel, severely damaging the motorcycle and causing an accident. Never neglect chain maintenance.
Note:
- Lubrication of the drive chain should ideally be carried out with the motorcycle set up so that the rear suspension hangs free.
- The chain must be adjusted with the motorcycle in an upright position, resting on its wheels, and with no additional weight on it.
Chain Lubrication
Lubrication is necessary every 200 miles (300 Km) and also after riding in wet weather, on wet roads, or any time that the chain appears dry.
Use the special chain lubricant as recommended in the specification section.
Correct application is critical for chain lubrication. Apply the lubricant for one full chain revolution only, then leave for eight hours before riding. This allows the lubricant's solvent (used to thin the oil) to evaporate and the oil to 'soak' into all parts of the chain. If the lubricant is applied and the motorcycle is ridden shortly afterwards, the lubricant is unlikely to reach all parts and the majority will be flung off and wasted. Applying excessive amounts is not helpful under any circumstances.
It should be noted that the lubricant is applied to the chain to lubricate its action across the sprockets. In an O-ring chain, external lubrication does not penetrate to the bushes and rollers as the O-ring seals prevents this from happening.
Caution: Do not use a power 'jet' wash to clean the chain as this may cause damage to the chain components.
Chain Adjustment
Chain Free-movement Inspection
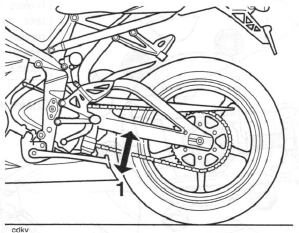
- Maximum movement position
Warning: Before starting work, ensure the motorcycle is stabilised and adequately supported. This will help prevent it from falling and causing injury to the operator or damage to the motorcycle.
1. Place the motorcycle on a level surface and hold it in an upright position with no weight on it.
2. Rotate the rear wheel by pushing the motorcycle to find the position where the chain has least slack.
Measure the chains vertical movement, mid-way between sprockets.
3. If correct, the vertical movement of the drive chain midway between the sprockets should be:
- 24 - 30 mm for the Daytona 675;
- 13 - 32 mm for the Street Triple and Street Triple R.
Chain Free-movement adjustment
1. Loosen the wheel spindle nut.
2. Release the locknuts on both the left hand and right hand chain adjuster bolts.

- Adjuster bolt locknut
- Adjuster bolt
- Rear wheel spindle nut
3. Moving both adjusters by an equal amount, turn the adjuster bolts clockwise to increase chain free movement and counter clockwise to reduce chain free movement.
4. When the correct amount of chain free movement has been set, push the wheel into firm contact with the adjusters.
Note:
- Check for equal adjustment on both sides using the graduation marks on the swinging arm.
5. Tighten both adjuster locknuts to 20 Nm and the rear wheel spindle nut to 110 Nm.
6. Repeat the chain adjustment check. Re-adjust if necessary.
Warning: Operation of the motorcycle with insecure adjuster locknuts or a loose wheel spindle may result in impaired stability and handling of the motorcycle. This impaired stability and handling may lead to loss of motorcycle control and an accident.
7. Check the rear brake effectiveness. Rectify if necessary.
Warning: It is dangerous to operate the motorcycle with defective brakes; you must have your authorised Triumph dealer take remedial action before you attempt to ride the motorcycle again. Failure to take remedial action may reduce braking efficiency leading to loss of motorcycle control and an accident.
Chain Wear Inspection
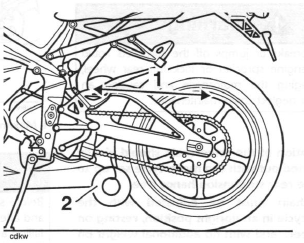
- Measurement across 20 links
- 10-20kg Weight
Warning: Before starting work, ensure the motorcycle is stabilised and adequately supported. This will help prevent it from falling and causing injury to the operator or damage to the motorcycle.
1. Remove the chain guard from the swinging arm.
2. Stretch the chain taut by hanging a 10-20 kg (20-40 Ib) weight on the chain.
3. Measure a length of 20 links on the straight part of the chain from pin centre of the 1 st pin to pin centre of the 21 st pin. Repeat the test at various sections of the chain to establish an average reading. This is because the chain may wear unevenly.
4. If the length exceeds the service limit of 319 mm (12.56 in), the chain must be replaced.
Warning: A chain that breaks or jumps off the sprockets could snag on the engine sprocket or lock the rear wheel, severely damaging the motorcycle and causing loss of control and an accident.
5. Examine the whole length of the chain. If there are any excessively tight or loose sections, loose pins or damaged rollers, the chain should be replaced.
6. Inspect sprockets for unevenly or excessively worn teeth. Also examine the sprockets for damaged teeth.
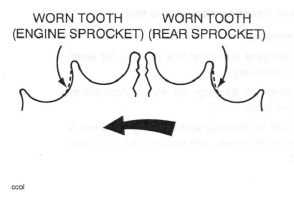
Note:
- Sprocket wear is exaggerated for illustration purposes.
Warning: The use of non-approved chains may result in a broken chain or may cause the chain to jump off the sprockets.
Use a genuine Triumph supplied chain as specified in the Triumph Parts Catalogue.
Never neglect chain maintenance and always have chains installed by an authorised Triumph dealer.
7. If there is any irregularity found in any of the components, replace the drive chain and/or any other damaged components.
8. Refit the chain guard, tightening the fixings to 9 Nm.
Rear Suspension Unit
Removal
Warning: If the engine has recently been running, the exhaust system will be hot. Before working on or near the exhaust system, allow sufficient time for the exhaust system to cool as touching any part of a hot exhaust system could cause burn injuries.
Warning: Before starting work, ensure the motorcycle is stabilised and adequately supported. This will help prevent it from falling and causing injury to the operator or damage to the motorcycle.
1. Raise and support the rear of the motorcycle under the frame or engine. Position a block to support the rear wheel.
2. Remove the seats.
3. Disconnect the battery, negative (black) lead first.
4. Remove the rear panel(s).
5. Daytona 675 only: Remove the lower fairings.
6. Remove the exhaust system.
7. Remove the three drop link plate fixings. Discard the nuts.
Note:
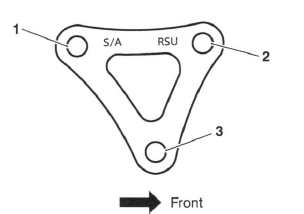
- Both drop link plates are marked as shown below. Both plates are identical, and must be fitted with the bolt hole markings facing the right hand side of the motorcycle.
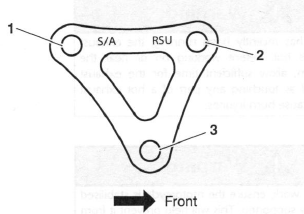
- Swinging arm bolt position
- Rear suspension bolt position
- Drag link bolt position
8. Noting the orientation of the drop link plates, remove the plates and position the drag link clear.
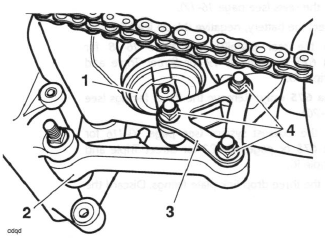
- Rear suspension unit
- Drag link
- Drop link
- Fixings
Warning: Never attempt to disassemble the rear suspension unit or reservoir. It contains fluid under pressure and serious injury could result if any part of the system is disturbed.
9. Remove the rear suspension unit upper mounting nut and bolt, and manoeuvre the unit upwards through the swinging arm and clear of the motorcycle.
Inspection
1. Clean all components and inspect for damage/wear to:
- rear suspension unit upper and lower mountings,
- lower mounting spacer, bearing and seals,
- drop link bearings, sleeves and seals.
2. Renew as necessary.
3. Check the swinging arm drop link bearing for wear.
Overhaul as necessary.
4. Check the drag link bearings for wear. Overhaul as necessary.
5. Inspect the unit for damage and fluid leaks. If there is any damage, or fluid leaks are evident, the unit must be replaced.
Installation
1. Remove the drag link sleeve and pack the bearing with fresh grease. Refit the sleeve.
2. Remove the rear suspension lower sleeve and pack the bearing with fresh grease. Refit the sleeve.
3. Remove the swinging arm drop link sleeve and pack the bearing with fresh grease. Refit the sleeve.
4. Refit the rear suspension unit to the motorcycle by lowering the unit downwards through the hole in the swinging arm.
5. Locate the rear suspension unit and loosely fit the upper mounting bolt and a new nut.
Note:
- The drop link plates are marked as shown below. Both plates are identical, and must be fitted with the bolt hole markings facing the right hand side of the motorcycle.
- Swinging arm bolt position
- Rear suspension bolt position
- Drag link bolt position
6. Locate the drop link plates and, from the right hand side, loosely fit the bolts and new nuts.
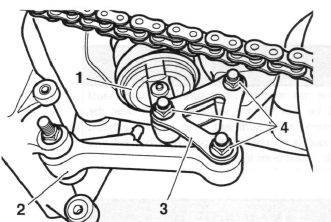
- Rear suspension unit
- Drop link plate
- Drag link
- Fixings
7. Tighten the three drop link fixings to 48 Nm.
8. With the weight of the motorcycle on its wheels, tighten the rear suspension unit upper mounting to 48 Nm.
9. Refit the exhaust system.
10. Daytona 675 only: Refit the lower fairings.
11. Fit the rear panel(s).
12. Connect the battery, red (positive) lead first.
13. Fit the seats.
Drag Link
Removal
Warning: If the engine has recently been running, the exhaust system will be hot. Before working on or near the exhaust system, allow sufficient time for the exhaust system to cool as touching any part of a hot exhaust system could cause burn injuries.
Warning: Before starting work, ensure the motorcycle is stabilised and adequately supported. This will help prevent it from falling and causing injury to the operator or damage to the motorcycle.
1. Raise and support the rear of the motorcycle beneath the frame or engine. Position a block to support the rear wheel.
2. Remove the seats.
3. Disconnect the battery, negative (black) lead first.
4. Remove the rear panel(s).
5. Daytona 675 only: Remove the lower fairings.
6. Remove the exhaust system.
7. Remove the two fixings securing the drag link.
8. Remove the drag link.
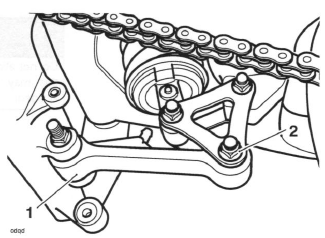
- Drag link
- Fixings
Inspection
1. Clean all components and inspect the drag link and bearings for damage/wear.
2. Check the rear suspension unit lower bearings for wear.
3. Check the drop link upper bearings for wear.
4. Renew as necessary.
Installation
1. Remove the drag link sleeves and pack the bearings with fresh grease. Refit the sleeves.
2. Refit the drag link, fit the bolts and new nuts, and tighten to 48 Nm.
3. Refit the exhaust system.
4. Daytona 675 only: Refit the lower fairings.
5. Fit the rear panel(s) and Street Triple R.
6. Connect the battery, red (positive) lead first.
7. Fit the seats.
See also:
 Triumph Street Triple S - Service manual > Rear Suspension
Exploded View - Swinging Arm Exploded View - Rear Hub and Wheel
Triumph Street Triple S - Service manual > Swinging Arm
Removal Warning: If the engine has recently been running, the exhaust system will be hot. Before working on or near the exhaust system, allow sufficient time for the exhaust system to cool as touching any part of a hot exhaust system could cause burn injuries.
 Benelli Imperiale 400
 BMW F900XR
 Honda CB500X
 KTM 390 Adventure
 Triumph Street Triple S
 Yamaha MT-03
 Kawasaki Z400
 Triumph Street Triple S
 Yamaha MT-03