 Triumph Street Triple S - Service manual > Cylinder Head Description
The engine is fitted with an aluminium alloy cylinder head, which carries the camshafts, valves and spark plugs. The cylinder head is cast as a single entity and various components are permanently added after machining.
The camshafts run directly in the head without separate bearings. Valve clearances are adjusted by changing variable thickness shims which sit between the valve tappet bucket and the valves.
The camshafts are driven by a silent-type chain. The chain is guided by two blades and is tensioned by a spring loaded tensioner for Street Triple, Street Triple R and Daytona 675 up to VIN 381274.
For Daytona 675 from VIN 381275 a hydraulic tensioner is fitted to tension the chain. The Hydraulic tensioner is fed oil via a gallery in the cylinder head. The combination of oil pressure and spring pressure pushes the plunger against the tensioner blade which tensions the camshaft drive chain. The hydraulic tensioner has an oil pressure relief valve located in the plunger that is set to open between 12 - 16 bar and when opens sprays oil through a drilling in the tensioner blade onto the camshaft drive chain.
Oil is supplied to the head by an internal gallery. Once supplied to the head, the oil is distributed along internal drillings within the head casting and camshaft.
Single valve springs are used to close both the inlet and exhaust valves. These valve springs have close wound coils at one end to assist in the prevention of valve bounce at high engine speed and to give a smooth valve actuation. When assembling the cylinder head it is important that the close wound, colour coded ends of the springs are fitted downwards (towards the piston). The tip of the inlet valves are hardened to give a long service life.
Due to the methods used to assemble the valve seat and valve guides to the head, these parts cannot be replaced.
Caution: In any of the following operations which necessitate the removal or disconnection of the camshaft drive chain, NEVER turn the engine without the camshaft drive chain and tensioner correctly fitted and adjusted. In the disassembled condition, the pistons will contact the valves if the crankshaft is turned, causing severe engine damage.
Camshaft Cover
Removal
1. Remove the rider's seat.
2. Disconnect the battery, negative (black) lead first.
3. Daytona 675 only: Remove the lower fairings.
4. Remove the fuel tank.
5. Remove the airbox.
6. Remove the ignition coils from the camshaft cover.
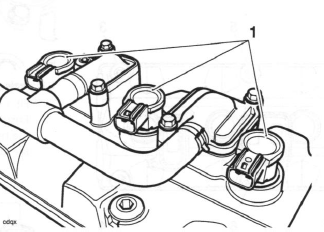
- Ignition coils
7. Detach the secondary air injection hose from the reed valves on top of the camshaft cover.
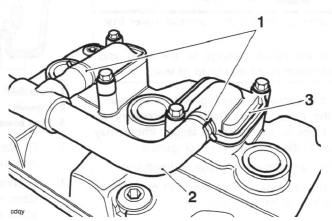
- Spring-close hose clip
- Secondary air injection hose
- Reed valve assembly
8. Remove the throttle bodies, injectors and fuel rail from the cylinder head.
Note:
- It is not necessary to disconnect the throttle cables. Instead, lay the assembly over the frame during the period when the engine is separated from the frame.
9. Progressively release the camshaft cover bolts in the sequence shown below.
Note:
- Two shorter bolts are fitted at the end adjacent to the camshaft drive chain.
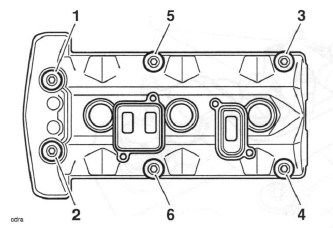
Camshaft Cover Bolt Release Sequence
10. Remove the camshaft cover from the motorcycle.
Caution: Never use a lever to remove the camshaft cover from the head.
Using a lever will cause damage to the head and camshaft cover which could lead to an oil leak.
11. Remove the camshaft cover gasket. If necessary, recover the three dowels from the secondary air injection holes in the camshaft ladder (these may come away in the camshaft cover or gasket).
12. Discard the camshaft cover gasket and bolt seals.
13. Remove any residual oil from the front of the head using a syringe or lint free cloth.
Installation
1. Refit the three dowels to the camshaft ladder.
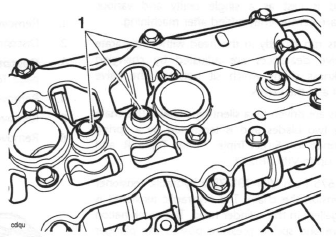
- Dowels
2. Fit a new camshaft cover seal to the cylinder head.
Ensure the groove in the gasket is correctly seated to the head. Ensure the plug tower seals and the dowels are correctly located.
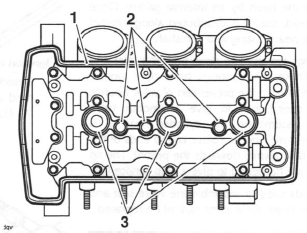
- Camshaft cover seal
- Dowels
- Plug tower seals
3. Fit the camshaft cover, ensuring that the gasket remains in the correct position.
4. Lubricate the new camshaft cover screw seals with clean engine oil. Fit the camshaft cover screws and screw seals and tighten until finger tight.
5. Finally, tighten the camshaft cover screws, in the same order as for removal, to 10 Nm.
6. Refit the throttle bodies, injectors and fuel rail to the cylinder head.
7. Check the throttle cable adjustment.
8. Refit the secondary air injection hose to the reed valves.
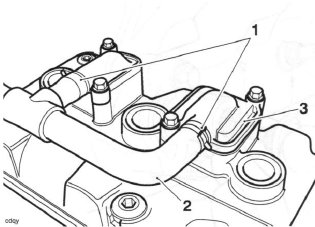
- Spring-close hose clip
- Secondary air injection hose
- Reed valve assembly
9. Inspect the ignition coils seal for damage and replace if necessary.
10. Fit the ignition coils and reconnect the electrical connectors.
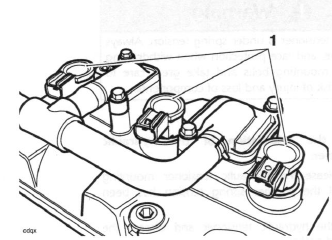
- Coils
11. Refit the airbox.
12. Refit the fuel tank.
13. Daytona 675 only: Refit the lower fairings.
14. Reconnect the battery, positive (red) lead first.
15. Refit the rider's seat.
See also:
 Triumph Street Triple S - Service manual > Cylinder Head
Exploded View - Cylinder Head and Valves Exploded View - Camshaft Cover
 Triumph Street Triple S - Service manual > Camshaft Drive Chain Tensioner - all Models
Removal 1. Remove the camshaft cover. 2. Noting the position of the bolt fitted with the copper washer, remove the right hand crank cover. Discard the gasket. Right hand crank cover Copper washer position

 Benelli Imperiale 400
 BMW F900XR
 Honda CB500X
 KTM 390 Adventure
 Triumph Street Triple S
 Yamaha MT-03
 Kawasaki Z400
 Triumph Street Triple S
 Yamaha MT-03