 Yamaha MT-03 - Service manual > Cooling system
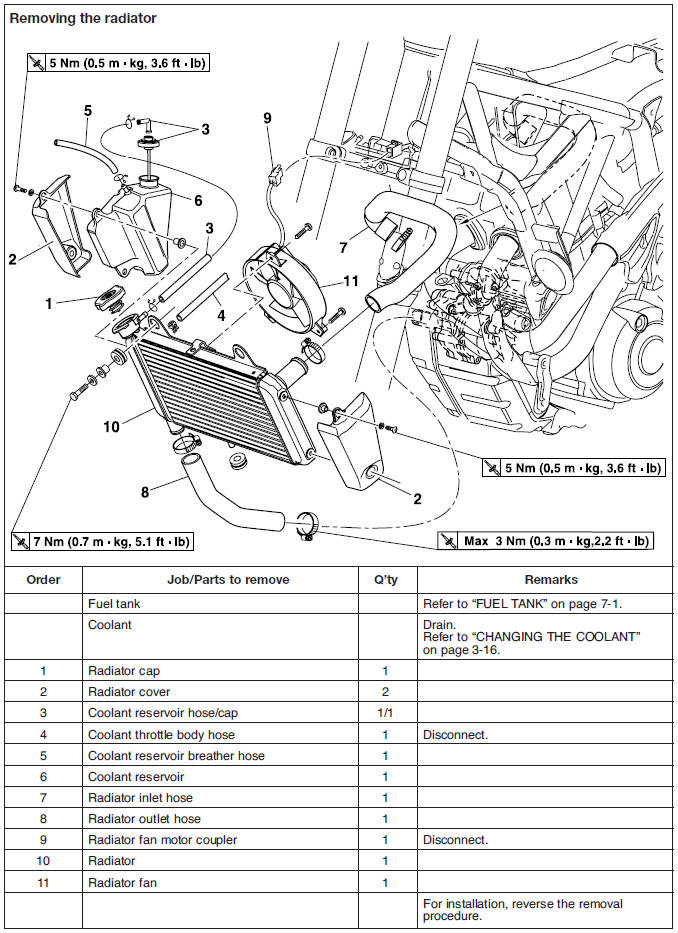
Radiator
Checking the radiator
1. Check:
- Radiator fins
Obstruction → Clean.
Apply compressed air to the rear of the radiator.
Damage → Repair or replace.
NOTE:
Straighten any flattened fins with a thin, flathead screwdriver.
2. Check:
- Radiator hoses.
Cracks/damage → Replace.
3. Measure:
- Radiator cap opening pressure
Below the specified pressure → Replace the radiator cap.
 Radiator cap opening pressure
110.0-140.0 kPa
(1.10-1.40 kg/cm2,
16.0-20.3 psi)
Radiator cap opening pressure
110.0-140.0 kPa
(1.10-1.40 kg/cm2,
16.0-20.3 psi)
a. Install the radiator cap tester "1" and radiator cap tester adaptor "2" and radiator cap tester adaptor "3" to the radiator cap "4".
 Radiator cap tester
90890-01325
Radiator cap tester
90890-01325
Radiator cap tester adaptor 90890-01352
Radiator cap tester adaptor 90890-01497
b. Apply the specified pressure for ten seconds and make sure there is no drop in pressure.
4. Check:
- Radiator fan
Damage → Replace.
Malfunction → Check and repair.
Installing the radiator
1. Install:
- Radiator inlet hose "1"
- Radiator outlet hose "2"
- Hose clamps "3"
NOTE:
Install the radiator inlet hose and radiator outlet hose so that each hose contacts the respective projection "a".
2. Fill:
- Cooling system (with the specified amount of the recommended coolant)
3. Check:
- Cooling system
Leaks → Repair or replace any faulty part.
a. Attach the radiator cap tester "1" and radiator tester adapter "2" to the radiator.
 Radiator cap tester
90890-01325
Radiator cap tester
90890-01325
Radiator tester adapter 90890-01496
b. Apply 100 kPa (1.0 kg/cm2, 14.2233 psi) of pressure and make sure there is no drop in pressure.
4. Measure:
- Radiator cap opening pressure.
Bellow the specified pressure → Replace the radiator cap.
Thermostat
Checking the thermostat
1. Check:
- Thermostat "1" Does not open at 71-85 ºC (159.8-185 ºF) → Replace.
a. Suspend the thermostat in a container filled with water.
b. Slowly heat the water.
c. Place a thermometer in the water.
d. While stirring the water, observe the thermostat and thermometer's indicated temperature.
1. Thermostat
2. Thermometer
3. Water
4. Container
 Fully closed
 Fully open
NOTE:
If the accuracy of the thermostat is in doubt, replace it. A faulty thermostat could cause serious overheating or overcooling.
2. Check:
- Thermostat cover
- Thermostat housing (cylinder head) Cracks/damage → Replace.
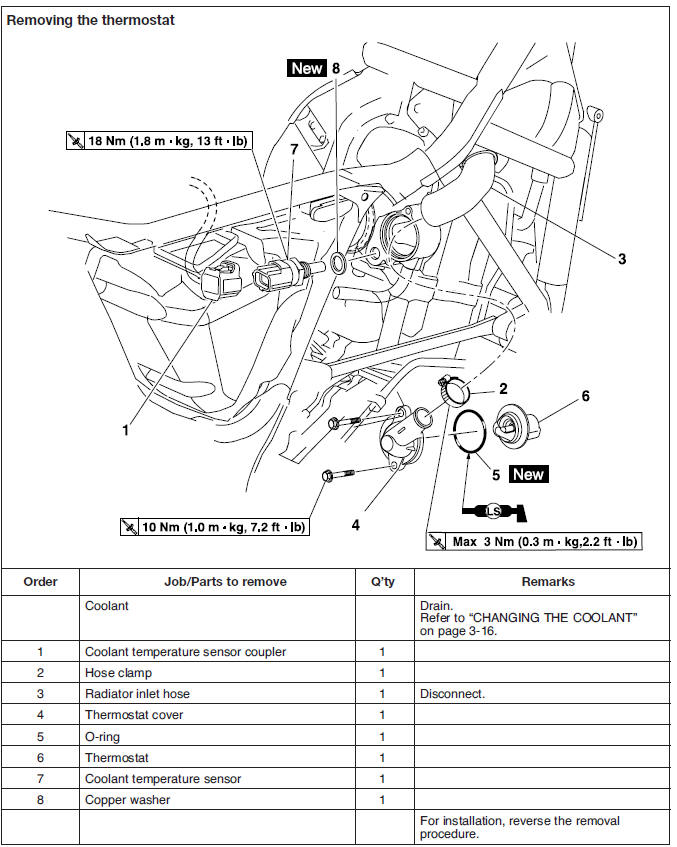
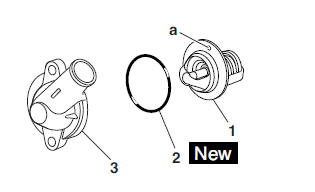
Installing the thermostat
1. Install:
- Thermostat "1"
- O-ring "2"

- Thermostat cover "3"
 Thermostat cover bolts
10 Nm (1.0 m*kg, 7.2 ft*lb)
Thermostat cover bolts
10 Nm (1.0 m*kg, 7.2 ft*lb)
NOTE:
- Install the thermostat with its breather hole "a" facing up.
- Lubricate the O-ring with a thin coat of lithium-soap-based grease.
2. Install:
- Radiator inlet hose "1"
- Hose clamp "2"
 Hose clamp
Max 3 Nm (0.3 m*kg, 2.2 ft*lb)
Hose clamp
Max 3 Nm (0.3 m*kg, 2.2 ft*lb)
NOTE:
Install the radiator inlet hose "1" so that it contacts the projection on the thermostat cover "a".
3. Install:
- Copper washer

- Coolant temperature sensor
 Coolant temperature sensor
18 Nm (1.8 m*kg, 13 ft*lb)
Coolant temperature sensor
18 Nm (1.8 m*kg, 13 ft*lb)
CAUTION:
Use extreme care when handling the coolant temperature sensor. Replace the sensor if it is dropped or subjected to a strong impact.
4. Fill:
- Cooling system (with the specified amount of the recommended coolant)
5. Check:
- Cooling system
Leaks → Repair or replace any faulty part.
6. Measure:
- Radiator cap opening pressure
Below the specified pressure → Replace the radiator cap.
Water pump

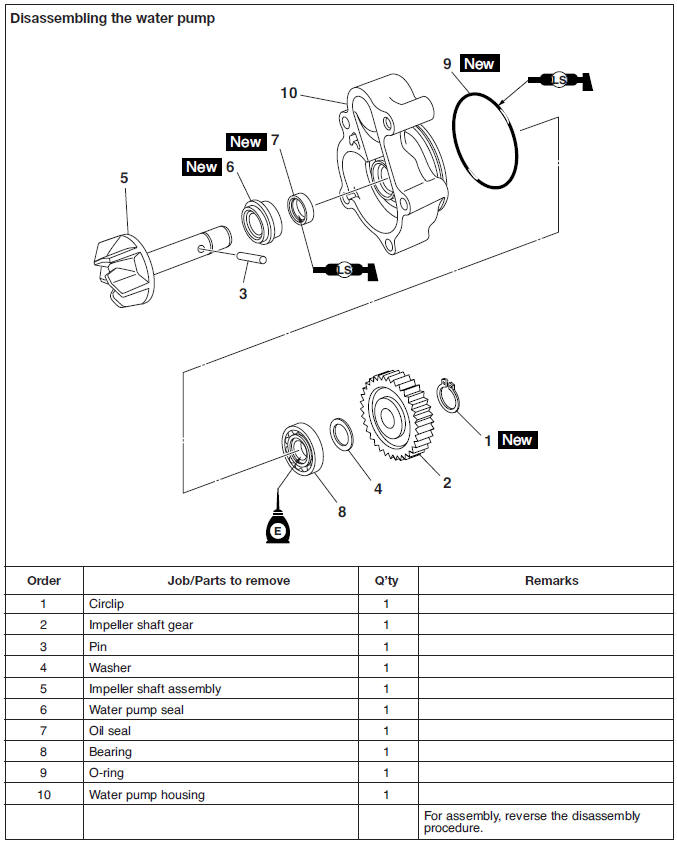
Disassembling the water pump
1. Remove:
- Water pump seal "1"
NOTE:
Tap out the water pump seal from water pump housing in the direction of the arrow shown.
2. Water pump housing
2. Remove:
- Bearing "1"
- Oil seal "2"
NOTE:
Tap out the bearing and oil seal from water pump housing in the direction of the arrow shown.
3. Water pump housing
3. Remove:
- Rubber damper holder "1"
- Rubber damper "2" (from the impeller, with a thin, flat-head screwdriver)
NOTE:
Do not scratch the impeller shaft.
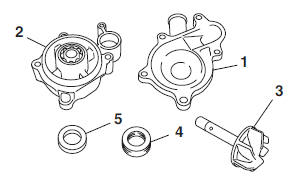
Checking the water pump
1. Check:
- Water pump housing cover "1"
- Water pump housing "2"
- Impeller "3"
- Rubber damper "4"
- Rubber damper holder "5"Cracks/damage/wear → Replace.
2. Check:
- Water pump seal
- Oil seal Cracks/damage/wear → Replace.
3. Check:
- Bearing Rough movement → Replace.
4. Check:
- Impeller shaft gear Pitting/wear → Replace.
5. Check:
- Water pump outlet pipe
- Radiator outlet hose
- Water jacket inlet housing Cracks/damage/wear → Replace.
Assembling the water pump
1. Install:
- Oil seal "1"
 (into the water pump housing "2")
 - Bearing "3"
NOTE:
- Before installing the oil seal, apply tap water or coolant onto its outer surface.
- Install the oil seal with a socket that matches its outside diameter.
2. Install:
- Water pump seal "1"

CAUTION:
Never lubricate the water pump seal surface with oil or grease.
NOTE:
- Install the water pump seal with the special tools.
- Before installing the water pump, apply Yamaha bond No.1215 "2" to the water pump housing "3".
 Mechanical seal installer "4"
90890-04132
Mechanical seal installer "4"
90890-04132
Middle driven shaft bearing driver "5" 90890-04058
Yamaha bond No.1215 90890-85505
 Push down.
3. Install:
- Rubber damper "1"

- Rubber damper holder "2"

NOTE:
Before installing the rubber damper, apply tap water or coolant onto its outer surface.
4. Measure:
- Impeller shaft tilt
Out of specification → Repeat steps (3) and (4).
CAUTION:
Make sure the rubber damper and rubber damper holder are flush with the impeller.
 Impeller shaft tilt limit
0.15 mm (0.006 in)
Impeller shaft tilt limit
0.15 mm (0.006 in)
1. Straightedge
2. Impeller
5. Install:
- Impeller shaft assembly "1"
- Washer
- Pin
- Impeller shaft gear
- Circlip

NOTE:
After installation, check that the impeller shaft rotates smoothly.
Installing the water pump
1. Install:
- Water pump outlet hose "1"
- O-rings

- Water pump outlet pipe (to the water pump assembly)
 Water pump outlet pipe bolts
10 Nm (1.0 m*kg, 7.2 ft*lb)
Water pump outlet pipe bolts
10 Nm (1.0 m*kg, 7.2 ft*lb)
- Hose clamps "2"
 Hose clamp
Max 3 Nm (0.3 m*kg, 2.2 ft*lb)
Hose clamp
Max 3 Nm (0.3 m*kg, 2.2 ft*lb)
WARNING
Always use new O-rings.
NOTE:
- Install the water pump outlet hose so that it contacts the projection "a" on the water jacket joint.
- Before installing the water pump outlet pipe, lubricate the O-rings with a thin coat of lithium- soap-based grease.
2. Install:
- Gasket

- Water pump assembly
 Water pump cover bolts
10 Nm (1.0 m*kg, 7.2 ft*lb)
Water pump cover bolts
10 Nm (1.0 m*kg, 7.2 ft*lb)
- Water pump cover
 Water pump assembly bolts
10 Nm (1.0 m*kg, 7.2 ft*lb)
Water pump assembly bolts
10 Nm (1.0 m*kg, 7.2 ft*lb)
3. Install:
- Radiator outlet hose "1"
- Hose clamp "2"
 Hose clamp
Max 3 Nm (0.3 m*kg, 2.2 ft*lb)
Hose clamp
Max 3 Nm (0.3 m*kg, 2.2 ft*lb)
NOTE:
Install the radiator outlet hose "1" so that it contacts the projection "a" on the water pump cover.
4. Fill:
- Cooling system
(with the specified amount of the recommended coolant)
5. Check:
- Cooling system
Leaks → Repair or replace the faulty part.
6. Measure:
- Radiator cap opening pressure.
Below the specified pressure → Replace the radiator cap

 Benelli Imperiale 400
 BMW F900XR
 Honda CB500X
 KTM 390 Adventure
 Triumph Street Triple S
 Yamaha MT-03
 Kawasaki Z400
 Triumph Street Triple S
 Yamaha MT-03