 Kawasaki Z400 - Service manual > Calipers
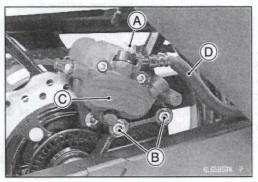
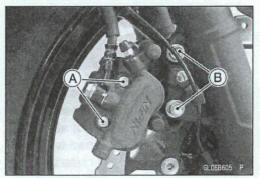
Front Caliper Removal

- Loosen the banjo bolt [A] at the brake hose lower end, and tighten it loosely.
- Remove the caliper mounting bolts [B] and caliper [C].
- Remove the banjo bolt to disconnect the brake hose [D] from the caliper (see Brake Hose Removal/Installation).
NOTICE
Brake fluid quickly damage painted plastic surfaces; any spilled fluid should be completely washed away Immediately.
Rear Caliper Removal
Loosen the banjo bolt [A] at the brake hose lower end, and tighten it loosely.
Remove the caliper mounting bolts [B] and caliper [C].
Remove the banjo bolt and disconnect the brake hose [D] from the caliper (see Brake Hose Removal/Installation).
NOTICE
Brake fluid quickly damage painted plastic surfaces; any spilled fluid should be completely washed away Immediately.
Caliper Installation
- Install the caliper and brake hose lower end.
- Replace the washers on each side of hose fitting with new ones.
- Fit the brake hose fitting into the groove on the caliper.
- Tighten:
Toque - Caliper Mounting Bob
Front: 25 N-m (2.5 kgf-m, 18 ft-lb)
Rear: 25 N-m (2.6 kgf-m, 18 ft-lb)
Brake How Banjo Bow 25 Nm (2.5 kgf*m, 18 ft-lb)
- Check the fluid level in the brake reservoirs.
- Bleed the brake line (see Brake Line Bleeding).
- Check the brake for good braking power, no brake drag, and no fluid leakage.
WARNING
After servicing, it taker, several applications of the brake lever or pedal before the brake pads contact the disc, which could result in Increased stopping distance and cause an accident resulting in injury or death. Do not attempt to ride the motorcycle until a firm brake lever or pedal is obtained by pumping the lever or pedal until the pads are against the disc.
Front Caliper Disassembly
- Refer to the Caliper Rubber Parts Replacement in the Periodic Maintenance chapter.
Front Caliper Assembly
- Refer to the Caliper Rubber Parts Replacement in the Periodic Maintenance chapter.
Rear Caliper Disassembly
- Refer to the Caliper Rubber Parts Replacement in the Periodic Maintenance chapter
Rear Caliper Assembly
- Refer to the Caliper Rubber Parts Replacement in the Periodic Maintenance, chapter
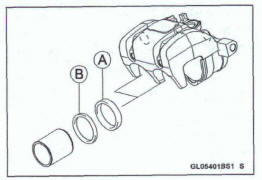
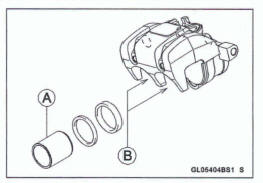
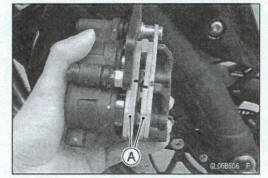
Caliper Fluid Seal Damage Inspection
The fluid seals (piston seals) [A] am placed around the piston to maintain clearance between the pad and the disc.
If the seal is in a poor condition, it could lead the pad to wear excessively or the brake to drag, which may cause the temperature of the discs or the brake fluid to increase.
Replace the fluid seal if it exhibits any of the conditions listed below.
- Brak.e fluid leakage around the pad.
- Brakes overheat.
- Considerable difference in inner and outer pad wear.
- Seal and piston are stuck together
*If the fluid seal is replaced, replace the dust seal [B] as well. Also, replace all seals every other the the pads are changed.
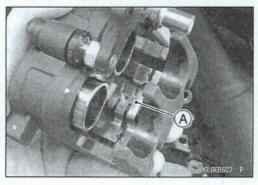
Caliper Dust Seal Damage Inspection
- Check that the dust seals [A] are not cracked, worn, swollen, or otherwise damaged
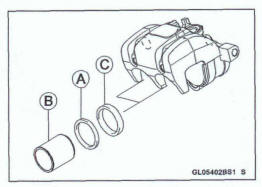
*It they show any damage, replace the dud seals with new ones.
Pistons [B] Fluid Seals [C]
Caliper Boots Inspection
- Check that the dust boot [A] and friction boot [B] are not cracked, worn, swollen, or otherwise damaged
*If thy show any damage, replace it
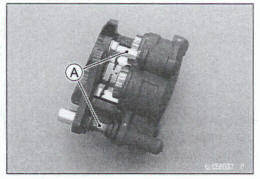
Caliper Piston and Cylinder Damage Inspection
- Visually inspect the pistons [A] and cylinder surfaces [B].
*Replace the caliper if the cylinder and piston are badly scores or rusty.
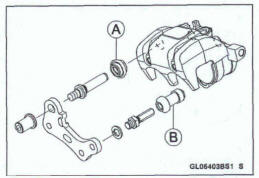
Caliper Holder Pin Inspection
The caliper body must slide smoothly on the caliper holder pins [A]. If the body does not slide smoothly, one pad will wear more than the other, pad wear will increase, and constant drag on the disc will raise brake and brake fluid temperature.
- Check to see that the caliper holder pins are not badly worn or stepped, and that the rubber boots are not damaged.
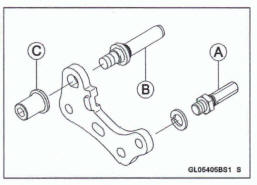
*If the caliper holder pin is damaged, inspect the caliper holder for warp or deformation. If the caliper is in good condition, replace the caliper holder pins [A] [B].
Torque- Caliper Holder Pin: 17.2 N*m(1.75 kgf*m, 12.7 ft*lb)
Apply a non-permanent locking agent to the threads of the caliper holder pin nut [C]
Torque- Caliper Holder Pin Nut: 22 N*m(2.2 kgf*m, 16 ft*lb)
Brake Pads
Brake Pad Removal
NOTE
The procedure to remove the front brake pad is as follows.
Removing the rear brake pad is the same as for the front brake pad.
- Loosen the pad pins [A].
- Remove the caliper mounting bolts [B].
- Remove the caliper with the hose installed.
- Remove: Pad Pins Brake Pads [A]
Brake Pad Installation
NOTE
The procedure to install the front brake pad is as follows.
Installing the rear brake pad is the same as for the front brake pad.
- Push the caliper pistons in by hand as far as they will go.
- Install the pad spring [A] in its correct position.
- Install the pad on the piston side first, then install the other side pad on the holder.
- Insert the pad pins.
- Install the caliper (see Caliper Installation).
- Tighten: Torque - Brake Pad Pk17 .2 Nm (1.75 kgf*m, 12.7 ft-lb)
WARNING
After servicing, it takes several applications of the brake lever or pedal before the brake pads contact the disc, which could result in increased stopping distance and cause an accident resulting in injury or death. Do not attempt to ride the motorcycle until a firm brake lever or pedal is obtained by pumping the lever or pedal until the pads am against the disc.
Brake Pad Wear Inspection
- Refer to the Brake Pad Wear Inspection in the Periodic Maintenance chapter.
See also:
 Kawasaki Z400 - Service manual > Brakes
Exploded View
Kawasaki Z400 - Service manual > Master Cylinder
Front Master Cylinder Removal Remove the banjo bolt [A] to disconnect the brake hose from the master cylinder (see Brake Hose Removal/Installation). Remove the damp bolts [B] and remove the master cylinder [C] with the reservoir, brake lever, and brake switch as an assembly. Disconnect the front brake light switch connector [D].
 Benelli Imperiale 400
 BMW F900XR
 Honda CB500X
 KTM 390 Adventure
 Triumph Street Triple S
 Yamaha MT-03
 Kawasaki Z400
 Triumph Street Triple S
 Yamaha MT-03