 Kawasaki Z400 - Service manual > Battery
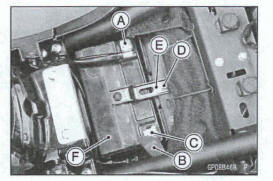
Battery Removal
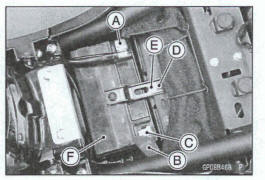
- Turn the ignition switch off.
- Remove: Front Seat (see Front Seat Removal in the Frame chapter)
- Disconnect the negative (-) cable [A].
NOTICE
Be sure to disconnect the negative (-) cable first.
- Slide out the positive (+) terminal cap [B] and disconnect the positive (+) cable [C].
- Remove: Bolt [D] Bracket [E] Battery [F]
Battery Installation
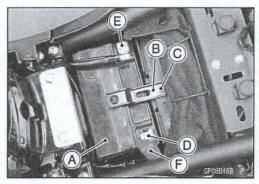
- Turn the ignition switch off.
- Put the battery [A] into the battery case.
- Install the bracket [B] and tighten the bolt [C] securely.
- Connect the positive (+) cable [D] first.
- Connect the negative (-) cable [E].
- Apply a light coat of grease on the battery terminals to prevent corrosion.
- Cover the (+) terminal with the red cap [F].
- Install the removed parts (see appropriate chapters).
Battery Activation
Electrolyte Filling
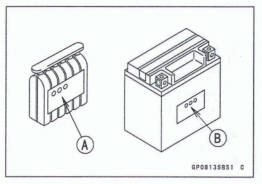
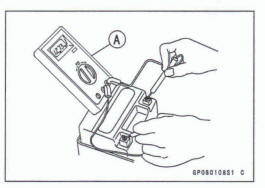
- Make sure that the model name [A] of the electrolyte container matches the model name [B] of the battery. These names must be the same
Battery Model Name
EX40G/H/J: FTX9-BS
NOTICE
Each battery comes with its own specific electrolyte container; using the wrong container may overfill the battery with Incorrect electrolyte, which can shorten battery life and deteriorate battery performance.
Be sure to use the electrolyte container with the same model name as the battery since the electrolyte volume and specific gravity vary with the battery type.
NOTICE
Do not remove the aluminum sealing sheet [A] from the filler ports [B] until just prior to use. be sure to use the dedicated electrolyte for correct electrolyte volume.
Danger
Sulfuric acid in battery electrolyte can cause severe burns. To prevent burns, wear protection clothing and safety glasses when handling electrolyte. If the electrolyte comes in contact with your skin or eyes, wash the area with liberal amounts of water and seek medical attention for more severe burns.
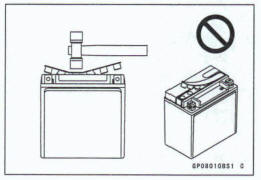
- Place the battery on a level surface.
- Check to see that the sealing sheet has no peeling, tears, or holes in it.
- Remove the sealing sheet.
Note
The battery is vacuum sealed. If the sealing sheet has leaking air into the battery, it may require a longer initial charge.
- Remove the electrolyte container from the vinyl bag.
- Detach the strip of caps [A] from the container and set aside, these All be used later to seal the battery.
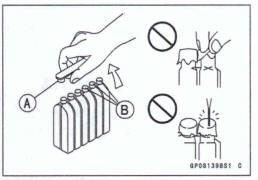
NOTE
Do not pierce or otherwise open the sealed cells [B] of the electrolyte container. Do not attempt to separate individual mils.
- Place the electrolyte container upside down with the six sealed cells into the filler ports of the battery. Hold the container level, push down to break the seals of all six cells. You will see air bubbles rising into each cell as the ports fill.
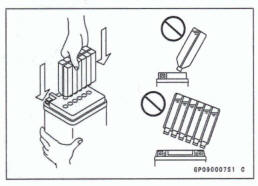
NOTE
Do not tilt the electrolyte container.
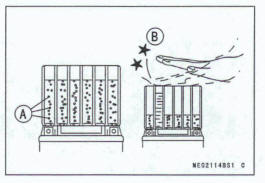
- Check the electrolyte flow.
*If no air bubbles [A] are coming up from the filler ports, or if the container cells have not emptied completely, tap the container [B] a few times.
NOTE
Be careful not to have the battery fell down.
- Keep the container in place. Don't remove the container from the battery, the battery requires all the electrolyte from the container for proper operation.
NOTICE
Removal of the container before It is completely empty can shorten the service Life of the battery.
Do not move the container until It is completely empty.
- After filling, let the battery sit for 20 - 60 minutes with the electrolyte container kept in place, which is required for the electrolyte to fully permeate into the plates.
- Make sure that the container cells have emptied completely, and remove the container from the battery.
- Place the strip of caps [A] loosely over the filler ports, press down firmly with both hands to seat the strip of caps into the battery (don't pound or hammer). When properly installed, the strip of caps will be level with the top of the battery
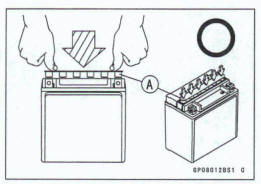
Notice
Once the strip of caps is installed onto the battery, never remove the caps, nor add water or electrolyte to the battery.
NOTE
Charging the battery immediately after filling can shorten service life.
Initial Charge
- Newly activated sealed batteries require an initial charge.
Standard Charge: 0.9 A x 5 - 10 hours
*If using a recommended battery charger, follow the charger's instructions for newly activated sealed battery.
Kawasaki-recommended chargers: Battery Mate 150-9 OptiMate PRO 4-S/PRO S/PRO2 Yuasa MB-2040/20W Christie ClOl22S
*If the above chargers are not available, use equivalent one.
- Let battery sit 30 minutes after initial charge, then check voltage using a voltmeter. (Voltage immediately after charging becomes temporarily high. For accurate measuring, let the battery sit for given time.)
NOTE
- Charging rates will vary depending on how long the battery has been stored, temperature, and the type of charger used. If voltage is not at least 12.6 V: repeat charging cycle.
- To ensure maximum battery life and customer satisfaction,
it is recommended the battery be load tested at
three times its amp-hour rating for 15 seconds.
Re-check voltage and if less than 12.6 V repeat the charging cycle and load test. If still below 12.6 V the battery is defective
Precautions
- No need of topping-up
No topping-up is necessary in this battery until it en& its lie under m1use. Forcibly wing off the seal cap to add water is very dangerous. Never do that.
- Refreshing charge.
If an engine will not start, a horn sounds weak, or lamps are dim, it indicates the battery has been discharged. Give refresh charge for 5 to 10 hours with charge current shown in the specification (see Refreshing Charge).
When a fast charge is inevitably required, do it following precisely the maximum charge current and time conditions indicated on the battery.
NOTICE
This battery is designed to sustain no unusual deterioration if refresh-charged according to the method specified above. However, the battery's performance may be reduced noticeably if charged under conditions other than given above. Never remove the seal cap during refresh charge.
If by chance an excessive amount of gas is generated due to overcharging, the relief valve releases the gas to keep the battery normal.
- When you do not use the motorcycle for months.
Give a refresh charge before you store the motorcycle and store it with the negative cable removed.
Give a refresh charge once a month during storage.
- Battery life.
If the battery will not start the engine even after several refresh charges, the battery has exceeded its useful life. Replace it (Provided, however, the vehicle's starting system has no problem).
DANGER
Batteries produce an explosive gas mixture of hydrogen and oxygen that can cause serious injury and bums if ignited. Keep the battery away from sparks and open flames during charging. When using a battery charger, connect the battery to the charger before turning on the charger. This procedure prevents sparks at the battery terminals which could ignite any battery gases. The electrolyte contains sulfuric acid. Be careful not to have it touch your skin or eyes. If touched, wash it off with liberal amount of water and seek medical attention for mom severe bums.
Interchange
A sealed battery can fully display its performance only when combined with a proper vehicle electric system. Therefore, replace a sealed battery only on a motorcycle which was originally equipped with a sealed battery.
Be careful, if a sealed battery is installed on a motorcycle which had an ordinary battery as original equipment, the sealed battery's life will be shortened.
Charging Condition Inspection
Battery charging condition can be checked by measuring battery terminal voltage with a digital meter [A].
- Remove: Battery (see Battery Removal)
- Measure the battery terminal voltage.
NOTE
Measure with a digital voltmeter which tan be read one decimal place voltage.
*If the reading is 12.6 V or more, no refresh charge is required, however, if the read is below the specified, refresh charge is required.
Battery Terminal Voltage Standard: 12.6 V or more
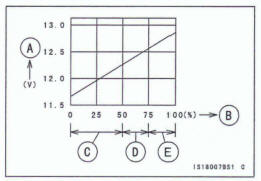
Terminal Voltage (V) [A] Battery Charge Rate (%) [B] Refresh charge is required [C] Note [D] Good [E]
Refreshing Charge
- Remove the battery [A] (see Battery Removal).
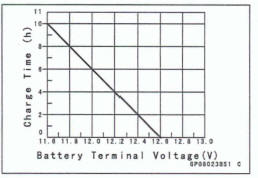
- Do refresh charge by following method according to the battery terminal voltage.
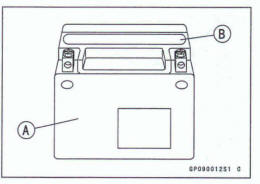
Warning
This battery is sealed type. Never remove sealing cap [B] even at charging. Never add water. Charge with current and time as stated below.
Terminal Voltage: 11.5 - less than 12.6 V Standard Charge: 0.9 A x 5 - 10 h (see following chart) Quick Charge: 4 A x 1 h
NOTICE
If possible, do not quick charge. If quick charge is done unavoidably, do standard charge later on.
Terminal Voltage: less than 11.5 V Charging Method: 0.9 A x 20 h
NOTE
Increase the charging voltage to a maximum voltage of 25 V if the battery will not accept current initially Charge for no more than 5 minutes at the increased voltage then check if the battery is drawing current. If the battery will accept current decrease the voltage and charge by the standard charging method described on the battery case. If the battery will not accept current after 5 minutes, replace the battery.
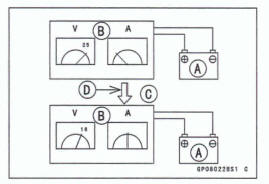
Battery [A] Battery Charger (B] Standard Value [C] Current starts to flow [D]
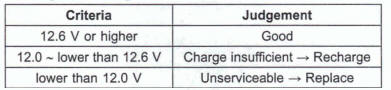
- Determine the battery condition after refresh charge.
Determine the condition of the battery left for 30 minutes
after completion of the charge by measuring the terminal
voltage according to the table below.
See also:
 Kawasaki Z400 - Service manual > Electrical System
Exploded View
Kawasaki Z400 - Service manual > Charging System
Alternator Cover Removal Drain: Engine Oil (see Engine Oil Change in the Periodic Maintenance chapter) Remove: Battery Case Cover (see Battery Case Cover Removal in the Frame chapter) Canister Bracket Bolts [A] (Equipped Models) Disconnect the alternator lead connector [A] and crankshaft sensor lead connector [B]. Clear each lead [C]. Place a suitable container under the alternator cover [A]. Remove: Alternator Cover Bolts [B] Brackets [C] Alternator Cover Gasket Dowel Pins
 Benelli Imperiale 400
 BMW F900XR
 Honda CB500X
 KTM 390 Adventure
 Triumph Street Triple S
 Yamaha MT-03
 Kawasaki Z400
 Triumph Street Triple S
 Yamaha MT-03