 Kawasaki Z400 - Service manual > Wheels (Rims)
Front Wheel Removal
- Remove: Front Wheel Rotation Sensor Bolt [A] (ABS Equipped Models)
Front Wheel Rotation Sensor [B] (ABS Equipped Mod- 4s)
Front Caliper (see Front Caliper Removal in the Brakes chapter)
Cotter Pin [C]
Axle Nut [D] and Washer
- Raise the front wheel off the ground with a suitable stand.
- Pull out the axle to the left and remove the front wheel from the forks.
NOTICE
Do not lay the wheel on the ground with the disc facing down. This can damage or warp the disc.
Place blocks under the wheel so that the disc does not touch the ground.
Front Wheel Installation
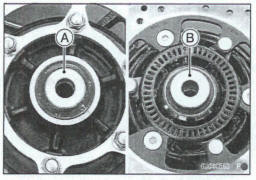
- Apply high-temperature grease to the grease seal lips.
- Fit the collars [A] on the both sides of the hub.
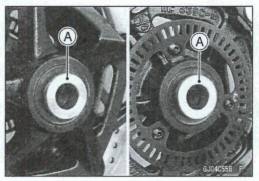
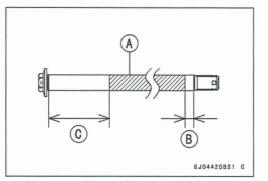
- Apply a thin coat of grease [A] to the front axle for rust
prevention.
About 10 mm (0.4 in.) [B] About 30 mm (1.2 in.) [C]
NOTE
Do not apply grease to the threads of the axle.

Insert the front axle from the left side.
*Wipe off excess grease if necessary
- Install the washer and axle nut.
- Tighten: Torque - Front Axle Nut: 98 N*m (10 kgf*m, 72 ft-lb)
- Insert a new cotter pin [A].
NOTE
- When inserting the cotter pin, if the slots in the nut do not align with the coffer pin hole in the axle, tighten the nut clockwise [B] up to next alignment.
- It should be within 30 degrees.
- Loosen once and tighten again when the slot goes past the nearest hole.
- Bend the cotter pin [A] over the nut [B].
WARNING
A loose axle nut can lead to an accident resulting in serious injury or death. Tighten the axle nut to the proper torque and a new cotter pin.
- Install the removed parts (see appropriate chapters).
- Check the front brake effectiveness (see Brake Operation Inspection in the Periodic Maintenance chapter).
WARNING
After servicing, It takes several applications of the brake lever before the brake pads contact the disc, which could result in inm8wd stopping distance and cause an accident resulting in Injury or death.
Do not attempt to ride the motorcycle until a firm brake lever is obtained by pumping the lever until the pads are against the disc.
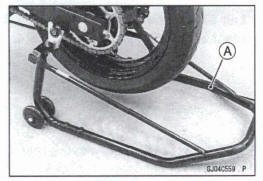
Rear Wheel Removal
- Raise the rear wheel off the ground with the stand [A].
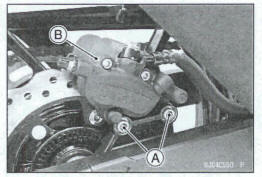
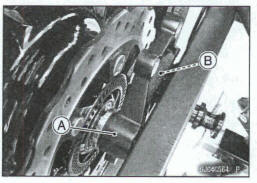
Remove the rear caliper mounting bolts [A].
Remove the rear caliper [B] from the rear brake disc
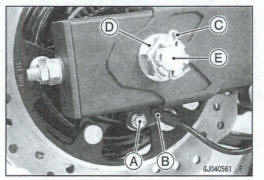
- Remove: Rear Wheel Rotation Sensor Bolt [A] Rear Wheel Rotation Sensor [B] Cotter Pin [C] Axle Nut [D] and Washer Axle [E] (from Left Side)
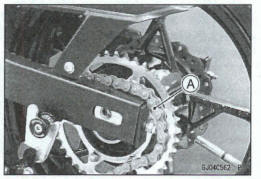
- Remove the drive chain [A] from the rear sprocket toward the left.
- Move the rear wheel back and remove it.
NOTICE
Do not lay the wheel on the ground with the disc facing down. This can damage or warp the disc.
Place blocks under the wheel so that the disc does not touch the ground.
Rear Wheel Installation
- Apply high-temperature grease to the grease seal lips.
- Fit the collars on the both sides of the hub.
Left Side Collar [A] Right Side Collar [B] (with Flange)
Engage the drive chain with the mar sprocket.
Install the caliper bracket [A] onto the swingarm stop [B].
- Apply a thin coat of grease [A] to the rear axle for rust
prevention.
About 10 mm (0.4 in.) [B] About 70 mm (2.8 in.) [C]
NOTE
Do not apply grease to the threads of the axle.
- Insert the rear axle from the left side.
*Wipe off excess grease if necessary.
- Install the washer and rear axle nut.
- Adjust the drive chain slack before tightening the rear axle nut (see Drive Chain Slack Inspection in the Periodic Maintenance chapter).
- Tighten: Torque - Rear Axle Nut: 98 Nm (10 kgf-m, 72 ft-lb)
- Insert a new cotter pin [A].
NOTE
- When inserting the cotter pin, if the dots in the nut do not align with the cotter pin hole in the axle, tighten the nut clockwise u p to next alignment.
- It should be within 30 degrees.
- Loosen once and tighten again when the slot goes past the nearest hole.

- Bend the cotter pin [A] over the nut [B].
Warning
A loose axle nut can lead to an accident resulting in serious injury or death. Tighten the axle nut to the proper torque and install a new cotter pin
- Install the removed parts (see appropriate chapters).
- Check the rear brake effectiveness (see Brake Operation Inspection in the Periodic Maintenance chapter).
WARNING
After servicing, it takes several applications of the brake pedal before the brake pads contact the disc, which could result in increased stopping distance and cause an accident resulting in injury or death.
Do not attempt to ride the motorcycle until a firm brake pedal is obtained by pumping the pedal until the pads are against the disc.
Balance Inspection
- Remove the front and rear wheels (see Front/Rear Wheel Removal).
- Support the wheel so that it can be spun freely.
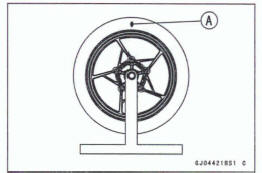
- Spin the wheel lightly, and mark [A] the wheel at the top when the wheel stops.
Repeat this procedure several times. If the wheel stops of its own accord in various positions, it is well balanced.
*If the wheel always stops in one position, adjust the wheel balance (see Balance Adjustment).
Balance Adjustment
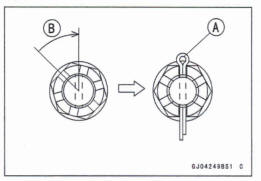
- If the wheel always stops in one position, provisionally attach a balance weight [A] on the rim at the marking using adhesive tape.
- Rotate the wheel 114 turn [B], and see whether or not the wheel stops in this position. If it does, the correct balance weight is being used.

*If the wheel rotates and the weight goes up, replace the weight with the next heavier size. If the wheel rotates and the weight goes down, replace the weight with the next lighter size. Repeat these steps until the wheel remains at rest after being rotated 114 turn.
- Rotate the wheel another 114 turn and then another 114 turn to see if the wheel is correctly balanced.
- Repeat the entire procedure as many times as necessary to achieve correct wheel balance.
- Permanently install the balance weight.
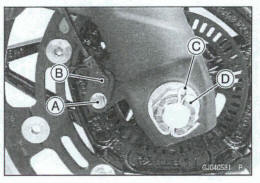
Balance Weight Removal
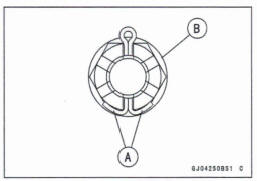
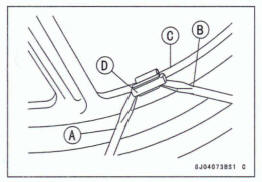
- Insert a standard tip screwdrivers [A] [B] between the rib [C] and the weight [D].
- Pry the balance weight with two screwdrivers and remove the balance weight.
- Discard the used balance weight.
NOTICE
Do not tap the screwdrivers. The rim could be damaged.
Balance Wight Installation
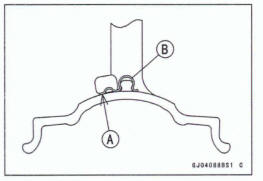
- Check if the weight portion has any play on the blade [A] and dip [B].
*If it does, discard it.
WARNING
Unbalanced wheels can create an unsafe riding condition. If the balance weight has any play on the rib of the rim, the blade and/or clip have been stretched. Replace the loose balance weight Do not reuse used balance weight
Balance Weight 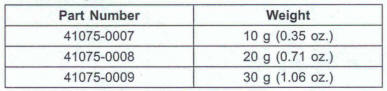
NOTE
- Balance weights are available from Kawasaki dealers in
10, 20, and 30 grams (0.35, 0.71, and 1.06 oz.) sizes.
An imbalance of less then 10 grams (0.35 oz.) mill not usually affect running stability.
- Do not use four or more balance weight (more than 90 gram, 3.17 oz.). If the wheel requires an excess balance weight, disassemble the wheel to find the cause.

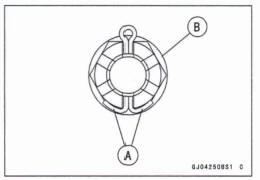
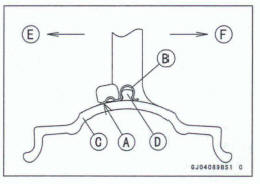
- Slip the balance weight [A] onto the rib [B] by pushing or
lightly hammering [C] the dip [D].
Left Side [E] Right Side [F]
- Be sure to install the balance weight.
Check that the blade [A] and clip [B] are fully seated on the rim [C] and that the clip is hooked over the rib [D].
Left Side [E]
Right Side [F]
See also:
 Kawasaki Z400 - Service manual > Wheels/Tires
Exploded View
Kawasaki Z400 - Service manual > Tires
Air Pressure Inspection/Adjustment Refer to the Air Pressure Inspection in the Periodic Maintenance chapter. Tire Inspection Refer to the Wheel/Tire Damage Inspection in the Periodic Maintenance chapter.
 Benelli Imperiale 400
 BMW F900XR
 Honda CB500X
 KTM 390 Adventure
 Triumph Street Triple S
 Yamaha MT-03
 Kawasaki Z400
 Triumph Street Triple S
 Yamaha MT-03