 Triumph Street Triple S - Owner's Manual > Tire Pressure Monitoring System (TPMS)
(if equipped)
Note: The Tire Pressure Monitoring System (TPMS) is available as an accessory option on all models and must be installed by your authorized Triumph dealer. The TPMS display on the instruments will only be activated when the system has been installed.
Warning: The daily check of tire pressures must not be excluded because of the installation of the Tire Pressure Monitoring System (TPMS).
Check the tire pressure when the tires are cold using an accurate tire pressure gage, see the Tire section for more information.
Use of the TPMS system to set inflation pressures may lead to incorrect tire pressures leading to loss of motorcycle control and an accident.
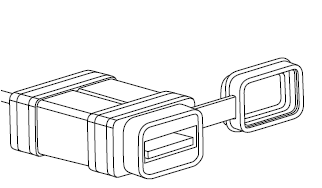
Tire pressure sensors are mounted to the front and rear wheels. These sensors measure the air pressure inside the tire and transmit pressure data to the instruments. These sensors will not transmit the data until the motorcycle is traveling at a speed greater than 12 mph (20 km/h). Two dashes will be shown in the display area until the tire pressure signal is received.
An adhesive label will be mounted to the wheel rim to indicate the position of the tire pressure sensor, which is near the valve.
Tire Pressure Warning Light (if equipped with TPMS)
Warning: Stop the motorcycle if the tire pressure warning light illuminates.
Do not ride the motorcycle until the tires have been checked and the tire pressures are at their recommended pressure when cold.
 The tire pressure warning light works in conjunction with the Tire Pressure
Monitoring System.
The tire pressure warning light works in conjunction with the Tire Pressure
Monitoring System.
The warning light will only illuminate when the front or rear tire pressure is below the recommended pressure. It will not illuminate if the tire is over inflated.
When the warning light is illuminated, the Tire Pressure display will show which tire is the deflated tire. It will also show the tire pressure.
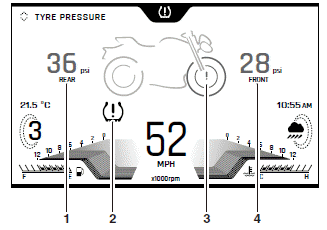
- Rear tire pressure indicator
- TPMS warning light
- Low front tire pressure warning shown
- Front tire pressure indicator
- TPMS symbol
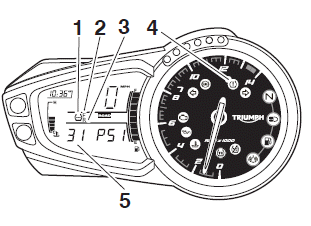
- Front tire indicator
- Rear tire indicator
- Tire pressure warning light
- Tire pressure
The tire pressure at which the warning light illuminates is temperature compensated to 68ºF (20ºC) but the numeric pressure display associated with it is not. Even if the numeric display seems at or close to the standard tire pressure when the warning light is on, a low tire pressure is indicated and a puncture is the most likely cause.
Tire Pressure Sensor Serial Number
The serial number for the tire pressure sensor is printed on a label attached to the sensor. This number may be required by your authorized Triumph dealer for service or diagnostics.
When the tire pressure monitoring system is being installed to the motorcycle, make sure that your authorized Triumph dealer records the serial numbers of the front and rear tire pressure sensors in the spaces provided below.
Front Tire Pressure Sensor

Rear Tire Pressure Sensor
Tire Pressures
Warning: The Tire Pressure Monitoring System (TPMS) is not to be used as a tire pressure gage when adjusting the tire pressures.
For correct tire pressures, always check the tire pressures when the tires are cold using an accurate tire pressure gage.
Use of the TPMS system to set inflation pressures may lead to incorrect tire pressures leading to loss of motorcycle control and an accident.
Caution Do not use anti puncture fluid or any other item likely to obstruct air flow to the TPMS sensor's orifices. Any blockage to the air pressure orifice of the TPMS sensor during operation will cause the sensor to become blocked, causing irreparable damage to the TPMS sensor assembly.
Damage caused by the use of anti puncture fluid or incorrect maintenance is not considered a manufacturing defect and will not be covered under warranty.
Always have your tires mounted by your authorized Triumph dealer and inform them that tire pressure sensors are installed on the wheels.
The tire pressures shown on the instrument panel indicate the actual tire pressure at the time of selecting the display. This may differ from the inflation pressure set when the tires are cold because tires become warmer during riding, causing the air in the tire to expand and the pressure to increase.
The cold inflation pressures specified by Triumph take account of this.
Only adjust tire pressures when the tires are cold using an accurate tire pressure gage, and do not use the tire pressure display on the instruments.
Replacement Tires
When replacing tires, always have an authorized Triumph dealer fit your tires and make sure they are aware that tire pressure sensors are fitted to the wheels.
Sensor Batteries
When the battery voltage in a pressure sensor is low, a message will be shown in the instrument display and the TPMS symbol or message will indicate which wheel sensor has the low battery voltage. If the batteries are completely flat, only dashes will be shown in the instrument display, the red TPMS warning light will be on and the TPMS symbol will flash continuously. Contact your authorized Triumph dealer to have the sensor replaced and the new serial number recorded in the spaces provided.
With the ignition switch turned to the ON position, if the TPMS symbol flashes continuously or the TPMS warning light remains on there is a fault with the TPMS system. Contact your authorized Triumph dealer to have the fault rectified.
Side Stand
Warning: The motorcycle is equipped with an interlock system to prevent it from being ridden with the side stand in the down position.
Never attempt to ride with the side stand down or interfere with the interlock mechanism as this will cause a dangerous riding condition leading to loss of motorcycle control and an accident.
Warning: Do not lean, sit or climb on the motorcycle when it is supported on the side stand.
This may cause the motorcycle to fall over leading to motorcycle damage and an accident.
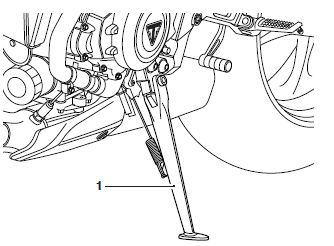
- Side stand
The motorcycle is equipped with a side stand on which the motorcycle can be parked.
When using the side stand, always turn the handlebars fully to the left and leave the motorcycle in first gear.
Whenever the side stand is used, before riding, always make sure that the side stand is fully up after first sitting on the motorcycle.
For instructions on safe parking, refer to the How to Ride the Motorcycle section.
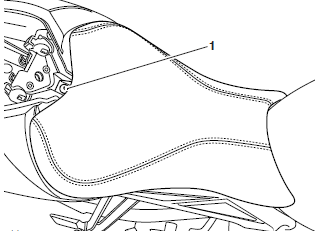
Seats
Seat Care
Caution: To prevent damage to the seat or seat cover, care must be taken not to drop the seat. Do not lean the seat against the motorcycle or any surface which may damage the seat or seat cover.
Instead, place the seat, with the seat cover facing upwards, on a clean, flat surface which is covered with a soft cloth.
Do not place any item on the seat which may cause damage or staining to the seat cover.
Rider's Seat
- Rider's seat fastener
To remove the rider's seat:
- Remove the passenger seat or seat cowl.
- Remove the fastener located to the rear of the padding. This will allow the rider's seat to slide up and rearwards for complete removal from the motorcycle.
To re-install the seat:
- Engage the seat's tongue under the fuel tank.
- Install and tighten the fastener to 80 lbf in (9 Nm).
- Re-install the passenger seat or seat cowl.
Warning: The rider's seat is only correctly retained and supported once the fastener is correctly tightened.
Never ride the motorcycle with the fastener loose or removed, as the rider's seat will not be secure and may move.
A loose or detached seat may cause loss of motorcycle control and an accident.
Passenger Seat and Seat Cowl
Note: This section applies to both the passenger seat and the seat cowl. The seat cowl is installed to certain models only, or is available as an accessory.
The passenger seat lock is located on the left hand side of the rear bodywork, in line with the footrest mounting rail.
Removal
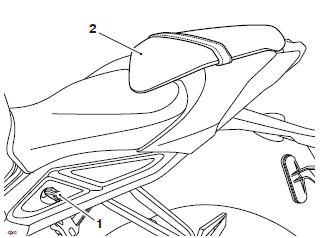
- Seat lock
- Passenger seat
To remove the passenger seat:
- Insert the ignition key into the seat lock and turn it counter-clockwise while pressing down on the front of the seat. This will release the passenger seat from its lock.
- Slide the passenger seat forward for complete removal from the motorcycle.
Warning: Never ride the motorcycle with the passenger seat detached or removed.
To prevent detachment of the seat during riding, after installation always grasp the seat and pull firmly upwards. If the seat is not correctly secured, it will detach from the lock.
A loose or detached seat could cause loss of motorcycle control and an accident.
Reinstall
To re-install the passenger seat:
- Engage the seat's tongue under the bracket.
- Align the locating peg to the lock and press down engaging the seat lock. An audible click can be heard when the seat is fully engaged in its lock.
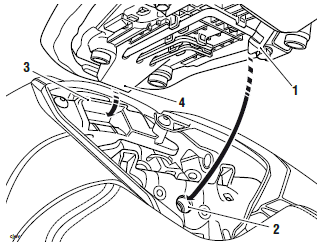
- Locating peg
- Lock
- Bracket
- Tongue
Owner's Handbook and Tool Kit
Owner's Handbook
The Owner's Handbook is located under the passenger seat.
Tool Kit
The tool kit is located on the underside of the passenger seat.
Street Triple S (40.2 cu in (660 cc) )
The tool kit includes a:
- Screwdriver
- Rear suspension unit spring preload adjustment tool (not stored in tool kit)
- Extension handle (not stored in tool kit)
- 0.16 in (4 mm) Allen key
- 0.2 in (5 mm) Allen key.
Street Triple R - LRH
The tool kit includes a:
- Screwdriver
- Rear suspension unit spring preload adjustment tool (not stored in tool kit)
- Extension handle (not stored in tool kit)
- 0.16 in (4 mm) Allen key
- 0.2 in (5 mm) Allen key
- Front fork adjuster tool
Street Triple R
The tool kit includes a:
- Screwdriver
- 0.16 in (4 mm) Allen key
- 0.2 in (5 mm) Allen key
- Front fork adjuster tool.
Street Triple RS
The tool kit includes a:
- Screwdriver
- 0.12 in (3 mm) Allen key
- 0.16 in (4 mm) Allen key
- 0.2 in (5 mm) Allen key
- Front fork adjuster tool.
Universal Serial Bus (USB) Socket
Warning: The USB socket is not waterproof unless the waterproof cap is installed.
Do not connect electronic devices while it is raining.
Water in the USB socket could lead to an electrical problem, resulting in motorcycle damage, loss of motorcycle control and an accident.
Caution: Do not leave the ignition switch in the ON position unless the engine is running as this will discharge the battery.
Caution: Make sure that all electronic devices and cables are safely secured under the seat when riding.
Make sure there is sufficient space surrounding any electronic devices for the seat to close without causing any damage to the electronic device or the motorcycle.
USB Port Socket
The Universal Serial Bus (USB) socket allows a 5 Volt USB connection for charging electronic devices such as mobile phones, cameras and GPS devices. Loads up to a maximum of two Amps can be connected to the USB socket.
To access the USB socket:
- Remove the passenger seat or seat cowl.
- The USB socket is located on the right hand side, adjacent to the seat lock.
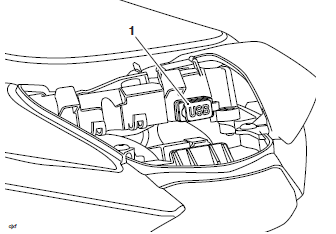
USB Port Socket
- Remove the cap.
- Plug the relevant USB adapter cable into the socket.
Note: Adapter cables are not supplied with the motorcycle.
Breaking-In
Breaking-in is the name given to the process that occurs during the first hours of a new vehicle's operation.
In particular, internal friction in the engine will be higher when components are new. Later on, when continued operation of the engine has ensured that the components have 'bedded in', this internal friction will be greatly reduced.
A period of careful breaking-in will ensure lower exhaust emissions, and will optimize performance, fuel economy and longevity of the engine and other motorcycle components.
During the first 500 miles (800 km):
- Do not use full throttle;
- Avoid high engine speeds at all times;
- Avoid riding at one constant engine speed, whether fast or slow, for a long period of time;
- Avoid aggressive starts, stops, and rapid accelerations, except in an emergency;
- Do not ride at speeds greater than 3/4 of maximum speed.
From 500 to 1,000 miles (800 to 1,500 km):
- Engine speed can gradually be increased to the rev limit for short periods.
Both during and after breaking-in has been completed:
- Do not overrev the engine when cold;
- Do not lug the engine. Always downshift before the engine begins to "struggle";
- Do not ride with engine speeds unnecessarily high. Shifting up a gear helps reduce fuel consumption, reduces noise and helps to protect the environment.
Daily Safety Checks
Warning: Failure to perform these checks every day before you ride may result in serious motorcycle damage or an accident causing serious injury or death.
Check the following items each day before you ride. The time required is minimal, and these checks will help ensure a safe, reliable ride.
If any irregularities are found during these checks, refer to the Maintenance and Adjustment section or see your authorized Triumph dealer for the action required to return the motorcycle to a safe operating condition.
Check the following:
Fuel: Adequate supply in tank, no fuel leaks.
Engine Oil: Correct level on dipstick. Add correct specification oil as required. No leaks from the engine or oil cooler.
Drive Chain: Correct adjustment.
Tires/Wheels: Correct inflation pressures (when cold). Tread depth/ wear, tire/wheel damage, punctures etc.
Nuts, Bolts, Fasteners: Visually check that steering and suspension components, axles, and all controls are properly tightened or fastened. Inspect all areas for loose/damaged fasteners.
Steering Action: Smooth but not loose from lock to lock. No binding of any of the control cables.
Brakes: Pull the brake lever and push the brake pedal to check for correct resistance. Investigate any lever/pedal where the travel is excessive before meeting resistance, or if either control feels spongy in operation.
Front Brake Pads: Check that the correct amount of friction material is remaining on all the brake pads.
Brake Fluid Levels: No brake fluid leakage. Brake fluid levels must be between the MAX and MIN marks on both reservoirs.
Front Forks: Smooth action. No leaks from fork seals.
Throttle: Make sure that the throttle grip returns to the idle position without sticking.
Clutch: Smooth operation and correct cable free play.
Coolant: No coolant leakage. Check the coolant level in the expansion tank (when the engine is cold).
Electrical Equipment: All lights and the horn function correctly.
Engine Stop: Stop switch turns the engine off.
Stand: Returns to the fully up position by spring tension. Return springs not weak or damaged.
See also:
 Triumph Street Triple S - Owner's Manual > How to Ride the Motorcycle
Stopping the Engine Caution: The engine should normally be stopped by turning the ignition switch to the OFF position. The engine stop switch is for emergency use only.
 Benelli Imperiale 400
 BMW F900XR
 Honda CB500X
 KTM 390 Adventure
 Triumph Street Triple S
 Yamaha MT-03
 Kawasaki Z400
 Triumph Street Triple S
 Yamaha MT-03