 Triumph Street Triple S - Owner's Manual > Hand Controls
Throttle Control
An electronic throttle twist grip controls the opening and closing of the throttles via the engine's electronic control module. There are no direct-acting cables in the system.
The throttle grip has a resistive feel to it as it is rolled rearwards to open the throttles. When the grip is released it will return to the throttle closed position by its internal return spring and the throttles will close.
There are no user adjustments for the throttle control.
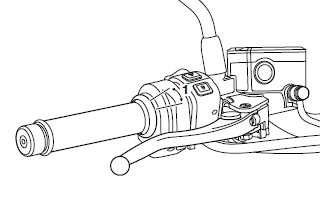
- Throttle closed position
Warning: Reduce speed and do not continue to ride for longer than is necessary with the Malfunction Indicator Light (MIL) illuminated.
The fault may adversely affect engine performance, exhaust emissions and fuel consumption.
Reduced engine performance could cause a dangerous riding condition, leading to loss of control and an accident. Contact an authorized Triumph dealer as soon as possible to have the fault checked and rectified.
If there is a malfunction with the throttle control the Malfunction Indicator Light (MIL) becomes illuminated and one of the following engine conditions may occur:
- MIL illuminated, restricted engine RPM and throttle movement
- MIL illuminated, limp-home mode with the engine at a fast idle condition only
- MIL illuminated, engine will not start.
For all of the above conditions contact an authorized Triumph dealer as soon as possible to have the fault checked and rectified.
Brake Use
At low throttle opening (approximately 68ºF (20ºC) ), the brakes and throttle can be used together.
At high throttle opening (greater than 20º), if the brakes are applied for longer than two seconds the throttles will close and the engine speed will reduce. To return to normal throttle operation, release the throttle control, release the brakes and then reopen the throttle.
Ignition Switch/Steering Lock
Warning: For reasons of security and safety, always turn the ignition to the OFF or PARK position and remove the key when leaving the motorcycle unattended.
Any unauthorized use of the motorcycle may cause injury to the user, other road users and pedestrians and may also cause damage to the motorcycle.
Warning: With the key in the LOCK or P position, the steering will become locked.
Never turn the key to the LOCK or P positions while the motorcycle is moving as this will cause the steering to lock. Locked steering will cause loss of motorcycle control and an accident.
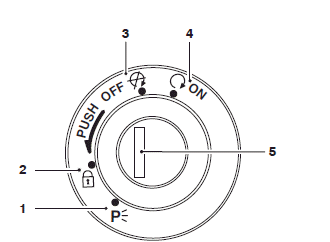
- PARK position
- LOCK position
- OFF position
- ON position
- Ignition switch/Steering lock
Switch Operation
This is a four position, key operated switch. The key can be removed from the switch only when it is in the OFF, LOCK or P (PARK) position.
TO LOCK: Turn the steering fully to the left, turn the key to the OFF position, push and fully release the key, then rotate it to the LOCK position.
PARKING: Turn the key from the LOCK position to the P position. The steering will remain locked.
Note: Do not leave the steering lock in the P position for long periods of time as this will cause the battery to discharge.
Ignition Key
Warning: Additional keys, key rings/chains or items attached to the ignition key may interfere with the steering, leading to loss of motorcycle control and an accident.
Remove all additional keys, key rings/ chains and items from the ignition key before riding the motorcycle.
Caution: Additional keys, key rings/chains or items attached to the ignition key may cause damage to the motorcycle's painted or polished components.
Remove all additional keys, key rings/ chains and items from the ignition key before riding the motorcycle.
Caution: Do not store the spare key with the motorcycle as this will reduce all aspects of security.
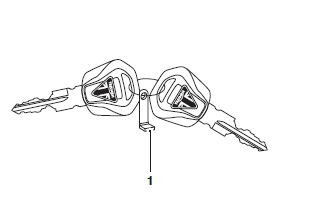
- Key number tag
In addition to operating the ignition switch/steering lock, the ignition key is required to operate the seat lock and fuel tank cap.
When the motorcycle is delivered from the factory, two ignition keys are supplied together with a small tag bearing the key number. Make a note of the key number and store the spare key and key number tag in a safe place away from the motorcycle.
There is a transponder within the ignition keys to turn off the engine immobilizer. To make sure the immobilizer functions correctly, always have only one of the ignition keys near the ignition switch. Having two ignition keys near the switch may interrupt the signal between the transponder and the engine immobilizer. In this situation the engine immobilizer will remain active until one of the ignition keys is removed.
Always get replacement keys from your authorized Triumph dealer. Replacement keys must be 'paired' with the motorcycle's immobilizer by your authorized Triumph dealer.
Engine Immobilizer
The ignition barrel housing acts as the antenna for the engine immobilizer.
When the ignition switch is turned to the OFF position and the ignition key is removed, the engine immobilizer is active. The engine immobilizer is deactivated when the ignition key is in the ignition switch and it is turned to the ON position.
Brake Lever Adjusters
Warning: Do not attempt to adjust the levers with the motorcycle in motion as this may lead to loss of motorcycle control and an accident.
After adjusting the levers, operate the motorcycle in an area free from traffic to gain familiarity with the new lever setting.
Do not loan your motorcycle to anyone as they may change the lever setting from the one you are familiar with causing loss of motorcycle control and an accident.
Brake Lever - Street Triple RS
There are two adjusters installed to the brake lever; a span adjuster and a ratio adjuster.
- Brake lever
- Span adjuster
- Ratio adjuster
Span Adjuster
The span adjuster allows the distance from the handlebar to the brake lever to be changed to suit the span of the rider's hands.
To adjust the brake lever span:
- Rotate the span adjuster counterclockwise to decrease the distance to the handlebar or clockwise to increase the distance from the handlebar.
- The distance from the handlebar grip to the released brake lever is shortest when the span adjuster is rotated fully counter-clockwise.
Ratio Adjuster
The ratio adjuster moves the brake master cylinder push rod to the left or right in 0.04 in (1 mm) increments from 0.75 in (19 mm) to 0.83 in (21 mm).
To adjust the brake lever ratio:
- Rotate the ratio adjuster to the rider's preferred position. The ratio adjuster can be rotated both clockwise and counter-clockwise to set the required preference.
- An audible click can be heard when the ratio adjuster is locked into position.
- The ratio adjuster has three lever positions:
- 19 (0.75 in (19 mm) ) for a softer brake feel with a longer lever travel
- 20 (0.78 in (20 mm) ) for a firmer brake feel and a medium lever travel
- 21 (0.8 in (21 mm) ) for a firm brake feel and a shorter lever travel.
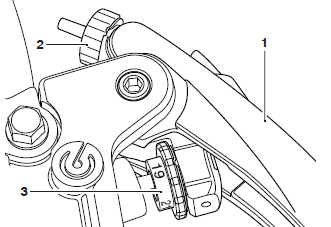
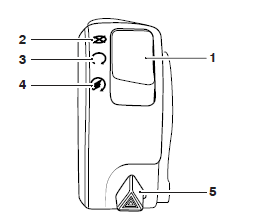
Brake Lever - Street Triple S (40.2 cu in (660 cc) )
A span adjuster is installed to the brake lever. The adjuster allows the distance from the handlebar to the brake lever to be changed to suit the span of the rider's hand.
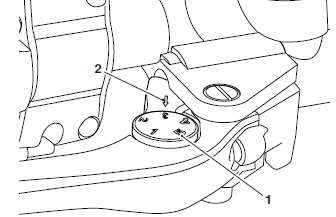
- Adjuster wheel
- Arrow mark
To adjust the brake lever:
- Push the brake lever forward and turn the adjuster wheel to align one of the numbered positions with the arrow mark on the lever holder.
- The distance from the handlebar grip to the released brake lever is shortest when set to number five and longest when set to number one.
Clutch Lever Adjusters
Warning: Do not attempt to adjust the levers with the motorcycle in motion as this may lead to loss of motorcycle control and an accident.
After adjusting the levers, operate the motorcycle in an area free from traffic to gain familiarity with the new lever setting.
Do not loan your motorcycle to anyone as they may change the lever setting from the one you are familiar with causing loss of motorcycle control and an accident.
Clutch Lever - Street Triple S (660 cc)
A span adjuster is installed to the clutch lever. The adjuster allows the distance from the handlebar to the clutch lever to be changed to suit the span of the rider's hand.
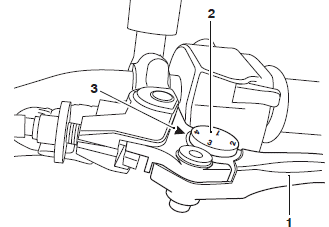
- Clutch lever
- Adjuster wheel
- Triangular mark
To adjust the clutch lever:
- Push the clutch lever forward and turn the adjuster wheel to align one of the numbered positions with the triangular mark on the lever holder.
- The distance from the handlebar grip to the released clutch lever is shortest when set to number four and longest when set to number one.
Clutch Lever - Street Triple RS
A span adjuster is installed to the clutch lever. The adjuster allows the distance from the handlebar to the clutch lever to be changed to suit the span of the rider's hand.
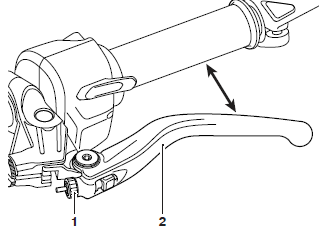
- Span adjuster
- Clutch lever
To adjust the clutch lever span:
- Rotate the span adjuster counter-clockwise to decrease the distance to the handlebar or clockwise to increase the distance from the handlebar.
- The distance from the handlebar grip to the released clutch lever is shortest when the adjuster wheel is adjusted fully counter-clockwise.
Right Handlebar Switches
Street Triple RS Only
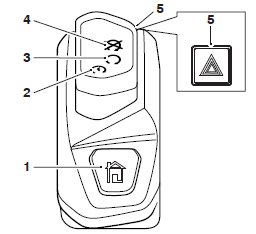
- Home button
- START position
- RUN position
- STOP position
- Hazard warning light switch
STOP Position
The STOP position is for emergency use.
If an emergency arises which requires the engine to be stopped, move the engine start/stop switch to the STOP position.
Caution: Do not leave the ignition switch in the ON position unless the engine is running as this may cause damage to electrical components and will discharge the battery.
Note: Although the engine stop switch stops the engine, it does not turn off all the electrical circuits and may cause difficulty in restarting the engine due to a discharged battery. Ordinarily, only the ignition switch should be used to stop the engine.
RUN Position
In addition to the ignition switch being turned to the ON position, the engine start/stop switch must be in the RUN position for the motorcycle to operate.
START Position
The START position operates the electric starter. For the starter to operate, the clutch lever must be pulled to the handlebar.
Note: Even if the clutch lever is pulled to the handlebar, the starter will not operate if the side stand is down and a gear is engaged.
Hazard Warning Lights
To turn the hazard warning lights on or off, press and release the hazard warning light switch.
The ignition must be switched ON for the hazard warning lights to function.
The hazard warning lights will remain on if the ignition is switched off, until the hazard warning light switch is pressed again.
Home Button
The HOME button is used to access the main menu on the instrument display.
Press and release the HOME button to select between the main menu and instrument display.
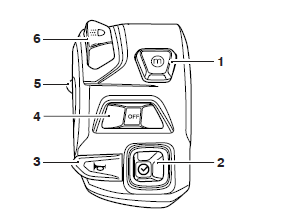
Right Handlebar Switches
All Models except Street Triple RS
- Engine start/stop switch
- STOP position
- RUN position
- Start position
- Hazard warning light switch
STOP Position
The STOP position is for emergency use.
If an emergency arises which requires the engine to be stopped, move the engine start/stop switch to the STOP position.
Caution: Do not leave the ignition switch in the ON position unless the engine is running as this may cause damage to electrical components and will discharge the battery.
Note: Although the engine stop switch stops the engine, it does not turn off all the electrical circuits and may cause difficulty in restarting the engine due to a discharged battery. Ordinarily, only the ignition switch should be used to stop the engine.
RUN Position
In addition to the ignition switch being turned to the ON position, the engine start/stop switch must be in the RUN position for the motorcycle to operate.
START Position
The START position operates the electric starter. For the starter to operate, the clutch lever must be pulled to the handlebar.
Note: Even if the clutch lever is pulled to the handlebar, the starter will not operate if the side stand is down and a gear is engaged.
Hazard Warning Lights
To turn the hazard warning lights on or off, press and release the hazard warning light switch.
The ignition must be switched ON for the hazard warning lights to function.
The hazard warning lights will remain on if the ignition is switched to the PARK position, until the hazard warning light switch is pressed again.
Left Handlebar Switches
Street Triple RS Only
- Mode button
- Joystick
- Horn button
- Turn signal switch
- High beam button
- Dipped beam/Daytime Running Lights (DRL) switch (if equipped)
Mode Button
When the MODE button is pressed and released it will activate the Riding Mode Selection Menu in the multifunction display screen. Further presses of the mode button will scroll through the available riding modes.
Joystick Button
The JOYSTICK is used to operate the following functions of the instruments:
- Up - scroll the menu bottom to top
- Down - scroll the menu top to bottom
- Left - scroll the menu to the left
- Right - scroll the menu to the right
- Centre - press to confirm selection
Horn Button
When the horn button is pushed, with the ignition switch turned on, the horn will sound.
Turn Signal Switch
When the turn signal switch is pushed to the left or right, the corresponding turn signals will flash on and off.
The turn signals can be canceled manually. To manually turn off the turn signal, press and release the turn signal switch in the central position.
Automatic self-canceling turn signals can be activated in the Bike Set Up function on the display.
There are two options available:
- Manual - The self-canceling function is off. The turn signals must be manually canceled.
- Auto - The self-canceling function is on. The signals will activate for eight seconds plus an additional 71 yards (65 meters).
Note: If the motorcycle stops for any reason, the signals will flash for the remainder of the time and distance unless manually canceled by the rider.
Daytime Running Lights (DRL) (if equipped)
 When the ignition is switched ON and the daytime running lights switch is set to
Daytime Running Lights, the daytime running lights warning light will
illuminate.
When the ignition is switched ON and the daytime running lights switch is set to
Daytime Running Lights, the daytime running lights warning light will
illuminate.
The daytime running lights and low beam headlights are operated manually using a switch on the left hand switch housing.
Warning: Do not ride for longer than necessary in poor ambient light conditions with the Daytime Running Lights (DRL) in use.
Riding with the Daytime Running Lights when dark, in tunnels or where poor ambient light is apparent may reduce the riders vision or blind other road users.
Blinding other road users or reduced vision in low ambient light levels may result in loss of motorcycle control and an accident.
Note: During daylight hours the Daytime Running Lights (DRL) improve the motorcycles visibility to other road users.
Low beam headlights must be used in any other conditions unless the road conditions allow for high beam headlights to be used.
High Beam Button
If the Daytime Running Light (DRL) switch is in the dip beam position, when the High Beam button is operated then the high beam will be switched on. Each press of the button will swap between dip and high beam.
If the DRL switch is in the daytime running lights position, then press and hold the High Beam button to turn the high beam on. It will remain on as long as the button is held in and will turn off as soon as the button is released.
Note: A lighting on/off switch is not installed on this model. The position light, tail light and license plate light all function automatically when the ignition is turned to the ON position.
The headlight will function when the ignition switch is turned to the ON position.
Left Handlebar Switches
All Models except Street Triple RS
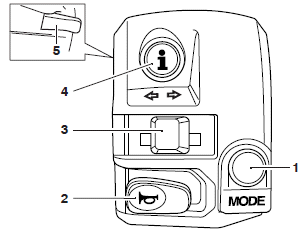
- MODE button
- Horn button
- Turn signal switch
- TRIP button
- High beam button
Mode Button
When the MODE button is pressed and released it will activate the Riding Mode Selection Menu in the multifunction display screen. Further presses of the mode button will scroll through the available riding modes.
Trip Button
The SCROLL button is used to operate the following functions of the instruments:
- Trip meter
- Odometer
- Tire Pressure Monitoring System (if equipped).
Turn Signal Switch
When the turn signal switch is pushed to the left or right and released, the corresponding turn signals will flash on and off. To turn off the turn signals, push and release the switch in the central position.
Automatic Self-Canceling Turn Signals (if equipped)
A short press and release of the turn signal switch to the left or right will cause the corresponding turn signals to flash on and off three times, then go off.
A longer press and release of the turn signal switch to the left or right will cause the corresponding turn signals to flash on and off.
The turn signals are automatically turned off after eight seconds and after riding a further 71 yards (65 meters).
To disable the turn signal self-cancel system refer to the Bike Setup section.
The turn signals can be canceled manually. To manually turn off the turn signal, press and release the turn signal switch in the central position.
Horn Button
When the horn button is pushed, with the ignition switch turned on, the horn will sound.
High Beam Button
When the high beam button is pressed the high beam will be switched on. Each press of the button will swap between dip and high beam.
Note:
A lighting on/off switch is not installed on this model. The position light,
tail light and license plate light all function automatically when the ignition
is turned to the ON position. A Pass feature is not available on this model.
The headlight will function when the ignition switch is turned to the ON
position. The headlight will go off while pressing the starter button until the
engine starts.
Instruments
There are two different types of instrument display depending on the motorcycle model.
TFT Instrument Display
Street Triple RS models are equipped with a full color Thin Film Transistor (TFT) instrument display.
Thin Film Transistor (TFT) Instrument Display
For TFT instrument display operating instructions.
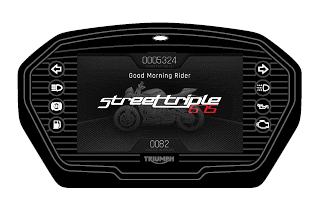
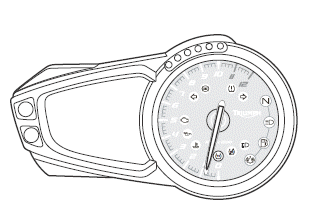
LCD Instrument Display
All models except Street Triple RS are equipped with a Liquid Crystal Display (LCD) instrument display.
|
Liquid Crystal Display (LCD) Instrument Display
For LCD instrument display operating instructions.

 Benelli Imperiale 400
 BMW F900XR
 Honda CB500X
 KTM 390 Adventure
 Triumph Street Triple S
 Yamaha MT-03
 Kawasaki Z400
 Triumph Street Triple S
 Yamaha MT-03