 Yamaha MT-03 - Service manual > Front wheel
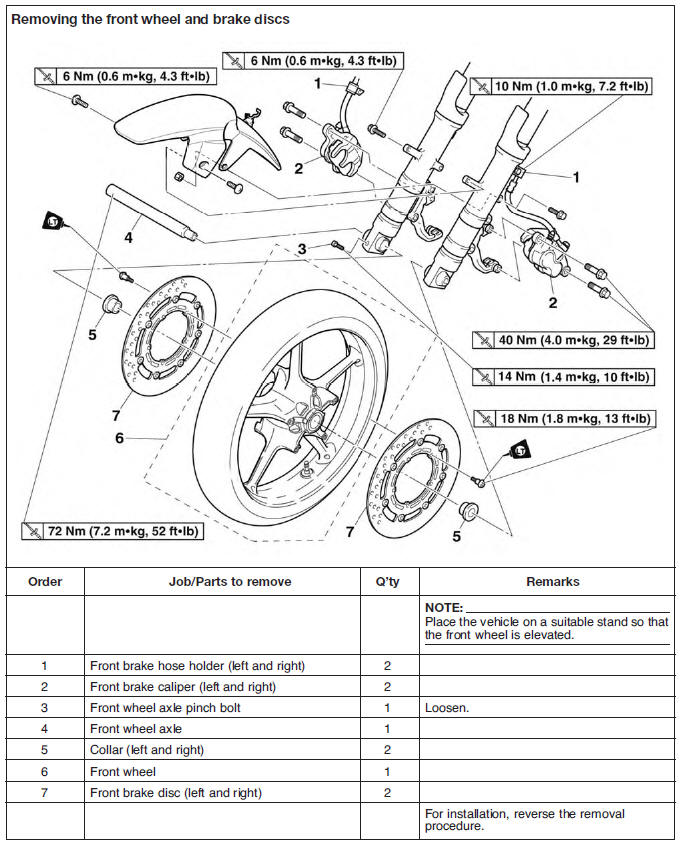
Removing the front wheel
1. Stand the vehicle on a level surface.
WARNING
Securely support the vehicle so that there is no danger of it falling over.
NOTE:
Place the vehicle on a suitable stand so that the front wheel is elevated.
2. Remove:
- Front brake calipers
NOTE:
Do not apply the brake lever when removing the front brake calipers.
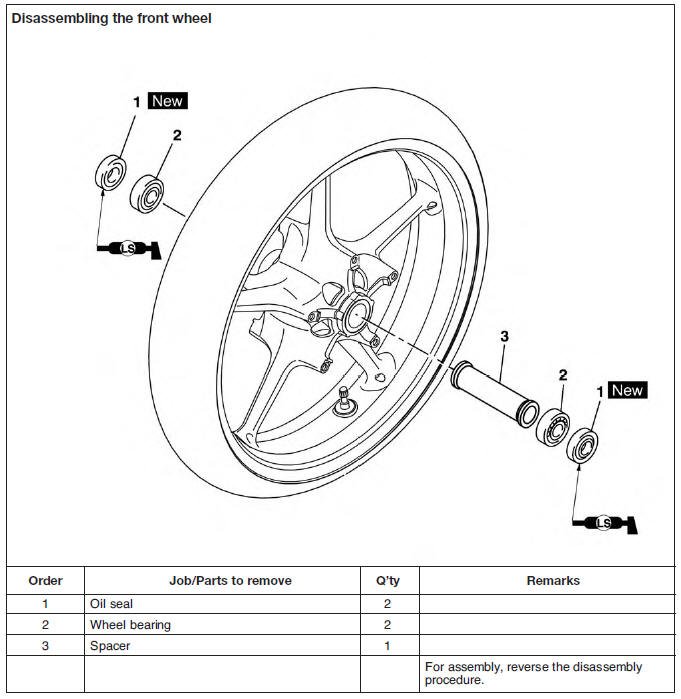
Disassembling the front wheel
1. Remove:
- Oil seals
- Wheel bearings
a. Clean the outside of the front wheel hub.
b. Remove the oil seals "1" with a flat-head screwdriver.
NOTE:
To prevent damaging the wheel, place a rag "2" between the screwdriver and the wheel surface.
c. Remove the wheel bearings "3" with a general bearing puller.
Checking the front wheel
1. Check:
- Front wheel axle
Roll the wheel axle on a flat surface.
Bends → Replace.
WARNING
Do not attempt to straighten a bent wheel axle.
2. Check:
- Tire
- Front wheel
Damage/wear → Replace.
3. Measure:
- Radial wheel runout "1"
- Lateral wheel runout "2"
Over the specified limits → Replace.
 Radial wheel runout limit
1.0 mm (0.04 in)
Radial wheel runout limit
1.0 mm (0.04 in)
Lateral wheel runout limit 0.5 mm (0.02 in)
4. Check:
- Wheel bearings
Front wheel turns roughly or is loose → Replace the wheel bearings.
- Oil seals
Damage/wear → Replace
Assembling the front wheel
1. Install:
- Wheel bearings

- Oil seals

a. Install the new wheel bearings and oil seals in the reverse order of disassembly.
CAUTION:
Do not contact the wheel bearing inner race "1" or balls "2". Contact should be made only with the outer race "3".
NOTE:
Use a socket "4" that matches the diameter of the wheel bearing outer race and oil seal.
Adjusting the front wheel static balance
NOTE:
- After replacing the tire, wheel or both, the front wheel static balance should be adjusted.
- Adjust the front wheel static balance with the brake disc installed.
1. Remove:
- Balancing weight(s)
2. Find:
- Front wheel's heavy spot
NOTE:
Place the front wheel on a suitable balancing stand.
a. Spin the front wheel.
b. When the front wheel stops, put an "X1" mark at the bottom of the wheel.
c. Turn the front wheel 90º so that the "X1" mark is positioned as shown.
d. Release the front wheel.
e. When the wheel stops, put an "X2" mark at the bottom of the wheel
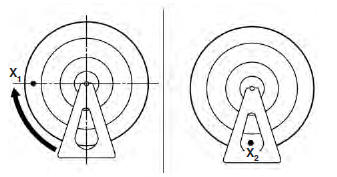
f. Repeat steps (d) through (f) several times until all the marks come to rest at the same spot.
g. The spot where all the marks come to rest is the front wheel's heavy spot "X".
3. Adjust:
- Front wheel static balance
a. Install a balancing weight "1" onto the rim exactly opposite the heavy spot "X".
NOTE:
Start with the lightest weight.
b. Turn the front wheel 90º so that the heavy spot is positioned as shown.
c. If the heavy spot does not stay in that position, install a heavier weight.
d. Repeat steps (b) and (c) until the front wheel is balanced.
4. Check:
- Front wheel static balance
a. Turn the front wheel and make sure it stays at each position shown
b. If the front wheel does not remain stationary at all of the positions, rebalance it.
Checking the front brake discs
Installing the front wheel (front brake discs)
The following procedure applies to both of the front brake discs.
1. Install:
- Front brake disc
 Front brake disc bolt
18 Nm (1.8 m*kg, 13 ft*lb)
LOCTITE
Front brake disc bolt
18 Nm (1.8 m*kg, 13 ft*lb)
LOCTITE
NOTE:
Tighten the brake disc bolts in stages and in a crisscross pattern.
2. Check:
- Front brake discs
3. Lubricate:
- Oil seal lips
- Collars
 Recommended lubricant
Lithium-soap-based grease
Recommended lubricant
Lithium-soap-based grease
4. Install:
- Front wheel
NOTE:
Install the tire and wheel with the mark "1" pointing in the direction of wheel rotation.
5. Tighten:
- Front wheel axle
 Front wheel axle
72 Nm (7.2 m*kg, 52 ft*lb)
Front wheel axle
72 Nm (7.2 m*kg, 52 ft*lb)
- Front wheel axle pinch bolt
 Front wheel axle pinch bolt
14 Nm (1.4 m*kg, 10 ft*lb)
Front wheel axle pinch bolt
14 Nm (1.4 m*kg, 10 ft*lb)
CAUTION:
Before tightening the wheel axle, push down hard on the handlebar several times and check if the front fork rebounds smoothly.
6. Install:
- Front brake calipers
 Front brake caliper bolt
40 Nm (4.0 m*kg, 29 ft*lb)
Front brake caliper bolt
40 Nm (4.0 m*kg, 29 ft*lb)
WARNING
Make sure the brake hose is routed properly.
NOTE:
Make sure that there is enough space between the brake pads before installing the brake calipers onto the brake discs.
Rear wheel
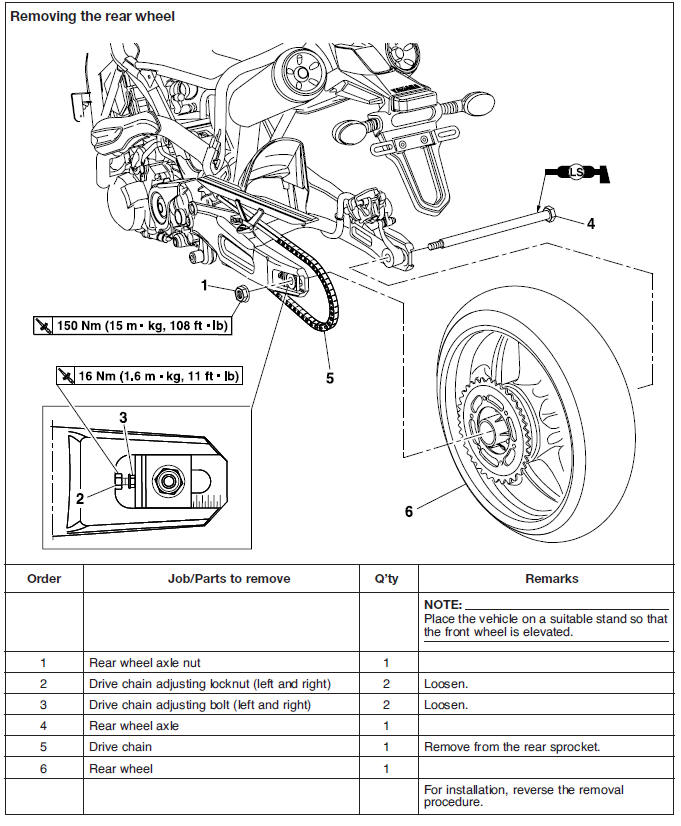
Removing the rear wheel
1. Stand the vehicle on a level surface.
WARNING
Securely support the vehicle so that there is no danger of it falling over.
NOTE:
Place the vehicle on a suitable stand so that the rear wheel is elevated.
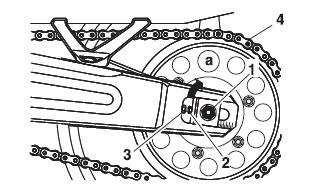
2. Loosen:
- Wheel axle nut "1"
- Locknut "2" (on each side of the swingarm)
3. Turn:
- Drive chain slack adjusting bolt "3" (fully in direction "a")
4. Push:
- Wheel (forward)
5. Remove:
- Drive chain "4" (from the rear sprocket)
NOTE:
- If the drive chain is difficult to remove, remove the wheel axle first, and then lift the wheel upward enough to remove the drive chain from the rear sprocket.
- The drive chain cannot be disassembled.
6. Remove:
- Wheel axle "1"
- Wheel
NOTE:
Support the brake caliper bracket "2" while pulling the wheel axle out.

Disassembling the rear wheel
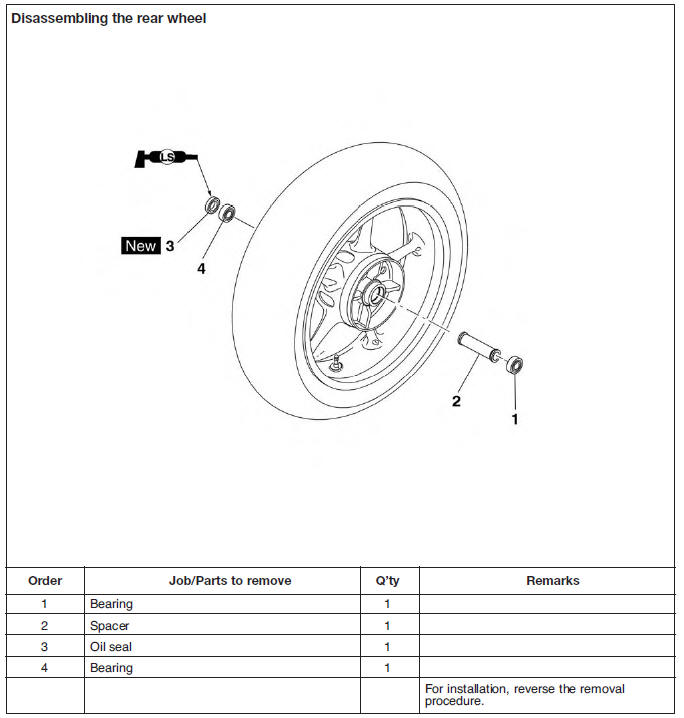
1. Remove:
- Oil seals
- Wheel bearings
Checking the rear wheel
1. Check:
- Rear wheel axle
- Rear wheel
- Wheel bearings
- Oil seals
2. Check:
- Tire
- Rear wheel
Damage/wear → Replace.
3. Measure:
- Radial wheel runout
- Lateral wheel runout
 Radial wheel runout limit
1.0 mm (0.04 in)
Radial wheel runout limit
1.0 mm (0.04 in)
Lateral wheel runout limit 0.5 mm (0.02 in)
Checking the rear wheel drive hub
1. Check:
- Rear wheel drive hub "1" Cracks/damage → Replace.
- Rear wheel drive hub dampers "2".
Damage/wear → Replace.
Checking and replacing the rear wheel sprocket
1. Check:
- Rear wheel sprocket
More than 1/4 tooth "a" wear → Replace the rear wheel sprocket.
Bent teeth → Replace the rear wheel sprocket.
b. Correct
1. Drive chain roller
2. Rear wheel sprocket
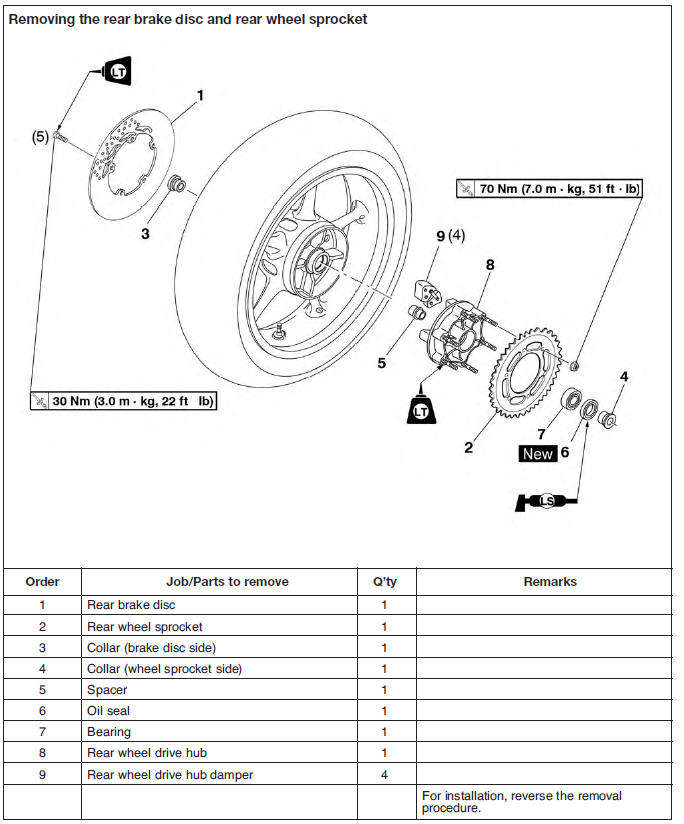
2. Replace:
- Rear wheel sprocket
a. Remove the self-locking nuts and the rear wheel sprocket.
b. Clean the rear wheel drive hub with a cleancloth, especially the surfaces that contact the sprocket.
c. Install the new rear wheel sprocket.
 Rear wheel sprocket self-locking
nut
70 Nm (7.0 m*kg, 51 ft*lb)
Rear wheel sprocket self-locking
nut
70 Nm (7.0 m*kg, 51 ft*lb)
NOTE:
Tighten the self-locking nuts in stages and in a crisscross pattern.
Assembling the rear wheel
1. Install:
- Wheel bearings

- Oil seals

Adjusting the rear wheel static balance
NOTE:
- After replacing the tire, wheel or both, the rear wheel static balance should be adjusted.
- Adjust the rear wheel static balance with the brake disc and rear wheel drive hub installed.
1. Adjust:
- Rear wheel static balance
Checking the rear brake disc
Installing the rear wheel (rear brake disc)
1. Install:
- Rear brake disc
 Rear brake disc bolt
30 Nm (3.0 m*kg, 22 ft*lb)
LOCTITE
Rear brake disc bolt
30 Nm (3.0 m*kg, 22 ft*lb)
LOCTITE
NOTE:
Tighten the brake disc bolts in stages and in a crisscross pattern.
2. Check:
- Rear brake disc
3. Lubricate:
- Oil seal lips
- Collars
 Recommended lubricant
Lithium-soap-based grease
Recommended lubricant
Lithium-soap-based grease
4. Install:
- Collar (wheel sprocket side)
- Collar (brake disc side)
- Rear brake caliper (on the swingarm)
- Rear wheel (on the swingarm)
- Drive chain (on the rear sprocket)
- Rear wheel axle
- Rear wheel axle nut
5. Adjust:
- Drive chain slack
 Drive
chain slack
40.0-50.0 mm (1.57-1.97 in)
Drive
chain slack
40.0-50.0 mm (1.57-1.97 in)
See also:
 Yamaha MT-03 - Service manual > Chassis
General chassis Removing the seats Removing the cowling
 Benelli Imperiale 400
 BMW F900XR
 Honda CB500X
 KTM 390 Adventure
 Triumph Street Triple S
 Yamaha MT-03
 Kawasaki Z400
 Triumph Street Triple S
 Yamaha MT-03