 Honda CB500X - Owner's Manual > Drive Chain
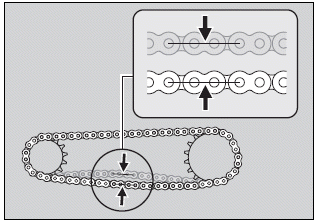
Inspecting the Drive Chain Slack
Check the drive chain slack at several points along the chain. If the slack is not constant at all points, some links may be kinked and binding.
Have the chain inspected by your dealer.
1. Shift the transmission to Neutral. Stop the engine.
2. Place your motorcycle on its side stand on a firm, level surface.
3. Check the slack in the lower half of the drive chain midway between the sprockets.
Drive chain slack: 1 1/4 - 1 5/8 in (30 - 40 mm)
- Do not ride your motorcycle if the slack exceeds 1 15/16 in (50 mm).
4. Roll the motorcycle forward and check that the chain moves smoothly.
5. Inspect the sprockets.
6. Clean and lubricate the drive chain.
Adjusting the Drive Chain Slack
Adjusting the chain requires special tools.
Have the drive chain slack adjusted by your dealer.
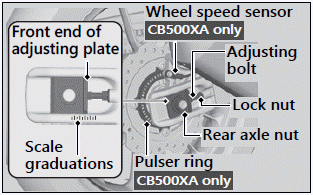
CB500XA only
When adjusting the drive chain slack, be careful not to damage the wheel speed sensor and pulser ring.
1. Shift the transmission to Neutral. Stop the engine.
2. Place your motorcycle on its side stand on a firm, level surface.
3. Loosen the rear axle nut.
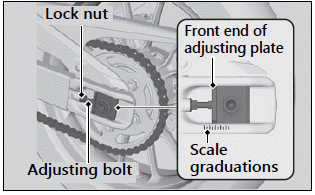
4. Loosen the lock nuts on both adjusting bolts.
5. Turn both adjusting bolts an equal number of turns until the correct drive chain slack is obtained. Turn the adjusting bolts counterclockwise to tighten the chain. Turn the adjusting bolts clockwise and push the rear wheel toward the front to provide more slack.
Adjust the slack at a point midway between the drive sprocket and the driven sprocket.
Check the drive chain slack.
6. Check rear axle alignment by making sure the front end of the chain adjusting plate aligns with the scale graduations on both sides of the swingarm.
Both marks should correspond. If the axle is misaligned, turn the right or left adjusting bolt until the marks are aligned and recheck chain slack.
7. Tighten the rear axle nut.
Torque: 65 lbf-ft (88 N-m, 9.0 kgf-m)
8. Hold the adjusting bolts and tighten the lock nuts.
Torque: 20 lbf-ft (27 N-m, 2.8 kgf-m)
9. Recheck drive chain slack.
If a torque wrench was not used for installation, see your dealer as soon as possible to verify proper assembly.
Improper assembly may lead to loss of braking capacity.
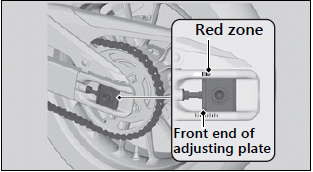
Checking the Drive Chain Wear
Check the chain wear label when adjusting the drive chain. If the front end of the chain adjusting plate enters the red zone on the label after the chain has been adjusted to the proper slack, the chain is excessively worn and must be replaced.
Chain: DID520VF or RK520KLO2
If necessary have the drive chain replaced by your dealer.
Clutch
Checking the Clutch
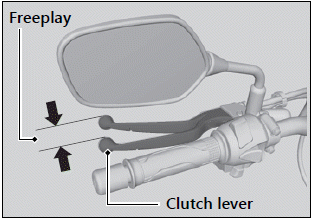
Checking the Clutch Lever Freeplay
Check the clutch lever freeplay.
Freeplay at the clutch lever: 3/8 - 13/16 in (10 - 20 mm)
Check the clutch cable for kinks or signs of wear. If necessary have it replaced by your dealer.
Lubricate the clutch cable with a commercially available cable lubricant to prevent premature wear and corrosion.
NOTICE Improper freeplay adjustment can cause premature clutch wear.
Adjusting the Clutch Lever Freeplay
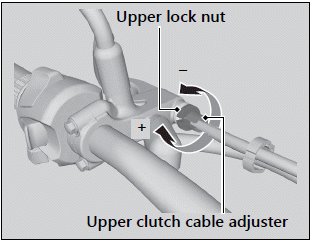
Upper Adjustment
Attempt adjustment with the upper clutch cable adjuster first.
1. Loosen the upper lock nut.
2. Turn the upper clutch cable adjuster until the freeplay is 3/8 - 13/16 in (10 - 20 mm).
3. Tighten the upper lock nut and check the freeplay again.
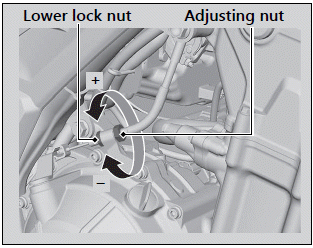
Lower Adjustment
If the upper clutch cable adjuster is threaded out near its limit, or the correct freeplay cannot be obtained, attempt adjustment with the lower clutch cable adjusting nut.
1. Loosen the upper lock nut and turn the upper clutch cable adjuster all the way in (to provide maximum freeplay). Tighten the upper lock nut.
2. Loosen the lower lock nut.
3. Turn the adjusting nut until the clutch lever freeplay is 3/8 - 13/16 in (10 - 20 mm).
4. Tighten the lower lock nut and check the clutch lever freeplay.
5. Start the engine, pull the clutch lever in, and shift into gear. Make sure the engine does not stall and the motorcycle does not creep. Gradually release the clutch lever and open the throttle. Your motorcycle should move smoothly and accelerate gradually.
If proper adjustment cannot be obtained or the clutch does not work correctly, see your dealer.
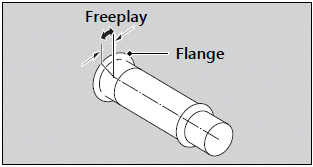
Throttle
Checking the Throttle
With the engine off, check that the throttle rotates smoothly from fully closed to fully open in all steering positions and throttle freeplay is correct. If the throttle does not move smoothly, close automatically, or if the cable is damaged, have the motorcycle inspected by your dealer.
Freeplay at the throttle grip flange: 1/16 - 1/4 in (2 - 6 mm)
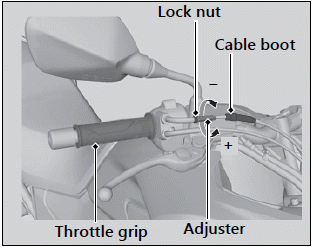
Adjusting the Throttle Freeplay
1. Slide the cable boot.
2. Loosen the lock nut.
3. Turn the adjuster until the freeplay is 1/16 - 1/4 in (2 - 6 mm).
4. Tighten the lock nut and return the cable boot, then inspect the throttle action again.
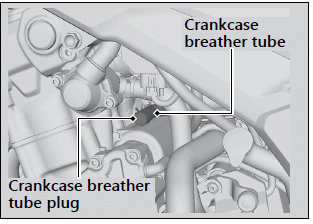
Crankcase Breather
Cleaning the Crankcase Breather
1. Place a suitable container under the crankcase breather tube.
2. Remove the crankcase breather tube plug from the tube.
3. Drain deposits into a suitable container.
4. Install the crankcase breather tube plug.
See also:
 Honda CB500X - Owner's Manual > Brakes
Checking Brake Fluid 1. Place your motorcycle in an upright position on a firm, level surface. 2. Front Check that the brake fluid reservoir is horizontal and that the fluid level is above the LWR mark.
Honda CB500X - Owner's Manual > Other Adjustments
Adjusting the Headlight Aim You can adjust vertical aim of the headlight for proper alignment. Turn the pinion in or out as necessary using a Phillips screwdriver.
 Benelli Imperiale 400
 BMW F900XR
 Honda CB500X
 KTM 390 Adventure
 Triumph Street Triple S
 Yamaha MT-03
 Kawasaki Z400
 Triumph Street Triple S
 Yamaha MT-03