 Honda CB500X - Owner's Manual > Display Setting
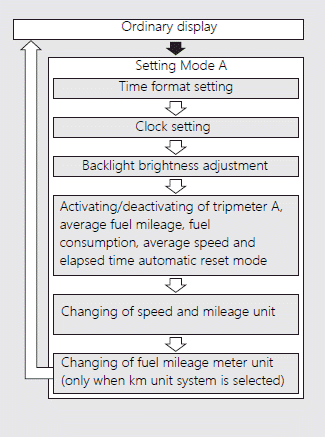
Setting Mode A
Following items can be changed sequentially.
- Time format setting
- Clock setting
- Backlight brightness adjustment
- Activating/deactivating of tripmeter A, average fuel mileage, fuel consumption, average speed and elapsed time automatic reset mode
- Changing the speed and mileage unit
- Changing the fuel mileage meter unit (only when km unit system is selected)
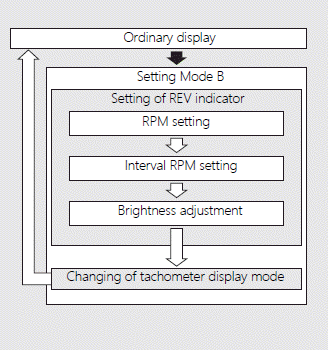
Setting Mode B
Following items can be changed sequentially.
- Setting of REV indicator
- RPM setting
- Interval RPM setting
- Brightness adjustment
- Changing of tachometer display mode
Setting Mode A
If the buttons are not pressed for about 30 seconds, the control is automatically switched from the setting mode to the ordinary display.
If the buttons are not pressed for about 30 seconds, items in the process of being set will be discarded and only items that were set and finalized will be applied. Only if the ignition switch is turned to the OFF position, items in the process of being set and those that are finalized will be applied.
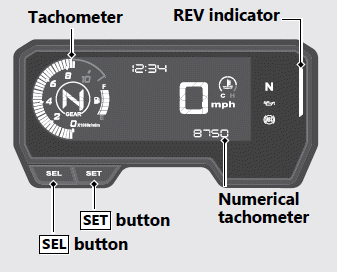
 Press and hold SEL
and SET buttons
Press and hold SEL
and SET buttons
 Press the SET
button
Press the SET
button
1. Time format setting:
You can switch the time format between 12 hour format or 24 hour format.
- Turn the ignition switch to the ON position.
- Press and hold SEL and SET buttons until the current time format start
flashing.

- Press SEL button to select "12hr" or "24hr".

- Press SET button. The time format is set, and then the display moves to the clock setting.
2. Clock setting:
- Press SEL button until the desired hour is displayed.
- Press and hold SEL button to advance the hour quickly.

- Press and hold SEL button to advance the hour quickly.
- Press SET button. The minute digits start flashing.

- Press SEL button until the desired minute is displayed.
- Press and hold SEL button to advance the minute quickly.

- Press and hold SEL button to advance the minute quickly.
- Press SET button. The clock is set, and then the display moves to the backlight brightness adjustment.
3. Backlight brightness adjustment:
You can adjust the brightness to one of five levels.
- Press SEL button. The brightness level is switched.
- You can adjust the brightness level from five levels.

- You can adjust the brightness level from five levels.
- Press SET button. The backlight is set, and then the display moves to the activating/ deactivating of tripmeter A, average fuel mileage, fuel consumption, average speed and elapsed time automatic reset mode.
4. Activating/deactivating of tripmeter A, average fuel mileage, fuel consumption, average speed and elapsed time automatic reset mode:
You can activate or deactivate the automatic reset mode by refueling after the 1st (E) segment of the fuel gauge starts flashing.
Initial setting is activation.
- Press SEL button to select "
 "
(activate) or "
"
(activate) or " " (deactivate) in
the automatic reset mode.
" (deactivate) in
the automatic reset mode. 
- Press SET button. The activation/ deactivation of automatic reset mode is set, and then the display moves to the changing of speed and mileage unit.
5. Changing of speed and mileage unit:
- Press the SEL button to select either "mph" and "mile" or "km/h" and "km"
.

- When the "km/h" for speed and "km" for mileage are selected
Press the SET button. The speed and mileage unit is set, and then the display moves to the changing of fuel mileage meter unit.
When the "mph" for speed and "mile" for mileage are selected
Press SET button. The speed and mileage unit is set, and then the display moves to the ordinary display.
6. Changing the fuel mileage meter unit:
- Press SEL button to select "L/100km" or "km/L".

- Press SET button. The fuel mileage meter unit is set, and then the display moves to the ordinary display.
Setting Mode B
If the buttons are not pressed for about 30 seconds, the control is automatically switched from the setting mode to the ordinary display.
If the buttons are not pressed for about 30 seconds, items in the process of being set will be discarded and only items that were set and finalized will be applied. Only if the ignition switch is turned to the OFF position, items in the process of being set and those that are finalized will be applied.
 Press and hold the
SEL button and ignition switch to the ON position until the initial animation
ends
Press and hold the
SEL button and ignition switch to the ON position until the initial animation
ends
 Press the SET
button
Press the SET
button
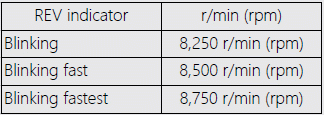
1. Setting of REV indicator:
You can change the setting of the REV indicator.
REV indicator blinks during setting.
- To change the setting mode B, turn the ignition switch to the ON
position while pressing SEL button until the initial animation ends. The
display moves to the setting of "REV indicator blinking fastest RPM". At the
same time, the numerical tachometer and the blinking bar segments show the
current settings of the "REV indicator blinking fastest RPM".
- Tachometer bar blinks only while setting of REV indicator.
- Each time SEL button is pressed, the "REV indicator blinking fastest
RPM" setting value will be increased by one segment (250 r/min (rpm)). When
the "REV indicator blinking fastest RPM" setting value exceeds 8,750 r/min
(rpm), the "REV indicator blinking fastest RPM" setting value automatically
returns to 5,000 r/min (rpm).
- Press and hold SEL button to advance the "REV indicator blinking fastest RPM" setting value quickly.
Available Setting Range 5,000 r/min (rpm) to 8,750 r/min (rpm)
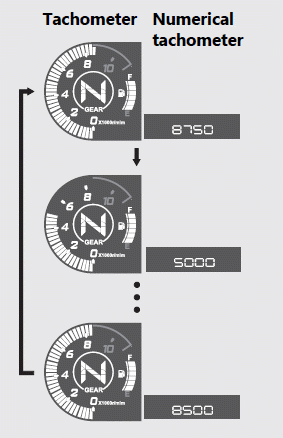
- Press SET button. The "REV indicator blinking fastest RPM" is set, and
then the display moves to the setting of "REV indicator blinking interval
RPM".
At the same time, the numerical tachometer shows the current "REV indicator blinking interval RPM" and the blinking bar segment show the current settings of the "REV indicator blinking fastest RPM". - Each time SEL button is pressed, the numbers of the "REV indicator blinking interval RPM" advances as follows: 250 r/min (rpm), 500 r/min (rpm), 750 r/min (rpm), 1,000 r/min (rpm) and 0 r/min (rpm).
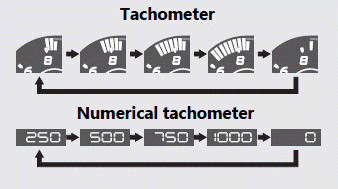
Example:
REV indicator blinking fastest
RPM: 8,750 r/min (rpm)
REV indicator blinking interval
RPM: 250 r/min (rpm)
If the "REV indicator blinking interval RPM" is 0, the REV indicator blinks when reaching the "REV indicator blinking fastest RPM" setting value.
- Press SET button. The "REV indicator blinking interval RPM" is set, and
then the display moves to the brightness adjustment of the REV indicator.
The REV indicator switches from blinking to lighting. - Press SEL button. The brightness level is switched.
- You can adjust the brightness level from five levels.
- You can adjust the brightness level from five levels.
- Press SET button. The brightness of the REV indicator is set, and then the display moves to the display setting of the tachometer.
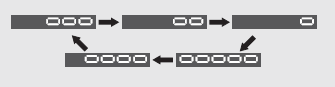
2. Changing of tachometer display mode:
You can change the display mode of the tachometer.
- Press SEL button to switch the display mode of tachometer.
- Press SET button. The currently selected display mode is set, and then the display moves to the ordinary display.
Conventional display
Shows the engine RPM on the tachometer bar segment.
Peak hold display
Shows the engine RPM on the tachometer bar segment and peak hold segment.
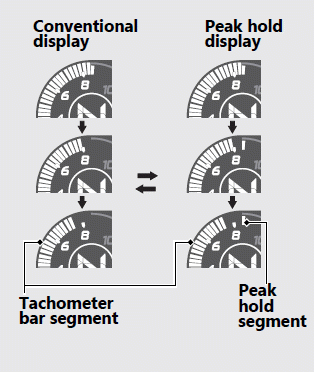
The peak hold segment keeps to show the maximum engine RPM temporarily.
Example: Engine revolutions per minutes 8,750 r/min (rpm)
See also:
 Honda CB500X - Owner's Manual > Instruments
button button Display Check When the ignition switch is turned to the ON position, initial animation will show. If any part of these displays does not come on when it should, have your dealer check for problems. Tachometer red zone Clock (12-hour or 24-hour display) Section B display Section A display Tachometer NOTICE Do not operate the engine in the tachometer red zone.
Honda CB500X - Owner's Manual > Indicators
If one of these indicators does not come on when it should, have your dealer check for problems. Left turn signal indicator Right turn signal indicator REV indicator High beam indicator PGM-FI (Programmed Fuel Injection) malfunction indicator lamp (MIL) Neutral indicator Low oil pressure indicator ABS (Anti-lock Brake System) indicator
 Benelli Imperiale 400
 BMW F900XR
 Honda CB500X
 KTM 390 Adventure
 Triumph Street Triple S
 Yamaha MT-03
 Kawasaki Z400
 Triumph Street Triple S
 Yamaha MT-03