 Triumph Street Triple S - Owner's Manual > Cooling System
To ensure efficient engine cooling, check the coolant level each day before riding the motorcycle, and top off the coolant if the level is low.
Note: A year round, Hybrid Organic Acid Technology (known as Hybrid OAT or HOAT) coolant is installed in the cooling system when the motorcycle leaves the factory. It is colored green, contains a 50% solution of ethylene glycol based antifreeze, and has a freezing point of -31ºF (-35ºC).
Corrosion Inhibitors
Warning: HD4X Hybrid OAT coolant contains corrosion inhibitors and antifreeze suitable for aluminum engines and radiators. Always use the coolant in accordance with the instructions of the manufacturer.
Coolant that contains anti-freeze and corrosion inhibitors contains toxic chemicals that are harmful to the human body. Never swallow antifreeze or any of the motorcycle coolant.
Note: HD4X Hybrid OAT coolant, as supplied by Triumph, is premixed and does not need to be diluted prior to filling or topping off the cooling system.
To protect the cooling system from corrosion, the use of corrosion inhibitor chemicals in the coolant is essential.
If coolant containing a corrosion inhibitor is not used, the cooling system will accumulate rust and scale in the water jacket and radiator. This will block the coolant passages, and considerably reduce the efficiency of the cooling system.
Coolant Level Inspection
Note: The coolant level should be checked when the engine is cold (at room or ambient temperature).
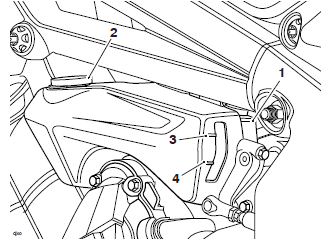
- Expansion tank
- Filler cap
- MAX mark
- MIN mark
To inspect the coolant level:
- Position the motorcycle on level ground and in an upright position.
The expansion tank can be viewed from the left hand side of the motorcycle, below and towards the front of the fuel tank. - Check the coolant level in the expansion tank. The coolant level must be between the MAX and MIN marks.
- If the coolant is below the minimum level, the coolant level must be adjusted.
Coolant Level Adjustment
Warning: Do not remove the expansion tank or radiator pressure cap when the engine is hot.
When the engine is hot, the coolant inside the radiator will be hot and also under pressure.
Contact with this hot, pressurized coolant will cause scalds and skin damage.
Caution: If hard water is used in the cooling system, it will cause scale accumulation in the engine and radiator and considerably reduce the efficiency of the cooling system.
Reduced cooling system efficiency may cause the engine to overheat and suffer severe damage.
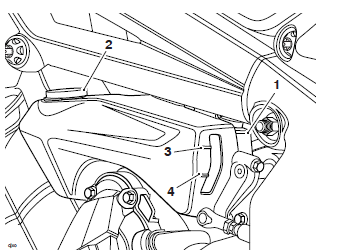
- Expansion tank
- Filler cap
- MAX mark
- MIN mark
To adjust the coolant level:
- Allow the engine to cool.
- The expansion tank cap can be removed from the left hand side of the motorcycle.
- Remove the cap from the expansion tank and add coolant mixture through
the filler opening until the level reaches the MAX mark.
Reinstall the cap.
Note: If the coolant level is being checked because the coolant has overheated, also check the level in the radiator and top off if necessary.
In an emergency, distilled water can be added to the cooling system. However, the coolant must then be drained and replenished with HD4X Hybrid OAT coolant as soon as possible.
Coolant Change
It is recommended that the coolant is changed by an authorized Triumph dealer in accordance with scheduled maintenance requirements.
Radiator and Hoses
Warning: The fan operates automatically when the engine is running.
Always keep hands and clothing away from the fan.
Contact with the rotating fan may cause an accident and/or personal injury.
Caution: Using high pressure water sprays, such as from a car wash facility or household pressure washer, can damage the radiator fins, cause leaks and impair the radiator's efficiency.
Do not obstruct or deflect airflow through the radiator by installing unauthorized accessories, either in front of the radiator or behind the cooling fan.
Interference with the radiator airflow can cause overheating, potentially resulting in engine damage.
Check the radiator hoses for cracks or deterioration, and tension clips for tightness in accordance with scheduled maintenance requirements. Have your authorized Triumph dealer replace any defective items.
Check the radiator grille and fins for obstructions by insects, leaves or mud.
Clean off any obstructions with a stream of low pressure water.
Throttle Control
Warning: Always be alert for changes in the 'feel' of the throttle control and have the throttle system checked by an authorized Triumph dealer if any changes are detected.
Changes can be due to wear in the mechanism, which could lead to a sticking throttle control.
A sticking or stuck throttle control will lead to loss of motorcycle control and an accident.
Throttle Inspection
Warning: Use of the motorcycle with a sticking or damaged throttle control will interfere with the throttle function resulting in loss of motorcycle control and an accident.
To avoid continued use of a sticking or damaged throttle control, always have it checked by your authorized Triumph dealer.
To inspect the throttle:
- Check that the throttle opens smoothly, without undue force and that it closes without sticking. Have your authorized Triumph dealer check the throttle system if a problem is detected or any doubt exists.
- If there is an incorrect amount of free play, Triumph recommends that you have your authorized Triumph dealer investigate.
- Check that there is 0.04 - 0.08 in (1 - 2 mm) of throttle grip free play when lightly turning the throttle grip back and forth.
Clutch
The motorcycle is equipped with a cable-operated clutch.
If the clutch lever has excessive free play, the clutch may not disengage fully.
This will cause difficulty in shifting gear and selecting neutral. This may cause the engine to stall and make the motorcycle difficult to control.
Conversely, if the clutch lever has insufficient free play the clutch may not engage fully, causing the clutch to slip, which will reduce performance and cause premature clutch wear.
Clutch lever free play must be checked in accordance with scheduled maintenance requirements.
Clutch Inspection
Check that there is 0.08 - 0.12 in (2 - 3 mm) clutch lever free play at the lever.
If there is an incorrect amount of free play, adjustments must be made.
Clutch Adjustment
To adjust the clutch:
- Turn the adjuster sleeve until the correct amount of clutch lever free play is achieved.
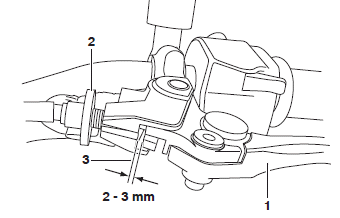
- Clutch lever
- Adjuster sleeve (lock nut fully loosened)
- Correct clearance 0.08 - 0.12 in (2 - 3 mm)
- Check that there is 0.08 - 0.12 in (2 - 3 mm) clutch lever free play at the lever.
- If there is an incorrect amount of free play, adjustments must be made.
- If correct adjustment cannot be made using the lever adjuster, use the cable adjuster at the lower end of the cable.
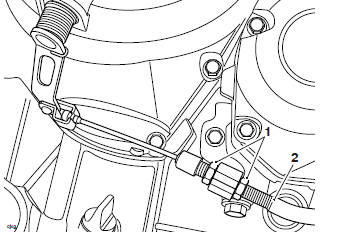
- Adjuster locknuts
- Clutch outer cable
- Loosen the adjuster lock nut.
- Turn the outer cable adjuster to give 0.08 - 0.12 in (2 - 3 mm) of free play at the clutch lever.
- Tighten the locknut to 30.1 lbf in (3.5 Nm).
Drive Chain
Warning: A loose or worn chain, or a chain that breaks or jumps off the sprockets could catch on the engine sprocket or lock the rear wheel.
A chain that snags on the engine sprocket will injure the rider and lead to loss of motorcycle control and an accident.
Similarly, locking the rear wheel will lead to loss of motorcycle control and an accident.
For safety and to prevent excessive wear the drive chain must be checked, adjusted and lubricated in accordance with the scheduled maintenance requirements. Checking, adjustment and lubrication must be carried out more frequently for extreme conditions such as high speed riding, salty or heavily gritted roads.
If the chain is badly worn or incorrectly adjusted (either too loose or too tight) the chain could jump off the sprockets or break. Therefore, always replace worn or damaged chains using genuine Triumph parts supplied by an authorized Triumph dealer.
Drive Chain Lubrication
Lubrication is necessary every 200 miles (300 km) and also after riding in wet weather, on wet roads, or any time that the chain appears dry.
To lubricate the drive chain:
- Use the special drive chain lubricant as recommended in the Specifications section.
- Apply lubricant to the sides of the rollers then allow the motorcycle to stand unused for at least eight hours (overnight is ideal). This will allow the lubricant to penetrate to the drive chain O-rings etc.
- Before riding, wipe off any excess lubricant.
- If the drive chain is especially dirty, clean first and then apply lubricant as mentioned above.
Caution: Do not use a pressure washer to clean the drive chain as this may cause damage to the drive chain components.
Drive Chain Free Movement Inspection
Warning: Before starting work, make sure the motorcycle is stabilized and adequately supported.
This will help prevent injury to the operator or damage to the motorcycle.
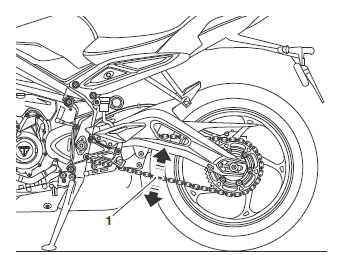
- Maximum movement position
To inspect the drive chain free movement:
- Place the motorcycle on a level surface and hold it in an upright position with no weight on it.
- Rotate the rear wheel by pushing the motorcycle to find the position where the chain is tightest, and measure the vertical movement of the chain midway between the sprockets.
- The vertical movement of the drive chain must be in the range of 0.79 to 1.18 in (20 - 30 mm).
Drive Chain Free Movement Adjustment
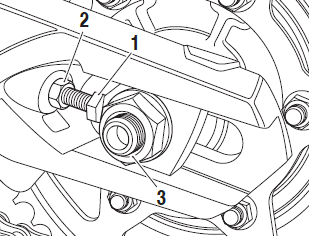
- Adjuster bolt
- Adjuster bolt lock nut
- Rear wheel spindle nut
If the drive chain free movement is incorrect, adjustment must be made as follows:
- Loosen the wheel spindle nut.
- Loosen the lock nuts on both the left hand and right hand chain adjuster bolts.
- Moving both adjusters by an equal amount, turn the adjuster bolts clockwise to increase drive chain free movement and counterclockwise to reduce drive chain free movement.
- When the correct amount of drive chain free movement has been set, push the wheel into firm contact with the adjusters. Tighten both adjuster lock nuts to 15 lbf ft (20 Nm) and the rear wheel spindle nut to 81 lbf ft (110 Nm).
- Repeat the drive chain adjustment check. Readjust if necessary.
Warning: Operation of the motorcycle with insecure adjuster lock nuts or a loose wheel spindle may result in impaired stability and handling of the motorcycle.
This impaired stability and handling may lead to loss of control or an accident.
- Check the rear brake effectiveness.
Rectify if necessary.
Warning: It is dangerous to operate the motorcycle with defective brakes; you must have your authorized Triumph dealer take remedial action before you attempt to ride the motorcycle again.
Failure to take remedial action may reduce braking efficiency leading to loss of motorcycle control or an accident.
Drive Chain and Sprocket Wear Inspection
Warning: Never neglect drive chain maintenance and always have drive chains installed by an authorized Triumph dealer.
Use a genuine Triumph supplied drive chain as specified in the Triumph Parts Catalog.
The use of non-approved drive chains may result in a broken drive chain or may cause the drive chain to jump off the sprockets leading to loss of motorcycle control or an accident.
Caution: If the sprockets are found to be worn, always replace the sprockets and drive chain together.
Replacing worn sprockets without also replacing the drive chain will lead to premature wear of the new sprockets.
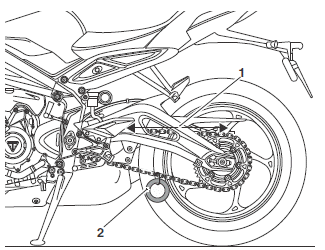
- Measure across 20 links
- Weight
To inspect the drive chain and sprocket wear:
- Remove the chain guard.
- Stretch the chain taut by hanging a 20 - 40 lb (10 - 20 kg) weight on the chain.
- Measure the length of 20 links on the straight part of the chain from pin center of the 1st pin to the pin center of the 21st pin. Since the chain may wear unevenly, take measurements in several places.
- If the length exceeds the maximum service limit of 12.55 in (319 mm), the chain must be replaced.
- Rotate the rear wheel and inspect the drive chain for damaged rollers, and loose pins and links.
- Also inspect the sprockets for unevenly or excessively worn or damaged teeth.
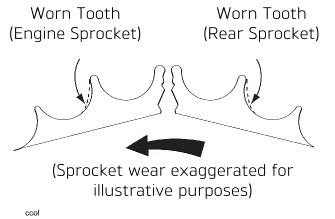
- If there is any irregularity, have the drive chain and/or the sprockets replaced by an authorized Triumph dealer.
- Re-install the chain guard, tightening the fasteners to 35 lbf in (4 Nm).
See also:
 Triumph Street Triple S - Owner's Manual > Engine Oil
Warning: Motorcycle operation with insufficient, deteriorated, or contaminated engine oil will cause accelerated engine wear and may result in engine or transmission seizure.
 Triumph Street Triple S - Owner's Manual > Brakes
Breaking-in New Brake Pads and Discs Warning: Brake pads must always be replaced as a wheel set. At the front, where two calipers are installed on the same wheel, replace all the brake pads in both calipers.

 Benelli Imperiale 400
 BMW F900XR
 Honda CB500X
 KTM 390 Adventure
 Triumph Street Triple S
 Yamaha MT-03
 Kawasaki Z400
 Triumph Street Triple S
 Yamaha MT-03