 Triumph Street Triple S - Service manual > Coolant
A permanent type of anti-freeze is installed in the cooling system when the motorcycle leaves the factory.
Models built up to VIN 331531
The coolant is coloured blue, contains a 50% solution of ethylene glycol, and has a freezing point of -35ºC (-15ºF).
Models built from VIN 331532
A year-round, Hybrid Organic Acid Technology (known as Hybrid OAT or HOAT) coolant is installed in the cooling system. It is coloured green, contains a 50% solution of ethylene glycol based antifreeze, and has a freezing point of -35ºC (-31 ºF).
Note:
- HD4X Hybrid OAT coolant, as supplied by Triumph, is pre-mixed and does not need to be diluted prior to filling or topping up the cooling system.
All models
Always change the coolant at the intervals specified in the scheduled maintenance chart.
Warning: The coolant mixture contains anti-freeze and corrosion inhibitors, which both contain toxic chemicals which are harmful to the human body. Never swallow anti-freeze or any of the motorcycle coolant.
Caution: The coolant mixture contains a corrosion inhibitor which helps prevent damage to the metal surfaces inside the cooling system. Without this inhibitor, the coolant would 'attack' the metals and the resulting corrosion would cause blockages in the cooling system leading to engine overheating and damage. Always use the correct antifreeze as specified in the owner's handbook. Never use a methanol based anti-freeze as this does not contain the required corrosion inhibition properties.
Caution: Distilled water must be used with the anti-freeze (see specification for anti-freeze) in the cooling system.
If hard water is used in the system, it causes scale accumulation in the water passages, and considerably reduces the efficiency of the cooling system. Reduced cooling system efficiency may cause the engine to overheat and suffer severe damage.
Radiator Hoses
Regularly check all radiator hoses and hose clips for cracks, leaks or deterioration in accordance with the scheduled maintenance chart.
Radiator and Cooling Fan
Check the radiator fins for obstruction by insects, mud, leaves and general debris. Clean off any obstructions by hand or with a stream of low pressure water.
Warning: The cooling fan operates automatically. To prevent injury, keep hands and clothing away from the fan blades at all times.
Caution: Using high-pressure water sprays can damage the radiator fins and impair the radiator's efficiency.
Do not obstruct or deflect airflow through the radiator by installing unauthorized accessories in front of the radiator or behind the cooling fan. Interference with the radiator airflow can lead to overheating and consequent engine damage.
Coolant Level Inspection - Daytona 675
Warning: Do not remove the coolant pressure cap when the engine is hot. When the engine is hot, the coolant inside the radiator is hot and also under pressure. Contact with the pressurised coolant will cause scalds and skin damage.
1. Position the motorcycle on level ground and in an upright position.
2. The expansion tank can be viewed from the left hand side of the motorcycle, between the rear of the lower fairing and the frame. The coolant level should be between the 'MAX' and 'MIN.' marks.
- Expansion tank
- Expansion tank filler cap
- 'MAX' mark
- 'MIN' mark
3. If the level of coolant is low, remove the cap from the expansion tank and add coolant mixture as necessary to bring the level up to the 'MAX' mark.
Refit the cap.
Caution: If the coolant level is found to be low, or if coolant has to be added regularly, inspect the cooling system for coolant leaks. If necessary, pressure test the system to locate the source of the leak and rectify as necessary.
Loss of coolant may cause the engine to overheat and suffer severe damage.
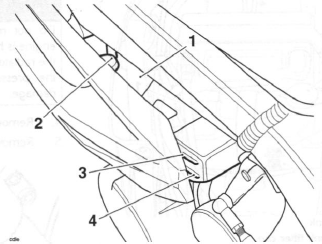
Coolant Level Inspection - Street Triple and Street Triple R
Warning: Do not remove the coolant pressure cap when the engine is hot. When the engine is hot, the coolant inside the radiator is hot and also under pressure. Contact with the pressurised coolant will cause scalds and skin damage.
1. Position the motorcycle on level ground and in an upright position.
2. Remove the rider's seat.
3. The expansion tank is positioned between the rear subframe rails beneath the seat.
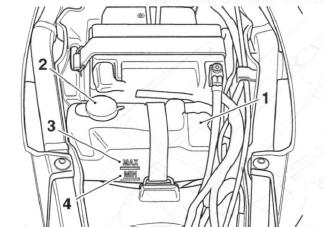
- Expansion tank
- Expansion tank filler cap
- 'MAX' mark
- 'MIN' mark
4. Check the coolant level in the expansion tank. The coolant level must be between the 'MAX and 'MIN' marks. If the coolant is below the minimum level, the coolant level must be adjusted.
5. If the level of coolant is low, remove the cap from the expansion tank and add coolant mixture as necessary to bring the level up to the 'MAX' mark.
Refit the cap.
Caution: If the coolant level is found to be low, or if coolant has to be added regularly, inspect the cooling system for coolant leaks. If necessary, pressure test the system to locate the source of the leak and rectify as necessary.
Loss of coolant may cause the engine to overheat and suffer severe damage.
Coolant Replacement - Daytona 675
Drainage
Note:
- Prior to disassembly of the coolant hoses, note the orientation and position of the hose clips to help ensure that they are returned to the same positions and orientation on assembly.
1. Position the motorcycle on level ground on the sidestand.
2. Remove the rider's seat.
3. Disconnect the battery, negative (black) lead first.
Warning: Do not remove the coolant pressure cap when the engine is hot. When the engine is hot, the coolant inside the the radiator is hot and also under pressure. Contact with the pressurised coolant will cause scalds and skin damage.
4. Remove the lower fairings.
5. Remove the coolant pressure cap on the radiator.
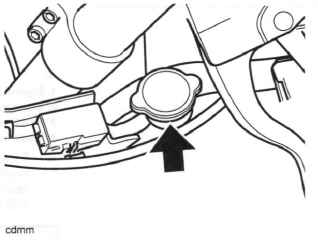
Radiator Cap
6. Position a container to collect the displaced coolant.
7. Slacken the clip then release the bottom hose from the radiator and allow the coolant to drain.
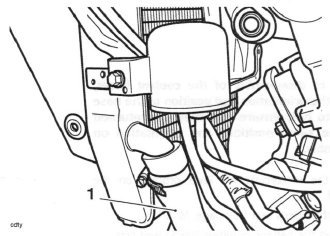
- Bottom hose
8. Remove the drain bolt from the coolant outlet tube, located next to the heat exchanger and allow the coolant to drain. Discard the sealing washer.
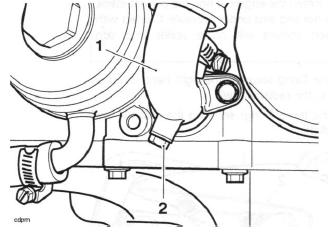
- Coolant outlet tube
- Drain bolt
Filling
9. Incorporating a new sealing washer, refit the drain bolt to the coolant outlet tube and tighten to 10 Nm.
10. Reconnect the bottom hose and tighten the hose clip.
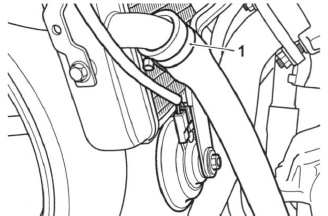
11. Remove the bleed screw from the right hand side of the radiator.
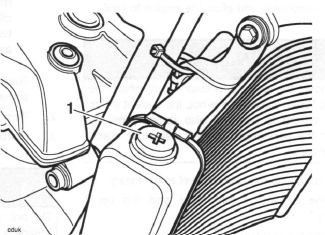
- Bleed screw
12. Slowly add coolant mixture to the system, through the filler opening in the radiator, until the system is full. If the system has filled correctly and fully, there should be coolant visible through the bleed screw opening as well as in the filler opening.
13. If there is no coolant visible through the bleed screw opening, but the filler side appears to be full, attach a length of clear tubing to the bleed screw spigot and syphon coolant into the bleed screw side of the radiator.
Note:
- A hand operated vacuum pump or similar should be used to syphon the coolant through the system.
14. If necessary, top up the system through the filler and refit the pressure cap.
15. Fit and tighten the bleed screw to 1.5 Nm.
16. With the aid of an assistant, lean the motorcycle fully over to the right hand side, and then the left hand side, to release air trapped in the cooling system.
Repeat as necessary.
17. Reconnect the battery, positive (red) lead first.
18. Start the motorcycle and allow to run for approximately 20 to 30 seconds. Briefly raise the engine speed several times to allow any air to be expelled from the system.
19. Stop the engine. Check and top up the coolant level as necessary.
20. With the aid of an assistant, lean the motorcycle fully over to the right hand side, and then the left hand side, to release air trapped in the cooling system.
21. Start the motorcycle. Briefly raise the engine speed several times to allow any air to be expelled from the system.
22. Allow the engine to run until the cooling fan operates.
23. Stop the motorcycle and allow the engine to cool.
Warning: Do not remove the coolant pressure cap when the engine is hot. When the engine is hot, the coolant inside the cooling system is hot and also under pressure.
Contact with the pressurised coolant will cause scalds and skin damage.
24. Check and top up the coolant level as necessary.
25. Check the expansion tank level and top up if necessary.
26. Refit the rider's seat.
27. Refit the lower fairings.
Coolant Replacement - Street Triple and Street Triple R
Drainage
Note:
- Prior to disassembly of the coolant hoses, note the orientation and position of the hose clips to help ensure that they are returned to the same positions and orientation on assembly.
1. Position the motorcycle on level ground on the sidestand.
2. Remove the rider's seat.
3. Disconnect the battery, negative (black) lead first.
Warning: Do not remove the coolant pressure cap when the engine is hot. When the engine is hot, the coolant inside the radiator is hot and also under pressure. Contact with the pressurised coolant will cause scalds and skin damage.
4. Release the fixing securing the right hand direction indicator to the radiator cowl.
5. Release the three fixings securing the radiator cowl to the radiator.
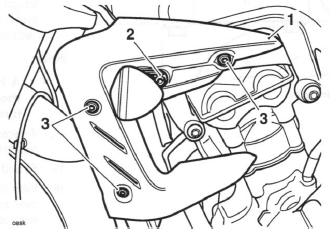
- Radiator cowl
- Direction indicator fixing
- Fixings
6. Without disconnecting the direction indicator connections, tie the radiator cowl aside. Do not allow the radiator cowl to hang from the direction indicator harness.
7. Repeat steps 4 to 6 above for the left hand radiator cowl.
8. Remove the coolant pressure cap on the radiator.
Radiator Cap
9. Position a container to collect the displaced coolant.
10. Slacken the clip then release the bottom hose from the radiator and allow the coolant to drain.
- Bottom hose
11. Remove the drain bolt from the coolant outlet tube, located next to the heat exchanger and allow the coolant to drain. Discard the sealing washer.

- Coolant outlet tube
- Drain bolt
Filling
1. Incorporating a new sealing washer, refit the drain bolt to the coolant outlet tube and tighten to 10 Nm.
2. Reconnect the bottom hose and tighten the hose clip.
3. Remove the bleed screw from the right hand side of the radiator.
- Bleed screw
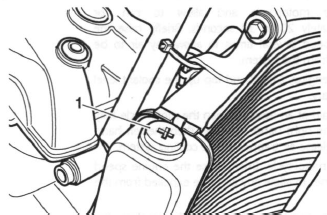
4. Remove the bleed screw from the top hose.
- Top hose
- Bleed screw
5. Slowly add coolant mixture to the system, through the filler opening in the radiator, until the system is full. If the system has filled correctly and fully, there should be coolant visible through the bleed screw opening as well as in the filler opening.
6. If there is no coolant visible through the bleed screw opening, but the filler side appears to be full, attach a length of clear tubing to the bleed screw spigot and syphon coolant into the bleed screw side of the radiator.
Note:
- A hand operated vacuum pump or similar should be used to syphon the coolant through the system.
7. If necessary, top up the system through the filler and refit the pressure cap.
8. Fit the radiator and top hose bleed screws, and tighten to 1 Nm.
9. With the aid of an assistant, lean the motorcycle fully over to the right hand side, and then the left hand side, to release air trapped in the cooling system.
Repeat as necessary.
10. Reconnect the battery, positive (red) lead first.
11. Start the motorcycle and allow to run for approximately 20 to 30 seconds. Briefly raise the engine speed several times to allow any air to be expelled from the system.
12. Stop the engine. Check and top up the coolant level as necessary.
13. With the aid of an assistant, lean the motorcycle fully over to the right hand side, and then the left hand side, to release air trapped in the cooling system.
14. Start the motorcycle. Briefly raise the engine speed several times to allow any air to be expelled from the system.
15. Allow the engine to run until the cooling fan operates.
16. Stop the motorcycle and allow the engine to cool.
Warning.
Do not remove the coolant pressure cap when the engine is hot. When the engine is hot, the coolant inside the cooling system is hot and also under pressure.
Contact with the pressurised coolant will cause scalds and skin damage.
17. Check and top up the coolant level as necessary.
18. Reposition the right hand radiator cowl and direction indicator to the radiator.
19. Install the three radiator cowl fixings and the direction indicator fixing and tighten as follows:
- Tighten the radiator cowl fixings to 5 Nm.
- Tighten the direction indicator fixing to 4 Nm.
20. Repeat steps 18 and 19 above for the left hand radiator cowl.
21. Check the expansion tank level and top up if necessary.
22. Refit the rider's seat.
Water Pump
Note:
- The oil pump and water pump are supplied as an assembly and cannot be separated. For additional information, refer to Oil Pump.
Coolant Pressure Cap
Inspection
Warning: Do not remove the coolant pressure cap when the engine is hot. When the engine is hot, the coolant inside the radiator is hot and also under pressure. Contact with the pressurised coolant will cause scalds and skin damage.
1. Check the condition of the upper and lower seals of the coolant pressure cap.
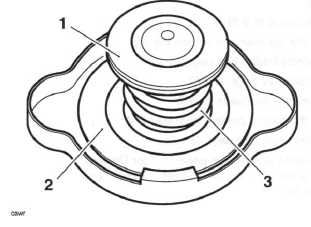
- Lower seal
- Upper seal
- Spring
Note:
- If there is any sign of damage or deterioration replace the cap.
2. Pressure test the cap to the blow off pressure of 1.1 bar. If the cap opens at a lower pressure or fails to open at 1.1 bar, replace the cap.
Thermostat
Removal
Note:
- Prior to disassembly of the coolant hoses, note the orientation and position of the hose clips to help ensure that they are returned to the same positions and orientation on assembly.
1. Remove the rider's seat.
2. Disconnect the battery, negative (black) lead first.
3. Drain the coolant.
4. Remove the fuel tank.
5. Remove the airbox.
6. Remove the throttle bodies.
Warning: Do not remove the coolant pressure cap when the engine is hot. When the engine is hot, the coolant inside the radiator is hot and also under pressure. Contact with the pressurised coolant will cause scalds and skin damage.
7. Detach the top hose from the thermostat elbow.
8. Release the fixings securing the thermostat elbow to the cylinder head.
9. Remove the thermostat housing. Discard the O-ring.
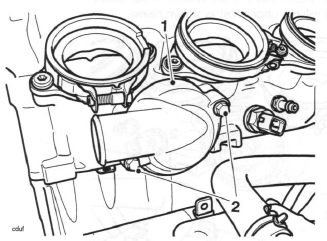
- Thermostat housing
- Fixings
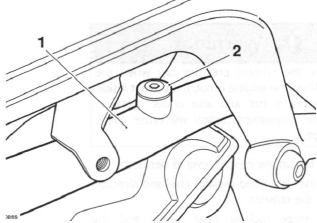
10. Remove the thermostat from the cylinder head.
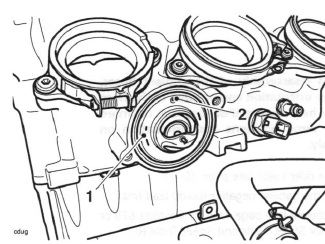
- Thermostat
- Bleed valve
Inspection
1. Inspect the thermostat at room temperature. If the valve is open, the thermostat must be replaced.
2. To check the valve opening temperature, suspend the thermostat in a container of water and raise the temperature of the water until the thermostat opens.
The thermostat should start to open at 71 ºC +/- 5ºC.
3. If the temperature at which thermostat opening takes place is incorrect, replace the thermostat.
Installation
1. Locate the thermostat into the cylinder head. Ensure the bleed valve is uppermost as shown below.
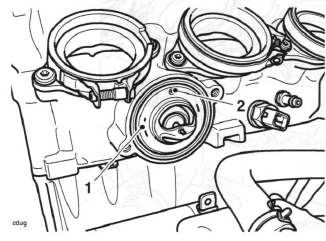
- Thermostat
- Bleed valve
2. Fit a new O-ring to the thermostat elbow groove.
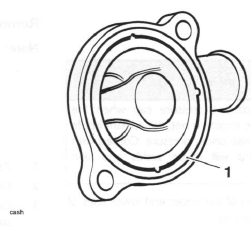
- O-ring groove
3. Tighten the fixings to 9 Nm.
4. Reconnect the top hose and tighten the clip.
5. Refit the throttle bodies.
6. Refit the airbox.
7. Refit the fuel tank.
8. Reconnect the battery positive (red) lead first.
9. Refit the rider's seat.
10. Refill the cooling system.
See also:
 Triumph Street Triple S - Service manual > Cooling
Exploded View - Cooling System - Daytona 675
Triumph Street Triple S - Service manual > Radiator - Daytona 675
Removal Note: Prior to disassembly of the coolant hoses, note the orientation and position of the hose clips to help ensure that they are returned to the same positions and orientation on assembly.
 Benelli Imperiale 400
 BMW F900XR
 Honda CB500X
 KTM 390 Adventure
 Triumph Street Triple S
 Yamaha MT-03
 Kawasaki Z400
 Triumph Street Triple S
 Yamaha MT-03