 Yamaha MT-03 - Owner's Manual > Cast wheels
To maximize the performance, durability, and safe operation of your motorcycle, note the following points regarding the specified wheels.
- The wheel rims should be checked for cracks, bends or warpage before each ride. If any damage is found, have a Yamaha dealer replace the wheel. Do not attempt even the smallest repair to the wheel. A deformed or cracked wheel must be replaced.
- The wheel should be balanced whenever either the tire or wheel has been
changed or replaced.
An unbalanced wheel can result in poor performance, adverse handling characteristics, and a shortened tire life. - Ride at moderate speeds after changing a tire since the tire surface must first be "broken in" for it to develop its optimal characteristics.
Adjusting the clutch lever free play
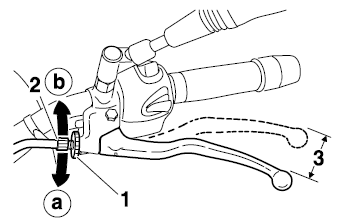
- Locknut
- Adjusting bolt
- Clutch lever free play
The clutch lever free play should measure 10.0-15.0 mm (0.39-0.59 in) as shown. Periodically check the clutch lever free play and, if necessary, adjust it as follows.
1. Loosen the locknut at the clutch lever.
2. To increase the clutch lever free play, turn the adjusting bolt in direction (a). To decrease the clutch lever free play, turn the adjusting bolt in direction (b).
NOTE: If the specified clutch lever free play could be obtained as described above, tighten the locknut and skip the rest of the procedure, otherwise proceed as follows.
3. Fully turn the adjusting bolt at the clutch lever in direction (a) to loosen the clutch cable.
4. Loosen the locknut at the crankcase.
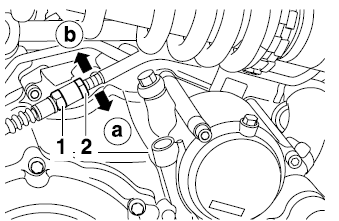
- Locknut
- Clutch lever free play adjusting nut (crankcase)
5. To increase the clutch lever free play, turn the adjusting nut in direction (a). To decrease the clutch lever free play, turn the adjusting nut in direction (b).
6. Tighten the locknut at the clutch lever and the crankcase.
Checking the front and rear brake pads
The front and rear brake pads must be checked for wear at the intervals specified in the periodic maintenance and lubrication chart.
Front brake pads
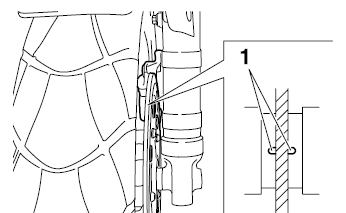
- Front brake pad wear indicator groove
Each front brake pad is provided with a wear indicator groove, which allows you to check the brake pad wear without having to disassemble the brake.
To check the brake pad wear, check the wear indicator groove. If a brake pad has worn to the point that the wear indicator groove has almost disappeared, have a Yamaha dealer replace the brake pads as a set.
Rear brake pads
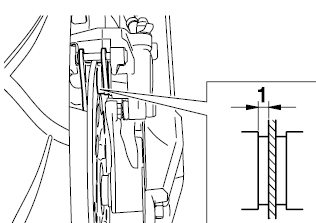
- Rear brake pad lining thickness
Check each rear brake pad for damage and measure the lining thickness.
If a brake pad is damaged or if the lining thickness is less than 1.0 mm (0.04 in), have a Yamaha dealer replace the brake pads as a set.
Checking the brake fluid level
Front brake
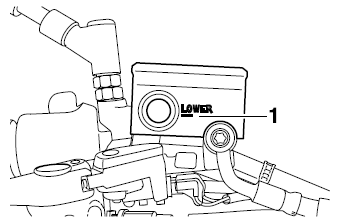
- Minimum level mark
Rear brake
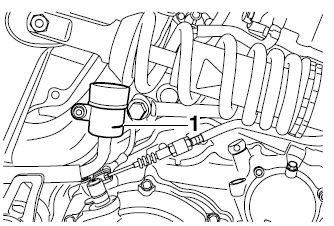
- Minimum level mark
Insufficient brake fluid may allow air to enter the brake system, possibly causing it to become ineffective.
Before riding, check that the brake fluid is above the minimum level mark and replenish if necessary. A low brake fluid level may indicate worn brake pads and/or brake system leakage.
If the brake fluid level is low, be sure to check the brake pads for wear and the brake system for leakage.
Observe these precautions:
- When checking the fluid level, make sure that the top of the brake fluid reservoir is level.
- Use only the recommended quality brake fluid, otherwise the rubber seals may deteriorate, causing leakage and poor braking performance.
Recommended brake fluid: DOT 4
- Refill with the same type of brake fluid. Mixing fluids may result in a harmful chemical reaction and lead to poor braking performance.
- Be careful that water does not enter the brake fluid reservoir when refilling. Water will significantly lower the boiling point of the fluid and may result in vapor lock.
- Brake fluid may deteriorate painted surfaces or plastic parts. Always clean up spilled fluid immediately.
- As the brake pads wear, it is normal for the brake fluid level to gradually go down. However, if the brake fluid level goes down suddenly, have a Yamaha dealer check the cause.
See also:
 Yamaha MT-03 - Owner's Manual > Adjusting the engine idling speed
Idle adjusting screw The engine idling speed must be checked and, if necessary, adjusted as follows at the intervals specified in the periodic maintenance and lubrication chart.
Yamaha MT-03 - Owner's Manual > Changing the brake fluid
Have a Yamaha dealer change the brake fluid at the intervals specified in the NOTE after the periodic maintenance and lubrication chart. In addition, have the oil seals of the master cylinders and calipers as well as the brake hoses replaced at the intervals listed below or whenever they are damaged or leaking. Oil seals: Replace every two years. Brake hoses: Replace every four years.
 Benelli Imperiale 400
 BMW F900XR
 Honda CB500X
 KTM 390 Adventure
 Triumph Street Triple S
 Yamaha MT-03
 Kawasaki Z400
 Triumph Street Triple S
 Yamaha MT-03