 BMW F900XR - Owner's Manual > Brakes
How can stopping distance be minimised?
Each time the brakes are applied, a load distribution shift takes place with the load shifting forward from the rear to the front wheel. The sharper the motorcycle decelerates, the more load is shifted to the front wheel. The higher the wheel load, the more braking force can be transmitted without the wheel locking.
To optimise stopping distance, apply the front brakes rapidly and keep on increasing the force you apply to the brake lever. This makes the best possible use of the dynamic increase in load at the front wheel. Remember to pull the clutch at the same time.
In the "emergency braking situations" that are trained so frequently, braking force is applied as rapidly as possible and with the rider's full force applied to the brake levers; under these circumstances the dynamic shift in load distribution cannot keep pace with the increase in deceleration and the tyres cannot transmit the full braking force to the surface of the road. Under these circumstances the front wheel can lock up.
BMW Motorrad ABS prevents the front wheel from locking up.
Panic braking
If you brake sharply from a speed in excess of 50 km/h, the brake light flashes rapidly as a warning for road users behind you.
If you brake until your speed is less than 15 km/h, the hazard warning lights start to flash as well. The hazard warning lights switch off automatically as soon as you start to accelerate and vehicle speed reaches 20 km/h.
Descending mountain passes
WARNING Braking only with the rear brake on mountain descents
Brake fade, destruction of the brakes due to overheating
- Use both front and rear brakes, and make use of the engine's braking effect as well.
Wet and dirty brakes
Wetness and dirt on the brake discs and the brake pads diminish braking efficiency.
Delayed braking action or poor braking efficiency must be reckoned with in the following situations:
- Riding in the rain or through puddles of water.
- After the vehicle has been washed.
- Riding on salted or gritted roads.
- After work has been carried on the brakes, due to traces of oil or grease.
- Riding on dirt-covered surfaces or off-road.
WARNING Wetness and dirt result in diminished braking efficiency
Risk of accident
- Apply the brakes lightly while riding to remove wetness and dirt, or dismount and clean the brakes.
- Think ahead and brake in good time until full braking efficiency is restored.
ABS Pro
- with riding modes Pro OE
Physical limits applicable to motorcycling
WARNING Braking when cornering
Risk of crash despite ABS Pro
- Invariably, it remains the rider's responsibility to adapt riding style to riding conditions.
- Do not take risks that would negate the additional safety offered by this system.
ABS Pro is available in all riding modes except Dynamic PRO.
Possibility of a fall not precluded
Although ABS Pro provides the rider with valuable assistance and constitutes a huge advance in safety for braking with the motorcycle banked for cornering, it cannot under any circumstances be considered as redefining the physical limits that apply to motorcycling.
It is still possible for these limits to be overshot due to misjudgement or rider error. In extreme cases this can result in a crash.
Use on public roads
ABS Pro helps make the motorcycle even safer for riding on public roads. When the brakes are applied because of an unforeseen hazard when the motorcycle is banked for cornering, within the physical limits that apply to motorcycling the system prevents the wheels from locking and skidding away.
NOTICE ABS Pro was not developed to enhance individual braking performance with the motorcycle banked into corners.
Parking your motorcycle
Side stand
- Switch off the engine.
ATTENTION Poor ground underneath the stand
Risk of damage to parts if vehicle topples
- Always check that the ground under the stand is level and firm.
ATTENTION Additional weight placing strain on the side stand
Risk of damage to parts if vehicle topples
- Do not sit or lean on the vehicle while it is propped on the side stand.
- Extend the side stand and prop the motorcycle on the stand.
- If the camber of the roadway permits, turn the handlebars all the way to the left.
- On a gradient, the motorcycle should always face uphill; select 1st gear.
Centre stand
- with centre stand OE
- Switch off the engine.
ATTENTION Poor ground underneath the stand
Risk of damage to parts if vehicle topples
- Always check that the ground under the stand is level and firm.
ATTENTION Centre stand retracts due to severe movements
Risk of damage to parts if vehicle topples
- Do not lean or sit on the vehicle with the centre stand extended.
- Extend the centre stand and lift the motorcycle on to the stand.
Refuelling
Fuel grade
Requirement
For optimum fuel consumption, fuel should be sulphur-free or as low-sulphur as possible.
ATTENTION Engine operation with leaded fuel
Damage to catalytic converter
- Do not attempt to run the vehicle on leaded fuel or fuel with metallic additives (e.g. manganese or iron).
- Observe the maximum ethanol content of the fuel.
NOTICE Recommended fuel grade, F 900 XR A2 (0K41)
A different fuel grade can be used for the A2 version. See the more detailed information in the "Technical data" section.
 Recommended fuel grade
-
 Premium
unleaded (maximum 15% ethanol, E15)
95 ROZ/RON
90 AKI
- with regular-grade fuel, unleaded OE
 Recommended fuel grade
- Regular, unleaded (control is national-market-specific) (maximum 15%
ethanol, E15)
91 ROZ/RON
87 AKI
Pay attention to the following symbols in the fuel filler cap and on the fuel pump:

Refuelling
WARNING Fuel is highly flammable
Risk of fire and explosion
- Do not smoke. Never bring a naked flame near the fuel tank.
WARNING Escape of fuel due to heat-induced expansion if fuel tank is overfilled
Risk of falling
- Do not overfill the fuel tank.
ATTENTION Wetting of plastic surfaces by fuel
Damage to the surfaces (surfaces become unsightly or dull)
- Clean plastic surfaces immediately after contact with fuel.
- Make sure the ground is level and firm and place the motorcycle on its
side stand.
- with centre stand OE
- Make sure the ground is level and firm and place the motorcycle on its centre stand.
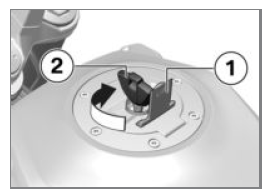
- Open protective flap 1.
- Unlock fuel tank cap 2 by turning the ignition key clockwise and open up.
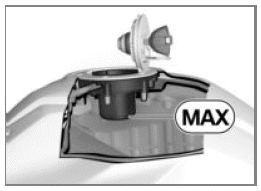
- Do not fill the tank past the bottom edge of the filler neck.
NOTICE When refuelling after running on reserve, make sure that you top up the tank to a level above reserve, so that the new level is detected and the fuel reserve indicator light is switched off.
NOTICE The "usable fuel capacity" specified in the technical data is the quantity that the fuel tank could hold if refilled after it had been run dry and the engine had cut out due to a lack of fuel.
 Fuel tank capacity
- approx. 15.5 l
 Reserve fuel
- approx. 3.5 l
- Press the fuel tank cap down firmly to close.
- Remove the ignition key and close the protective cap.
Refuelling
- with Keyless Ride OE
Requirement
The steering lock is disengaged.
WARNING Fuel is highly flammable
Risk of fire and explosion
Do not smoke. Never bring a naked flame near the fuel tank.
WARNING Escape of fuel due to heat-induced expansion if fuel tank is overfilled
Risk of falling
- Do not overfill the fuel tank.
ATTENTION Wetting of plastic surfaces by fuel
Damage to the surfaces (surfaces become unsightly or dull)
- Clean plastic surfaces immediately after contact with fuel.
- Make sure the ground is level and firm and place the motorcycle on its
side stand.
- with centre stand OE
- Make sure the ground is level and firm and place the motorcycle on its centre stand.
- with Keyless Ride OE
- Switch off the ignition.
NOTICE The fuel filler cap can be opened within the defined waiting time after the ignition has been switched off, without the radio-operated key being within range.
 Waiting time for opening the fuel
filler cap
- 2 min
There are two variant ways of opening the fuel filler cap:
- Within the waiting time.
- After the waiting time has expired.
Version 1
- with Keyless Ride OE
Requirement
Within the waiting time
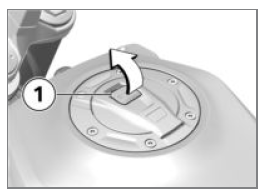
- Slowly pull tab 1 on the fuel filler cap up.
Fuel filler cap unlocks.
- Fully open the fuel filler cap.
Version 2
- with Keyless Ride OE
Requirement
After the waiting time has expired
- Bring the radio-operated key into range.
- Slowly pull tab 1 up.
The indicator light for the radio-operated key flashes while the search for the radio-operated key is in progress.
- Slowly pull tab 1 on the fuel filler cap up again.
Fuel filler cap unlocks.
- Fully open the fuel filler cap.
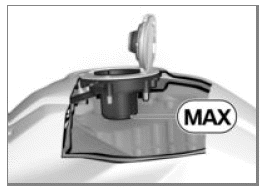
- Refuel with fuel of the grade stated above; do not fill the tank past the bottom edge of the filler neck.
NOTICE When refuelling after running on reserve, make sure that you top up the tank to a level above reserve, so that the new level is detected and the fuel reserve indicator light is switched off.
NOTICE The "usable fuel capacity" specified in the technical data is the quantity that the fuel tank could hold if refilled after it had been run dry and the engine had cut out due to a lack of fuel.
 Fuel tank capacity
- approx. 15.5 l
 Reserve fuel
- approx. 3.5 l
- Press down firmly on the filler cap of the fuel tank.
The fuel filler cap engages with an audible click.
The fuel filler cap locks automatically when the waiting time expires.
The engaged fuel filler cap locks immediately when you secure the steering lock or switch on the ignition.
Opening fuel filler cap emergency release
- with Keyless Ride OE
Fuel filler cap cannot be opened.
- Have the fault rectified as quickly as possible by a specialist workshop, preferably an authorised BMW Motorrad retailer.
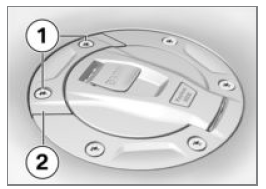
- Remove screws 1.
- Remove emergency release 2.
Fuel filler cap unlocks.
- Fully open the fuel filler cap.
- Refuel.
- Close the fuel filler cap emergency release.
Closing fuel filler cap emergency release
- with Keyless Ride OE
Requirement
Fuel filler cap is in closed position.
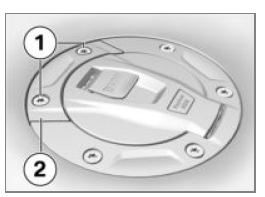
- Hold emergency release 2 in position.
- Install screws 1.
Securing motorcycle for transportation
- Make sure that all components that might come into contact with straps used to secure the motorcycle are adequately protected against scratching. Use adhesive tape or soft cloths, for example, for this purpose.
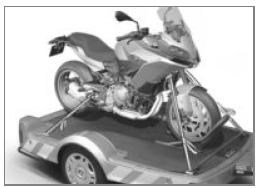
ATTENTION Vehicle topples to side when being lifted on to stand
Risk of damage to parts if vehicle topples
- Secure the vehicle to prevent it toppling, preferably with the assistance of a second person.
- Push the motorcycle on to the transportation flat and hold it in position: do not place it on the side stand or centre stand.
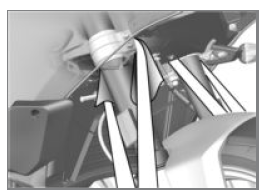
ATTENTION Trapping of components
Component damage
- Do not trap components such as brake lines or cable legs.
- At the front, secure the straps to the bottom fork bridge on both sides and tighten the straps.
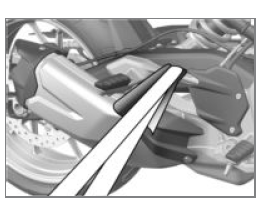
- At the rear, secure the straps to the rear footrests on both sides and tighten the straps.
- Uniformly tighten all the straps.
See also:
 BMW F900XR - Owner's Manual > Starting
Starting engine ATTENTION Sufficient gearbox lubrication only with the engine is running. Gearbox damage Do not allow the motorcycle to roll for a lengthy period of time or push it a long distance with the engine switched off.
 BMW F900XR - Owner's Manual > Engineering details
General notes To find out more about engineering go to: bmw-motorrad.com/technology Antilock Brake System (ABS)

 Benelli Imperiale 400
 BMW F900XR
 Honda CB500X
 KTM 390 Adventure
 Triumph Street Triple S
 Yamaha MT-03
 Kawasaki Z400
 Triumph Street Triple S
 Yamaha MT-03